
Creating a quilt is always a rewarding experience, but when you add a three-dimensional effect, your project transforms into something truly extraordinary. A 3D Quilt Block offers visual depth, texture, and a modern twist on traditional quilting techniques. Whether you’re a beginner looking for a challenge or an experienced quilter exploring new patterns, this tutorial will guide you through the process in a simple and accessible way. By the end of this article, you’ll be ready to create a striking quilt pattern that will impress anyone who sees it.
Why Choose a 3D Quilt Block?
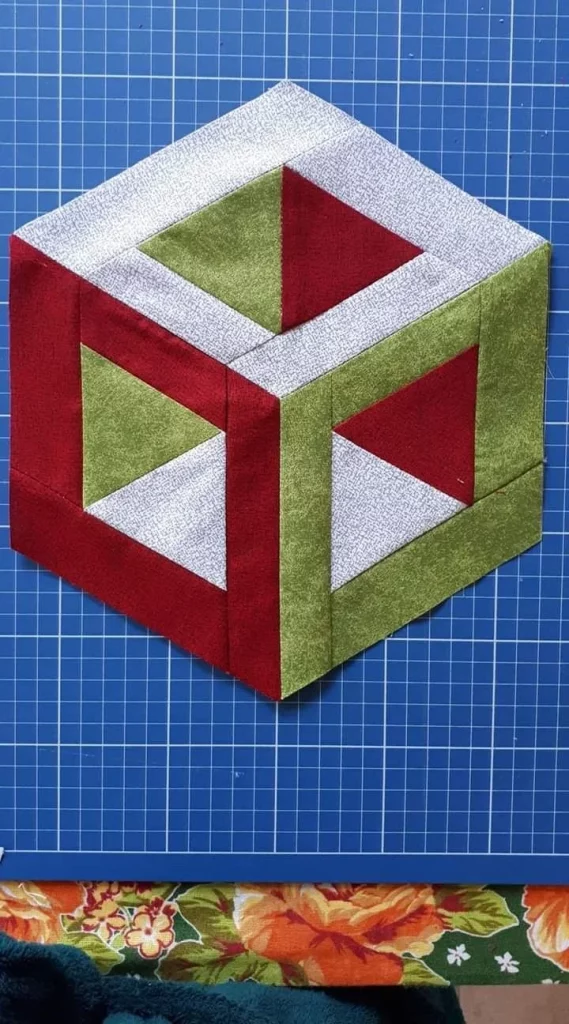
A 3D quilt block is an excellent way to bring life to your quilting projects. Unlike flat designs, the three-dimensional effect adds movement and makes the quilt look intricate, even when the construction is surprisingly simple. These blocks work beautifully as part of a larger quilt or as standalone projects like wall hangings or cushion covers.
The illusion of depth in a 3D quilt block is created through strategic color placement and clever use of geometry. With just a few carefully chosen fabrics, you can achieve an effect that looks like raised cubes or folded layers. This design is ideal for anyone who loves playing with colors and visual illusions.
Another great reason to try a 3D quilt block is the creative freedom it offers. You can use bold, contrasting fabrics for a striking modern look, or choose soft, tonal shades for a subtle and elegant finish. This pattern is highly customizable, so you can make it uniquely yours.
Materials You’ll Need
Before you dive into cutting and sewing, gather all the necessary supplies to make your quilting process smooth and enjoyable. Here’s a comprehensive list of materials for creating a 3D quilt block:
- Fabric: Choose three coordinating fabrics in light, medium, and dark tones to create the 3D effect. Cotton quilting fabric works best.
- Cutting Tools: Rotary cutter, self-healing cutting mat, and acrylic ruler for precise measurements.
- Thread: 100% cotton thread in a neutral color that blends well with your fabric.
- Sewing Machine: Any reliable machine with a ¼-inch foot for accurate seam allowances.
- Iron and Pressing Surface: Pressing your seams is essential for achieving crisp lines.
- Pins or Clips: To hold your pieces together before sewing.
- Optional: Quilting gloves for better fabric handling.
Having everything prepared will save time and make your quilting experience enjoyable. Keeping your fabrics pressed and cutting tools sharp ensures your quilt pattern will look neat and professional. If you’re missing anything, check local craft stores or online quilting shops for high-quality supplies.
Cutting the Fabric Pieces
The key to a perfect 3D quilt block lies in accurate cutting and fabric placement. For this tutorial, we’ll make one 3D block that measures 12.5 inches unfinished (12 inches finished). Follow these measurements:
- Light Fabric: Cut 4 rectangles measuring 4.5” x 2.5”.
- Medium Fabric: Cut 4 rectangles measuring 4.5” x 2.5”.
- Dark Fabric: Cut 4 rectangles measuring 4.5” x 2.5”.
- Background Fabric (optional): If you want a border, cut strips measuring 1.5” wide.
Lay the fabrics on your cutting mat and double-check measurements before cutting. Accuracy is crucial for the geometric design to align correctly. Once all your pieces are ready, organize them by color so you can easily grab the right one during assembly.
If you’re making multiple blocks, consider cutting all your pieces at once to save time. Stack your fabrics neatly and use a sharp rotary cutter to ensure clean edges. This preparation step will make the sewing process flow more smoothly.
Sewing the 3D Effect
Now that you have your pieces ready, it’s time to bring your quilt pattern to life. The 3D effect relies on precise color placement. Follow these steps:
- Create Three Strips: Arrange one light, one medium, and one dark rectangle in that order. Sew them together along the long edges with a ¼-inch seam allowance.
- Press the Seams: Press each seam toward the darker fabric to prevent color shadowing and keep your block neat.
- Join the Strips: Once you’ve sewn your three-color strips, cut them into segments measuring 4.5” wide. Rotate the segments so the colors alternate, forming a cube-like illusion.
Repeat these steps for all strips. You’ll see the 3D cube effect begin to appear as you assemble the block. Accuracy in alignment will ensure the final design is sharp and visually appealing.
When all segments are joined, press the block flat and square it up to 12.5 inches. If needed, trim any uneven edges for a perfect finish. This block is now ready to join other blocks or serve as a centerpiece in your quilt project.
Ideas for Personalization
One of the most exciting aspects of quilting is the ability to make every project unique. Here are a few ways you can personalize your 3D quilt block:
- Color Schemes: Experiment with high-contrast colors for a bold, graphic look, or stick to shades of one color for a subtle, elegant effect.
- Fabric Choices: Try using batiks, solids, or even textured fabrics for a more dynamic appearance.
- Layout Variations: Combine several 3D blocks in different rotations to create mesmerizing quilt patterns that resemble cubes or diamonds.
Adding a creative touch makes your quilt more than just a project—it becomes a reflection of your style. Don’t be afraid to step outside your comfort zone with unusual color pairings or new fabrics. Your quilt pattern will be one-of-a-kind, showcasing your personality and artistic vision.
Finishing the Project
Once your 3D quilt block is complete, the next step is deciding how to use it. You can make multiple blocks and piece them together for a stunning quilt, or use a single block for smaller projects like a pillow, table runner, or wall hanging.
If you plan to make a full quilt, add sashing between the blocks to enhance the three-dimensional effect. Choose a solid background fabric that complements your color scheme. This will help the blocks stand out and give the illusion of floating cubes.
Finally, quilt as desired. Straight-line quilting works beautifully for this pattern, emphasizing the geometric lines. Alternatively, free-motion quilting can add texture and personality. Finish by adding binding, and your 3D quilt is ready to impress.
Share Your 3D Quilt Block Creations
Now that you’ve learned how to create a beautiful 3D quilt block, it’s time to show off your work! Quilting is more fun when shared with others, so post pictures of your project on social media or join online quilting communities to inspire fellow quilters. Use hashtags like #3DQuiltBlock, #QuiltPattern, and #ModernQuilting to connect with others who love this craft as much as you do.

Whether you make a single block or an entire quilt, your 3D design will be a conversation starter. Don’t forget to share this tutorial with friends who might want to try it, too. Let’s keep the quilting tradition alive and creative by inspiring each other every step of the way.