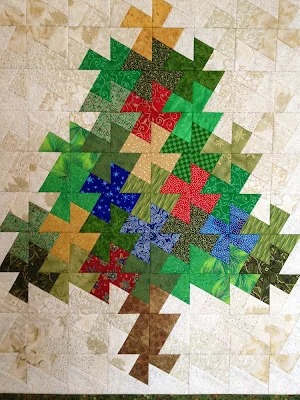
The Twister Holiday Quilt is a delightful and intricate pattern that brings charm and movement to your holiday quilting projects. This design is perfect for showcasing festive fabrics and uses a unique cutting method to create mesmerizing pinwheel effects. It’s a creative way to celebrate the season with a quilt that’s as playful as it is beautiful.
This pattern works well for quilters of all experience levels, offering an opportunity to try out the innovative Twister ruler technique. Below, you’ll find a step-by-step guide with detailed instructions and measurements to help you craft your holiday masterpiece.

Step-by-Step Instructions with Measurements
Materials Needed:
- Charm squares: Forty-two (42) 5-inch squares in holiday-themed patterns.
- Border fabric: ½ yard for the first border.
- Twister ruler: Mini Twister or Lil’ Twister, depending on the desired block size.
- Backing fabric: 1.5 yards.
- Batting: 36 x 44 inches.
- Binding fabric: ¼ yard.
- Rotary cutter and mat: Essential for precise cuts.
- Sewing machine and thread: Coordinated to your fabric.
Step 1: Prepare the Charm Squares
- Lay out your 5-inch squares in a 6×7 grid, alternating colors and patterns for a balanced look.
- Sew the squares together using a ¼-inch seam allowance. Press the seams open or to one side.
Step 2: Add a Border
- Cut 2.5-inch strips from your border fabric.
- Sew the border strips around the quilt top to frame the charm squares.
- Press the seams flat for a polished appearance. The quilt top should now measure approximately 34 x 40 inches.
Step 3: Use the Twister Ruler
- Position the Twister ruler on the quilt top, aligning it with the seams of the charm squares.
- Cut around the Twister ruler to create new blocks. Repeat this process across the entire quilt.
- After cutting, rearrange the blocks to form pinwheel designs.
Step 4: Sew the Pinwheels Together
- Assemble the pinwheel blocks row by row.
- Sew with a ¼-inch seam allowance, pressing seams as you go.
- Once completed, the quilt top should measure approximately 30 x 36 inches.
Step 5: Assemble the Quilt Sandwich
- Layer the quilt top, batting, and backing fabric. Ensure the layers are smooth and secured with basting pins or spray adhesive.
Step 6: Quilt and Bind
- Quilt the layers together, either following the pinwheel pattern or adding complementary stitching designs.
- Trim the edges and attach a 2.5-inch binding strip to finish your quilt.
This Twister Holiday Quilt is a festive and fun project that will add warmth and character to your home during the holidays. Enjoy the process, and happy quilting!
