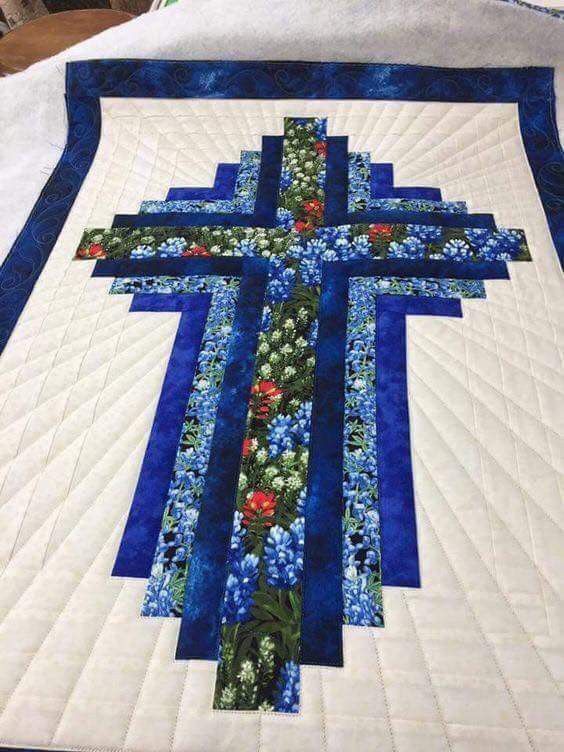
Creating a beautiful quilt can be both an artistic endeavor and a deeply personal project. The ‘At the Cross Quilt Pattern’ is one of those timeless quilt patterns that carries symbolic meaning while adding a striking design element to your quilt. In this tutorial, we’ll walk you through the entire process, from selecting fabrics to cutting precise pieces and sewing them into a gorgeous quilt. Let’s dive into this detailed guide!
What is the ‘At the Cross Quilt Pattern’?
The ‘At the Cross Quilt Pattern’ is a classic design that features intersecting lines resembling crosses. This pattern has been popular among quilters for decades due to its simplicity and bold appearance.
The key feature of this quilt is the contrast created by the intersecting lines. Quilters often use contrasting fabrics to make the cross design stand out, adding depth and dimension to the quilt.
Whether you’re a beginner or an experienced quilter, this pattern is a great way to practice precision cutting and piecing while creating a visually stunning quilt.
Materials Needed for the ‘At the Cross Quilt’
Before you begin, gather all the necessary materials. Having everything prepared beforehand will make the quilting process smooth and enjoyable.
- Fabric: Choose at least two contrasting fabrics—one for the crosses and another for the background.
- Rotary cutter and mat: Precision is key when working with quilt patterns, so a rotary cutter and a cutting mat are essential.
- Quilting ruler: This helps ensure your cuts are straight and accurate.
Additionally, you’ll need a sewing machine, thread, pins, and an iron for pressing the seams.
Cutting the Fabric

Accurate cutting is crucial for achieving a neat and professional-looking quilt. Follow these steps to cut your fabric pieces:
- Cross fabric: Cut strips that are 2.5 inches wide. You’ll need several strips depending on the size of your quilt.
- Background fabric: Cut squares that are 4.5 inches on each side. These squares will form the main structure of the quilt.
- Optional borders: If you wish to add borders to your quilt, cut additional strips of 3 inches wide for the border.
Take your time during this step. Consistency in your cuts will help ensure that your quilt blocks fit together perfectly.
Assembling the Quilt Blocks
Once your fabric is cut, it’s time to start assembling the quilt blocks. This part requires attention to detail, but it’s also where your quilt starts to come to life.
- Lay out the pieces: Arrange the background squares and cross strips in the desired pattern.
- Sew the strips: Begin by sewing the cross strips to the sides of the background squares. Use a ¼-inch seam allowance for accuracy.
- Press the seams: After sewing, press the seams toward the darker fabric. This helps create a cleaner look and ensures the pieces lay flat.
Repeat these steps until you have enough quilt blocks to complete your desired quilt size.
Sewing the Quilt Top Together
Now that you have all your quilt blocks ready, it’s time to join them to create the quilt top. This step involves careful alignment to maintain the integrity of the cross pattern.
- Arrange the blocks: Lay out all the blocks on a flat surface to ensure the pattern aligns correctly.
- Sew the rows: Start by sewing the blocks together row by row. Again, use a ¼-inch seam allowance.
- Join the rows: Once all rows are complete, sew them together, making sure to match the seams where the blocks meet.
Take your time aligning the blocks. Small adjustments can make a big difference in the final appearance of the quilt.
Adding Borders (Optional)
If you’d like to add a border to your quilt, this is the time to do it. Borders can enhance the overall look of the quilt and add a frame to the design.
- Measure the quilt top: Measure the length and width of the quilt top.
- Cut border strips: Use the measurements to cut border strips of your desired width.
- Attach the borders: Sew the border strips to the edges of the quilt top, starting with the sides and then the top and bottom.
Borders are optional, but they can add a polished touch to your finished quilt.
Quilting the Layers Together
Quilting is the process of sewing the quilt top, batting, and backing fabric together. This step adds texture and secures the quilt layers.
- Layer the quilt: Place the backing fabric right side down, followed by the batting, and then the quilt top right side up.
- Baste the layers: Use safety pins or basting spray to hold the layers together.
- Quilt the design: You can quilt in straight lines, following the cross pattern, or create a free-motion design for added creativity.
Ensure that the layers are smooth and well-aligned before quilting.
Binding the Quilt
The final step in completing your ‘At the Cross Quilt’ is binding the edges. Binding not only finishes the quilt but also protects the edges from wear and tear.
- Cut binding strips: Cut strips of fabric 2.5 inches wide. The length should be enough to go around the entire quilt.
- Attach the binding: Sew the binding to the front of the quilt, aligning the raw edges.
- Finish the binding: Fold the binding over to the back and hand-stitch it in place for a clean finish.
Binding requires patience, but it’s the final touch that brings your quilt together.
Final Thoughts
The ‘At the Cross Quilt Pattern’ is a rewarding project that combines precision with creativity. Whether you’re making it as a gift or for your own home, this quilt pattern offers a striking design that stands the test of time.
By following this tutorial, you can create a stunning quilt that showcases your skills and personal style. Happy quilting!
