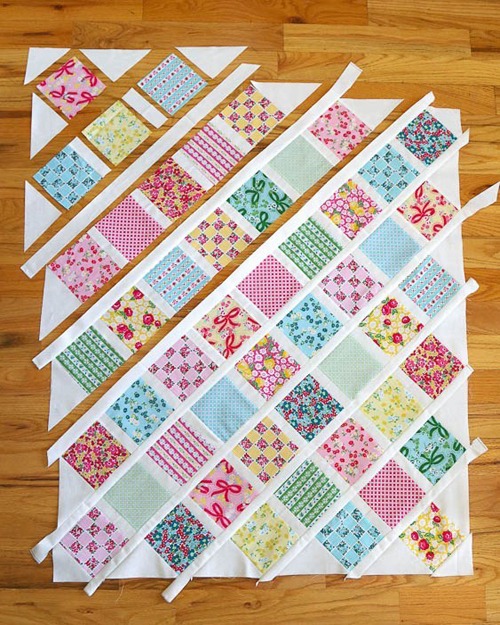
Creating a Lattice Baby Quilt is a rewarding and enjoyable project for quilters of all skill levels. This pattern combines simplicity with elegance, making it an ideal choice for a baby gift or nursery decoration. In this tutorial, we will guide you through each step, from fabric selection to the final stitches, ensuring that you achieve a beautiful and professional-looking quilt.
Choosing the Right Fabric
Selecting the perfect fabric is crucial for a stunning Lattice Baby Quilt. Soft, high-quality cotton fabrics work best for baby quilts as they are gentle on sensitive skin and easy to maintain. Consider pastel tones, playful prints, or neutral shades depending on the nursery’s theme.
Pre-washing your fabric is highly recommended. This step prevents shrinkage after quilting and ensures colorfastness. Always use a gentle detergent and tumble dry on low to keep the fabric in good condition. Additionally, ironing the fabric before cutting will help achieve precise measurements.
To enhance the lattice effect, choose a combination of light and dark fabrics. This contrast will make the lattice pattern more distinct and visually appealing. For an added touch, consider incorporating a theme, such as animals, florals, or geometric prints.
Cutting the Fabric – Measurements and Layout
For this quilt pattern, accurate cutting is essential. You’ll need the following fabric cuts:
- Lattice Strips: 2.5” x 10” (Cut 40)
- Background Squares: 5” x 5” (Cut 25)
- Border Strips: 3” x Width of Fabric (Cut 4)
- Backing Fabric: 40” x 40”
Use a rotary cutter, quilting ruler, and cutting mat for precise cuts. Arrange the pieces according to the lattice design before sewing to ensure the layout looks balanced. Placing the fabric on a flat surface and stepping back to review the arrangement can help identify any necessary adjustments.
A quilt app can be useful for visualizing different color schemes and layouts before cutting. Many apps allow you to upload fabric swatches and adjust placement digitally, helping you make confident design decisions.

Assembling the Quilt Top
Start by sewing the lattice strips to the background squares. Align the edges carefully and use a ¼-inch seam allowance for consistency. Press the seams toward the darker fabric to reduce bulk and maintain a smooth finish.
Once the lattice units are ready, sew them together in rows. Ensure that the seams align properly for a clean and professional look. Pinning at intersections can help maintain precision and prevent shifting during sewing.
After assembling the rows, join them to complete the quilt top. Press all seams neatly, and trim any excess fabric if necessary. A well-pressed quilt top will make the quilting process smoother and enhance the overall appearance.
Adding Borders and Sashing
Borders add a finished touch to your Lattice Baby Quilt and frame the design beautifully. Cut four border strips measuring 3 inches wide and the length of the quilt’s edges.
Attach the side borders first, sewing with a ¼-inch seam allowance. Press the seams outward to ensure a smooth transition. Repeat this step for the top and bottom borders, ensuring that the quilt remains squared.
Adding sashing between blocks can further enhance the lattice effect. Consider using a coordinating fabric that blends well with the quilt’s colors, adding depth and dimension to the final design.
Quilting and Batting Selection
Choosing the right batting is essential for the quilt’s comfort and durability. A lightweight cotton or cotton-polyester blend works well for baby quilts, providing softness without excessive bulk.
Lay the quilt top, batting, and backing fabric on a flat surface, ensuring all layers are smooth and aligned. Pin or baste the layers together to prevent shifting during quilting.
For quilting, a simple straight-line stitch following the lattice design enhances the pattern without overpowering it. If you prefer a more intricate look, consider free-motion quilting techniques for added texture.
Binding the Quilt
Binding gives the quilt a polished and professional finish. Cut binding strips 2.5 inches wide and the length required to cover the quilt’s edges.
Join the strips end to end, pressing the seams open to reduce bulk. Fold the binding in half lengthwise and press it before attaching it to the quilt.
Sew the binding to the quilt’s front using a ¼-inch seam allowance, then fold it over to the back and hand-stitch or machine-stitch it in place. Mitering the corners ensures a clean and crisp finish.
Final Touches and Care Instructions
Once the binding is secure, give the quilt a final press to smooth out any wrinkles. Check for any loose threads and trim them carefully.
Wash the quilt using a gentle cycle with mild detergent. Air drying or tumble drying on low heat helps maintain its softness and longevity.
A handmade Lattice Baby Quilt makes a cherished gift or keepsake, showcasing the time and effort put into crafting a beautiful and functional piece. Enjoy your finished quilt, and happy quilting!
Conclusion
Creating a Lattice Baby Quilt is a rewarding project that combines creativity with craftsmanship. With careful fabric selection, precise cutting, and meticulous quilting, you can produce a stunning and durable quilt.
Utilizing modern tools like a quilt app can aid in design visualization and layout planning. Exploring different quilt patterns allows you to customize your quilt to match any nursery theme.
By following this step-by-step tutorial, you will be able to complete a beautiful Lattice Baby Quilt, perfect for gifting or personal use. Happy quilting!
