
Creating a Pole Twisted Table Runner is an exciting quilting project that adds a dynamic, eye-catching design to any table setting. This tutorial will guide you through each step, from fabric selection to finishing touches, ensuring a stunning result. Whether you’re a beginner or an experienced quilter, this project is a fantastic way to refine your skills.
Materials and Fabric Selection
Choosing the right materials is crucial for a well-structured and visually appealing quilt project. Opt for high-quality quilting cotton to achieve the best results.
You’ll need four different fabrics with contrasting colors to highlight the twisted effect. The measurements should be as follows:
- Fabric A (Main Color) – 1/2 yard
- Fabric B (Accent Color 1) – 1/4 yard
- Fabric C (Accent Color 2) – 1/4 yard
- Fabric D (Background) – 1/2 yard
Cutting the Fabric
Precision in fabric cutting is key to ensuring all pieces align correctly during assembly. Use a rotary cutter, quilting ruler, and cutting mat for accuracy.
- Cut eight strips of Fabric A measuring 2.5” x 18”.
- Cut eight strips of Fabric B and C measuring 2.5” x 18” each.
- Cut background fabric (Fabric D) into rectangles, measuring 4” x 18”.
Assembling the Strip Sets
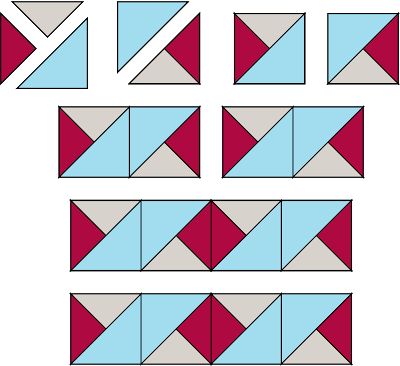
To create the twisted pole effect, strip sets must be sewn and then cut at an angle. This technique gives the illusion of movement.
Sew Fabric A, B, and C strips together in a repeating sequence. Press seams open to reduce bulk. After assembling, use a quilting ruler to cut 6-inch diagonal sections at a consistent angle.
Arranging and Sewing the Blocks
Once the angled strips are cut, arrange them in a staggered formation to enhance the twisted effect. Lay out your pieces before sewing to ensure a balanced pattern.
Sew sections together carefully, maintaining a 1/4-inch seam allowance. Press seams open or to one side for a smooth finish. Check alignment frequently to keep the design cohesive.
Adding the Background Fabric
The background fabric provides structure and enhances the illusion of the twisted poles. Proper placement ensures a professional and polished look.
Attach background fabric rectangles between each twisted segment. Pin pieces in place before sewing to prevent shifting. Maintain consistent seam allowances for a uniform appearance.
Quilting and Finishing Touches
Once the top is assembled, it’s time to quilt and finish your table runner. Choose a quilting pattern that complements the design and enhances the texture.
Layer the quilt top, batting, and backing fabric. Secure layers with quilting pins or adhesive spray. Quilt along the seams or use free-motion quilting for added dimension.
Binding and Final Details

Binding adds durability and a professional touch to your quilted table runner. Select a coordinating fabric to frame the design elegantly.
Cut binding strips 2.5 inches wide, sew them together, and attach using a 1/4-inch seam allowance. Fold over and hand-stitch or machine-finish the binding for a clean edge.
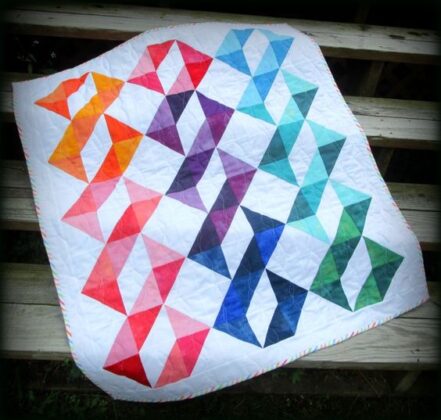
This Pole Twisted Table Runner is a rewarding project that showcases the beauty of quilting techniques. Experiment with different color combinations and quilting patterns to personalize your creation. Happy quilting!