
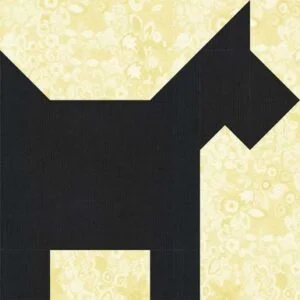
Creating a quilt is a rewarding experience, especially when you use a design as charming as the Scottie Dog block pattern. This 12-inch block is perfect for all quilters, whether you’re a beginner or experienced. With its playful, adorable design, the Scottie Dog block can be the centerpiece of a pet-themed quilt or simply add a touch of personality to any quilting project. In this tutorial, we’ll walk you through the process of making a 12-inch Scottie Dog quilt block, complete with fabric cutting instructions, sewing steps, and tips to help you create a beautiful quilt block that you’ll be proud of.
Materials Needed for the 12-Inch Scottie Dog Quilt Block
Before you start sewing, it’s essential to gather all the necessary materials for this quilt block. To create the 12-inch Scottie Dog quilt block, you will need fabric in various colors for the dog, background, and border, along with your basic quilting tools. Here’s a list of materials to get you started:
- Fabric for the Scottie Dog: You’ll need a fabric in a dark color like black or brown for the body of the Scottie Dog.
- Fabric for the Background: A neutral fabric like white, beige, or light gray works best for the background of the quilt block.
- Fabric for the Border: Choose a coordinating fabric to frame your Scottie Dog block. A contrasting color will help the design stand out.
- Basic Quilting Supplies: You’ll also need a rotary cutter, quilting ruler, sewing machine, thread, pins, and fabric scissors.
- Pattern Template: If you prefer, you can use a Scottie Dog template to trace and cut out the pieces.
Once you have your fabrics and tools ready, you’re all set to start quilting!
Step 1: Cutting the Fabric Pieces
The first step in creating the 12-inch Scottie Dog quilt block is cutting the fabric pieces. Each section of the quilt block has specific measurements that need to be accurate for everything to fit together properly. Follow the measurements below to ensure your pieces are the correct size:
- Scottie Dog Body: Cut a piece of dark-colored fabric measuring 4.5 inches by 5.5 inches. This will form the main body of the Scottie Dog.
- Scottie Dog Head: Cut a piece of fabric for the head, measuring 3.5 inches by 3.5 inches.
- Scottie Dog Ears: Cut two small triangle pieces for the ears. Each triangle should measure 2.5 inches by 2.5 inches.
- Background Fabric: Cut four background pieces measuring 3.5 inches by 3.5 inches for the corners. These will create the outer part of the quilt block around the Scottie Dog.
- Border Fabric: Cut four strips of border fabric, each measuring 1.5 inches by 12 inches.
It’s crucial to cut all your pieces accurately, as this will ensure that your Scottie Dog block fits perfectly together when you sew it. Using a rotary cutter and quilting ruler will help you make precise cuts.
Step 2: Sewing the Scottie Dog Body and Head
Now that you have all your pieces cut, it’s time to start assembling your Scottie Dog quilt block. Begin by sewing the body and head of the dog. For the body, take the large dark-colored fabric piece and place it onto the quilt background fabric. Line up the edges carefully and sew along the sides using a ¼-inch seam allowance.
Next, attach the head to the body. Align the top edge of the head with the top edge of the body fabric, and sew it into place. Be sure to press the seams open to reduce bulk and ensure a clean finish. Once the body and head are sewn together, it’s time to move on to the ears.
Step 3: Attaching the Ears to the Scottie Dog Block
The Scottie Dog’s ears are small but essential to the overall design. Take the two triangle pieces you cut earlier and place them at the top of the head. The wider side of the triangles should be aligned with the upper edges of the head, and the point of the triangle should point towards the center of the head. Sew along the edges of each triangle using a ¼-inch seam allowance. Once both ears are attached, press the seams open and ensure they’re securely in place.
Step 4: Completing the Background
Once the Scottie Dog body and head are assembled, you can start adding the background fabric. Take the four 3.5-inch square background pieces and sew them to the corners of the Scottie Dog block. This will create a clean, symmetrical frame around the dog. Make sure the edges of the background fabric line up with the edges of the Scottie Dog block, and sew each piece carefully to secure it. Press all seams open for a crisp finish.
Step 5: Adding the Border
The final step is to add the border fabric around the entire quilt block. Cut four 1.5-inch by 12-inch strips of border fabric. Sew one strip to the top and one to the bottom of the block, ensuring that the edges are aligned. Then, sew the remaining two strips to the left and right sides of the block. Press the seams open to give the border a neat, polished look.
Step 6: Final Pressing and Trimming
Once the border is attached, give your quilt block a final pressing to smooth out any wrinkles and ensure that all seams are well-set. Using a quilting ruler, trim the edges of the quilt block to 12.5 inches, ensuring that the Scottie Dog is centered in the block. This will give you a clean, squared quilt block that is ready to be added to your quilt top.
Step 7: Assembling Your Quilt
After completing the 12-inch Scottie Dog quilt block, you can start assembling it with other quilt blocks to create your full quilt. If you’re making a quilt with multiple Scottie Dog blocks, repeat the process to create as many blocks as you need. You can arrange the blocks in any pattern you like, whether that’s a grid pattern, alternating with other blocks, or something more creative. Once your quilt top is complete, you can quilt, bind, and finish it to create your beautiful Scottie Dog quilt.
Tips for Success
- Use a Quarter-Inch Seam Allowance: To ensure your pieces fit together perfectly, always use a ¼-inch seam allowance. This is standard for quilting and will help maintain consistent block sizes.
- Press Seams Open: Pressing seams open helps reduce bulk and ensures that your block lays flat, making it easier to assemble your quilt.
- Trim Excess Fabric: Don’t forget to trim any excess fabric or threads after sewing, as this will give your quilt a cleaner, more professional look.

Conclusion
Creating a 12-inch Scottie Dog quilt block is a fun and rewarding project for quilters of all skill levels. With its charming design, this block adds a delightful touch to any quilt. By following this tutorial step by step, you’ll be able to create beautiful Scottie Dog quilt blocks that can be used in a variety of quilt patterns. Whether you’re making a pet-themed quilt or simply adding a playful touch to your quilt collection, this pattern is sure to be a favorite for years to come. Happy quilting!
SEO Keywords Used: quilt, quilt patterns, Scottie Dog quilt, quilting tutorial, quilt block pattern