
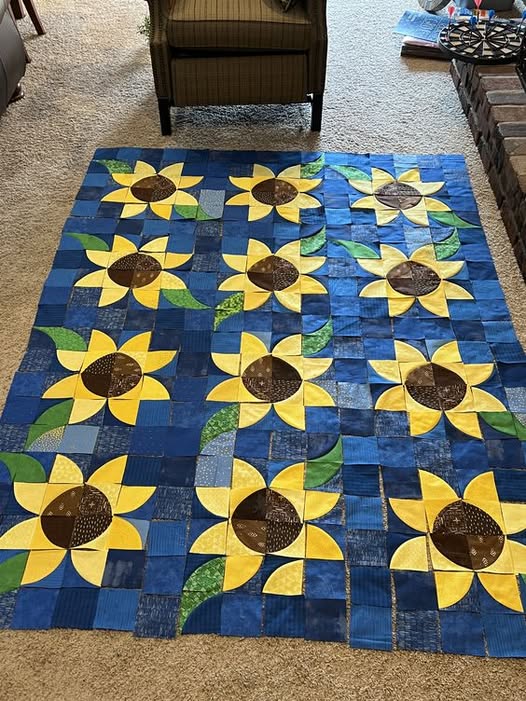
Creating a Sunflower Quilt Pattern is a beautiful way to bring warmth and joy to any space. This guide will walk you through a step-by-step tutorial on how to make a sunflower quilt, complete with fabric measurements and cutting instructions. Whether you are a beginner or an experienced quilter, this tutorial will help you create a stunning quilt that showcases the charm of sunflower designs.
Choosing the Right Materials
The first step in making a sunflower quilt is selecting the right materials. Choosing high-quality fabrics will ensure durability and enhance the beauty of your quilt. Opt for 100% cotton fabric, as it is easy to work with and holds up well over time.
Select fabrics in shades of yellow, gold, brown, green, and blue to create a realistic sunflower look. For contrast, consider using a neutral background fabric like white or beige. Additionally, ensure you have batting and backing fabric that complement the colors of your quilt patterns.
Essential quilting tools include a rotary cutter, self-healing cutting mat, quilting ruler, and an iron. Having these tools on hand will make the quilting process smoother and more precise, ensuring that your quilt comes together effortlessly.
Cutting the Fabric Pieces
Accurate fabric cutting is crucial to achieving a well-structured quilt. Below are the measurements for each component of the Sunflower Quilt Pattern:
- Petals: Cut 12 pieces of yellow or gold fabric (4” x 6” each).
- Center: Cut 1 brown fabric square (6” x 6”).
- Leaves: Cut 4 green fabric pieces (3” x 5” each).
- Background: Cut 4 white or beige squares (6” x 6”).
- Border: Cut strips of blue fabric (3” wide, length depends on the quilt size).
Using a rotary cutter and ruler, carefully cut each piece to match these measurements. Proper cutting ensures that the quilt pieces fit together seamlessly, preventing misalignment or distortion in the final design.
Assembling the Sunflower Blocks
Start by arranging the petal pieces around the center square to form a sunflower shape. Sew two petals together at a time, ensuring the edges align neatly. Press the seams open to reduce bulk and maintain a flat surface.
Once all the petals are sewn together, attach them to the brown center square. This step requires careful stitching to maintain a smooth curve. Pin the pieces together before sewing to prevent shifting.
Next, add the leaf pieces to the corners of the sunflower block. These green accents will enhance the overall look of the quilt, making it more vibrant and detailed. Make sure to align the edges properly before stitching.
Piecing the Quilt Top
After assembling the sunflower blocks, arrange them on a flat surface to determine the best layout. Consider alternating colors or using different shades of yellow and gold to create visual interest. Take a picture of the layout to use as a reference.
Sew the sunflower blocks together row by row, pressing the seams after each step. Keeping the seams neat and flat is essential for achieving a professional finish. A quarter-inch seam allowance is recommended for quilting projects.
Once all the blocks are joined, add the background fabric pieces around them. This will give the quilt a structured look and enhance the sunflower design. Double-check that all blocks align correctly before proceeding.
Adding Borders and Quilting
The quilt border frames the design and provides a finished look. Sew the blue fabric strips around the quilt top, starting with the shorter sides first. Press the seams to ensure a clean and crisp finish.
After adding the border, layer the quilt top with batting and backing fabric. Use quilting pins or basting spray to keep the layers in place. This step is essential to prevent fabric shifting while quilting.
Quilt the layers together using a stitch pattern that complements the sunflower design. Free-motion quilting or a simple straight-line pattern can enhance the overall look. If using a sewing machine, adjust the stitch length for smooth, even stitches.
Binding and Finishing Touches
The final step is binding the quilt edges for durability and aesthetics. Cut 2.5-inch-wide strips of fabric for the binding and sew them together to create a long strip. Fold the binding in half lengthwise and press with an iron.
Attach the binding to the quilt edges using a quarter-inch seam allowance. Sew it on one side first, then fold it over to the other side and secure it with hand-stitching or machine sewing. A neat binding enhances the overall look of the quilt patterns.
Once the binding is attached, give the quilt a final press with an iron to set the stitches. Trim any loose threads and check for any missed stitches. Your Sunflower Quilt Pattern is now complete and ready to be displayed or gifted!
Final Thoughts
Making a Sunflower Quilt Pattern is a rewarding project that allows for creativity and skill-building. Whether you use it as a decorative piece or a functional quilt, the bright and cheerful sunflower design adds warmth to any space.
By following this step-by-step guide, you can create a stunning quilt that showcases your quilting skills. Experiment with different color combinations and fabrics to make each sunflower quilt unique.
Enjoy the process and take pride in crafting a beautiful quilt that will be cherished for years to come. Happy quilting!