
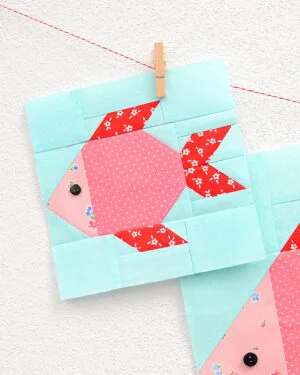
Quilting enthusiasts love the charm of nautical themes, and fish quilt patterns bring a unique oceanic vibe to any quilt project. This tutorial will guide you through creating a New Nautical Quilt Pattern – Fish Quilt Pattern – Free Tutorial, with detailed instructions on fabric cuts, measurements, and assembly. Whether you are a beginner or an experienced quilter, this pattern will help you bring a fresh and breezy aesthetic to your quilting collection.
Why Choose a Nautical Quilt Pattern?
A Timeless and Versatile Design
Nautical quilt patterns have remained a popular choice due to their timeless appeal. They work well in beach houses, coastal-themed rooms, or as gifts for ocean lovers. The fish quilt pattern specifically adds a whimsical and lively touch, making it an excellent choice for children’s rooms and themed décor.
A Great Way to Experiment with Colors
A fish quilt pattern allows you to play with blues, greens, and vibrant tropical hues to mimic the ocean’s beauty. You can also use different shades to create contrast and depth, giving your quilt an artistic and eye-catching look.
Perfect for Quilters of All Levels
Whether you’re just starting with quilting or have years of experience, a nautical quilt pattern is a fantastic project. It introduces simple shapes that come together beautifully, making it a rewarding quilt to complete.
Materials and Fabric Requirements
Essential Supplies
To create this quilt pattern, you will need some basic quilting tools. Ensure you have a rotary cutter, a self-healing cutting mat, quilting rulers, an iron, and a sewing machine. These will make cutting and sewing your fabric pieces more precise and efficient.
Fabric Selection
Choose 100% cotton quilting fabric for the best results. Here’s what you’ll need:
- Background Fabric: 1 yard (light blue or white)
- Fish Body Fabric: Fat quarters in various colors
- Fish Fin Fabric: 1/2 yard (contrast color)
- Binding Fabric: 1/2 yard
- Backing Fabric: 2 yards
- Batting: 1.5 yards (cotton or polyester)
Preparing Your Fabric
Wash and press your fabric before cutting to avoid shrinkage after quilting. Starching the fabric lightly will help maintain crisp edges when sewing pieces together.
Cutting Instructions
Fish Blocks
To create the fish blocks, follow these cutting measurements:
- Fish Body: (1) 5” x 5” square per fish
- Fish Tail: (2) 2.5” x 2.5” squares per fish
- Fish Fin: (1) 2” x 2” square per fish
- Background Squares: (2) 3” x 3” squares per fish
Border and Sashing
- Sashing Strips: (5) 2.5” x WOF (Width of Fabric)
- Border Strips: (4) 3” x WOF
Step-by-Step Assembly
Step 1: Create the Fish Blocks
Start by assembling the fish body and tail. Take one fish body square and sew two tail squares at diagonal angles to form the tail fin. Press seams open and trim excess fabric to keep a clean shape.
Next, add the fish fin square to one side of the body, ensuring it aligns at an angle to create a natural fin look. Press the seam and set it aside.
Step 2: Attach Background Pieces
Place the background squares around the fish block to frame the design. Sew each background square to the fish, making sure to align edges perfectly for a seamless look. Once attached, press all seams open to reduce bulk.
Step 3: Assemble the Quilt Top
Lay out all fish blocks in your desired arrangement. You can create a uniform school of fish or have them facing different directions for a more dynamic quilt. Sew the sashing strips between each row to separate the blocks and give them space to stand out.
Step 4: Add Borders
Once the quilt top is assembled, attach the border strips around the entire quilt. Start with the top and bottom borders, then add the side borders. Press all seams to keep the quilt flat.
Quilting and Finishing
Step 1: Prepare the Quilt Sandwich
Lay out your backing fabric with the batting on top, followed by your quilt top. Smooth out any wrinkles and baste the layers together using safety pins or basting spray.
Step 2: Quilting the Design
Choose a quilting pattern that enhances the nautical theme. Free-motion quilting with wavy lines can mimic ocean waves, or you can opt for a simple stitch-in-the-ditch technique to highlight the fish shapes.
Step 3: Bind the Quilt
Cut binding strips 2.5” wide and join them end-to-end. Fold them in half lengthwise and sew them to the quilt edges using a 1/4” seam allowance. Fold the binding over and hand-stitch or machine-sew it to the back of the quilt.
Final Thoughts
Creating a New Nautical Quilt Pattern – Fish Quilt Pattern – Free Tutorial is a fun and rewarding project that adds a fresh, seaside touch to any space. With careful fabric selection and precise piecing, you’ll have a stunning quilt perfect for beach lovers and ocean enthusiasts. Happy quilting!