
The Spinning Star Quilt Block is a classic and visually captivating pattern that adds dynamic movement to any quilt project. Whether you’re a beginner or an experienced quilter, this tutorial will guide you through creating this stunning block. With precise fabric measurements and step-by-step instructions, you’ll be able to craft a beautiful quilt block that enhances any quilt pattern.
Why Choose the Spinning Star Quilt Block?
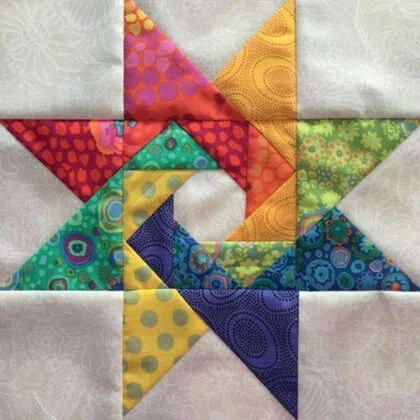
A Timeless Quilt Pattern
The Spinning Star design has been cherished for generations. Its intricate yet simple layout makes it an ideal pattern for quilters who enjoy geometric symmetry while adding a touch of movement to their quilts.
Versatile Color Combinations
One of the best aspects of this quilt pattern is its adaptability to various color schemes. You can use contrasting colors for a bold look or softer shades for a more delicate, vintage appeal.
Perfect for Any Skill Level
Although it may appear complex, the Spinning Star Quilt Block is beginner-friendly when broken down into step-by-step sections. It’s a great way to improve piecing and precision-cutting skills.
Materials and Fabric Requirements
Essential Supplies
To create this quilt block, you will need the following materials:
- Rotary cutter and self-healing mat
- Quilting ruler
- Sewing machine with a quarter-inch foot
- Iron and ironing board
Fabric Selection
For a single Spinning Star Quilt Block, you’ll need:
- Background Fabric: 1/2 yard (light color)
- Star Points Fabric: 1/4 yard (medium or dark color)
- Center Fabric: 1/8 yard (contrasting color)
- Binding Fabric: 1/4 yard (if creating a quilt with multiple blocks)
Preparing Your Fabric
Before cutting, press all fabrics to remove creases. Starching the fabric lightly can also help maintain crisp edges when piecing the block together.
Cutting Instructions
Star Points and Center Block
Cut the following fabric pieces:
- (4) 3.5” x 3.5” squares (star points fabric)
- (1) 4.5” x 4.5” square (center fabric)
- (4) 3.5” x 3.5” background squares
Half-Square Triangles (HSTs)
To create the star points, cut:
- (4) 4” x 4” background fabric squares
- (4) 4” x 4” star points fabric squares
Step-by-Step Assembly
Step 1: Create Half-Square Triangles (HSTs)
Place a 4” x 4” background fabric square right sides together with a 4” x 4” star points fabric square. Draw a diagonal line from corner to corner. Sew a quarter-inch seam on both sides of the line, then cut along the drawn line to create two HSTs. Press the seams toward the darker fabric.
Repeat this process for all four pairs of background and star points squares, resulting in eight HSTs.
Step 2: Trim and Arrange the Blocks
Trim each HST down to 3.5” x 3.5” to ensure uniformity. Arrange the blocks in a 3×3 grid with the center fabric square in the middle. Position the HSTs so they form the spinning star shape.
Step 3: Sew the Rows Together
Sew the squares together row by row. Press the seams of the first and third row in one direction, and press the seams of the second row in the opposite direction to help seams nest.
Once the rows are complete, sew them together, ensuring the points align correctly. Press all seams flat for a crisp finish.
Quilting and Finishing
Step 1: Assemble the Quilt Top
If making a full quilt, repeat the Spinning Star Quilt Block process multiple times. Arrange the blocks in a visually appealing layout, alternating colors or adding sashing between blocks for variety.
Step 2: Baste and Quilt
Layer the quilt top with batting and backing fabric. Use safety pins or basting spray to secure the layers. Quilt as desired—straight-line quilting or free-motion quilting can complement the Spinning Star pattern beautifully.
Step 3: Bind the Quilt
Trim excess batting and backing fabric, then attach the binding strips around the edges of the quilt using a quarter-inch seam. Fold the binding over to the back and hand-stitch or machine-stitch it in place.
Final Thoughts
The Spinning Star Quilt Block is a stunning addition to any quilt, adding movement and elegance to your designs. With careful cutting and piecing, you’ll create a visually striking quilt that showcases your skills and creativity. Whether you’re making a single block for a pillow or an entire quilt, this tutorial ensures a rewarding quilting experience. Happy quilting!