
The Log Cabin quilt pattern is one of the most recognizable and beloved quilt patterns in history. Originating in the 19th century, this classic design features a central square with strips radiating outward, symbolizing warmth and home. Over time, quilters have developed numerous variations, each bringing a unique twist to the traditional quilt block.
Whether you are a beginner or an experienced quilter, the Log Cabin and its variations provide endless possibilities. By changing fabric colors, strip widths, or layout designs, you can create stunning visual effects. This guide will walk you through the history, popular variations, and a step-by-step tutorial on how to make your own Log Cabin quilt.
The History of the Log Cabin Quilt Pattern
The Log Cabin quilt pattern dates back to the 1800s and gained popularity in the United States during the Civil War era. Many believe its design represents a pioneer’s cabin, with the central square symbolizing a hearth or fireplace.
Early Log Cabin quilts were often made using scraps of fabric, reflecting a tradition of frugality and resourcefulness. Some antique quilts feature a red center square, which was thought to represent the warmth of home, while others used black to signify mourning.
Over time, the Log Cabin quilt evolved into a treasured heirloom piece, passed down through generations. Today, it remains a popular choice among quilters for its versatility and aesthetic appeal.
Popular Variations of the Log Cabin Quilt Pattern
Although the classic Log Cabin quilt block features concentric strips around a central square, many variations exist. These include the Barn Raising, Courthouse Steps, and Pineapple blocks, each offering a distinct visual effect.
The Barn Raising variation arranges blocks in a diamond pattern, creating a striking sense of movement. This layout emphasizes contrast between light and dark fabrics, making the design stand out.
The Courthouse Steps variation differs by alternating strip placement on opposite sides of the center square. This structured look mimics the tiers of a courthouse, lending a bold, geometric appeal to the quilt.
Choosing Fabrics and Colors for Your Log Cabin Quilt
Selecting the right fabrics is crucial to achieving a stunning Log Cabin quilt. Traditional versions often feature light strips on one side of the block and dark strips on the other, creating a sense of depth.
Modern interpretations of Log Cabin quilt patterns embrace a variety of color schemes, from monochromatic designs to rainbow-inspired layouts. Consider using batiks, floral prints, or solids to add a unique touch to your quilt.
For beginners, it is helpful to start with a limited color palette to maintain contrast and visual harmony. Pre-cut fabric strips, such as jelly rolls, can also simplify the cutting process and ensure uniformity.
Step-by-Step Tutorial: Making a Log Cabin Quilt
Creating a Log Cabin quilt requires careful planning, cutting, and sewing. Below is a step-by-step guide to help you make a classic Log Cabin block.
Materials Needed:
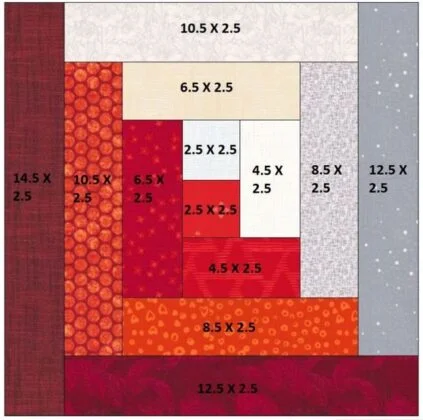
- 1 square of fabric for the center (2.5″ x 2.5″)
- Light and dark fabric strips (each 2.5″ wide)
- Rotary cutter and ruler
- Cutting mat
- Sewing machine and thread
- Iron and ironing board
Instructions:
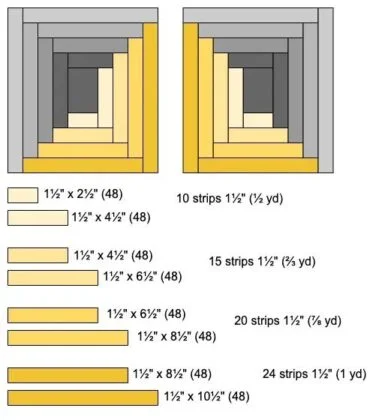
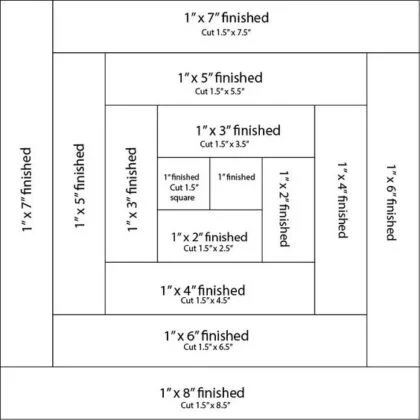
- Cut your fabric strips. Using a rotary cutter and ruler, cut 2.5-inch-wide strips of both light and dark fabrics. Prepare several lengths to accommodate block variations.
- Sew the center square. Start with a 2.5″ x 2.5″ square of fabric. Traditionally, this is red to symbolize a warm hearth, but you can choose any color.
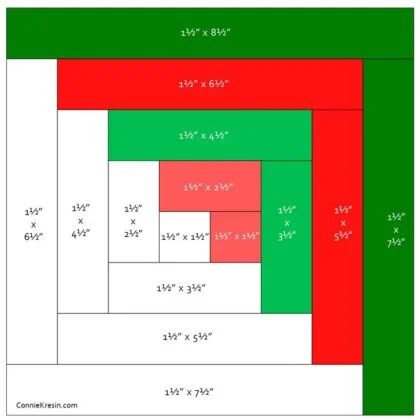
- Attach the first strip. Sew a light-colored strip (2.5″ x 2.5″) to one side of the center square. Press the seam outward to keep the fabric flat.
- Continue adding strips. Rotate the block counterclockwise and add another strip, ensuring each piece aligns neatly. Alternate between light and dark fabrics as you move outward.
- Trim and square up. Once all strips are attached, trim the block to ensure even edges. Repeat the process to make multiple blocks, then arrange them into your desired pattern.
- Assemble the quilt top. Lay out your completed blocks and sew them together in rows. Press all seams open to reduce bulk.
- Add borders and finish. Once the quilt top is assembled, add borders if desired. Layer with batting and backing fabric, then quilt and bind the edges.
Tips for a Perfect Log Cabin Quilt
Achieving a polished Log Cabin quilt requires precision and attention to detail. One key tip is to press your seams after each addition, as this helps maintain flat and even blocks.
Using a consistent seam allowance is also critical. A ¼-inch seam ensures that your blocks align properly when assembled. Any variations can result in uneven edges, making the final quilt look distorted.
Lastly, experiment with different layouts before sewing your blocks together. Arranging your blocks in various configurations allows you to visualize the final design and make adjustments as needed.
Conclusion
The Log Cabin and its variations remain a staple in the quilting world due to their adaptability and timeless appeal. Whether you choose a traditional or modern approach, this pattern offers endless opportunities for creativity.
By following this guide, you can create a beautiful Log Cabin quilt that showcases your unique style. With practice, you’ll gain confidence in your quilting skills and enjoy the process of making a cherished handmade piece.
Start your Log Cabin quilt today and experience the joy of quilting firsthand!