
Creating a Sunflowers Quilt Block Pattern is a beautiful way to bring warmth and charm to any quilt project. The sunflower symbolizes happiness and positivity, making it a perfect motif for home decor or gifts. In this tutorial, you will learn how to craft a stunning sunflower quilt block with precise measurements and step-by-step instructions.
What is a Sunflowers Quilt Block?
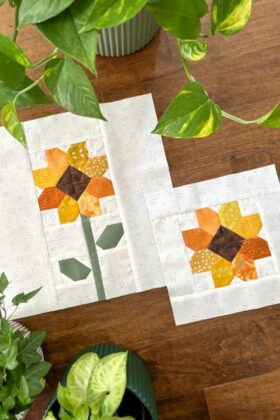
A Sunflowers Quilt Block is a patchwork design featuring a vibrant sunflower motif. This pattern typically consists of petals, a center, and background pieces that come together to create a floral-inspired quilt block.
This pattern can be achieved using traditional quilting techniques such as half-square triangles (HSTs), flying geese, and appliqué. Depending on your skill level, you can choose a simplified version or a more intricate design that adds depth and dimension.
Many quilters love incorporating sunflower blocks into their projects because they create a warm and inviting look. Whether used as a standalone block or part of a larger quilt, this pattern is versatile and eye-catching.
Materials and Tools Needed
Before starting your quilt pattern, gather the following materials:
- Fabric in yellow (for petals), brown (for center), green (for leaves), and background fabric
- Rotary cutter and cutting mat
- Quilting ruler
- Sewing machine
- Coordinating thread
- Iron and ironing board
Having all materials ready will make the process smoother and ensure accurate cuts. Using high-quality quilt fabric will enhance the durability and appearance of your finished project.
For beginners, pre-cut fabric packs or quilt patterns with pre-measured templates can help simplify the process and minimize fabric waste.
Fabric Cutting Measurements
To make a 12-inch Sunflowers Quilt Block, cut the following pieces:
- Yellow Petals: (8) 3.5″ x 3.5″ squares (for half-square triangles)
- Brown Center: (1) 4.5″ x 4.5″ square
- Green Leaves: (4) 3″ x 3″ squares (for flying geese units)
- Background Fabric: (8) 3.5″ x 3.5″ squares, (4) 2.5″ x 2.5″ squares
Using a rotary cutter ensures precise cuts, which is crucial for achieving sharp and symmetrical quilt blocks. Labeling each fabric piece can also help keep your workspace organized.
If you want a larger or smaller quilt block, simply adjust the fabric measurements while maintaining the same proportions.
Step-by-Step Sewing Instructions
1. Create the Half-Square Triangles (HSTs)
To form the sunflower petals, pair each yellow 3.5″ square with a background 3.5″ square. Draw a diagonal line on the back of the background fabric and sew 1/4-inch seams on both sides of the line.
Once sewn, cut along the drawn line to create two HSTs. Press the seams towards the darker fabric to avoid bulkiness.
Repeat this process until you have 16 half-square triangles. Trim them to 3″ x 3″ if needed for precision.
2. Assemble the Flying Geese Units
For the leaves, use the green 3″ squares and background 2.5″ squares to create four flying geese units. Position a small square on the top corner of a larger rectangle and sew diagonally.
Trim the excess fabric and press the seam towards the green fabric. Repeat for the other side to complete the flying geese units.
Flying geese units are essential in many quilt patterns because they create dynamic shapes and directional movement within the block.
3. Construct the Center Square
The center of the sunflower consists of the brown 4.5″ x 4.5″ square. To add depth, you can opt for a scrappy look by piecing smaller squares together in varying shades of brown.
For an appliqué-style center, cut a circle from brown fabric and use fusible interfacing to attach it to the quilt block.
This step gives the sunflower its distinct look, ensuring it stands out in your quilt design.
4. Arrange and Sew the Quilt Block
Now, lay out all the quilt pieces in a 4×4 grid to visualize the final block. Ensure the half-square triangles and flying geese units are oriented correctly.
Sew each row together using a 1/4-inch seam allowance. Then, press the seams open to reduce bulk and improve alignment.
Finally, sew the rows together to complete the Sunflowers Quilt Block. Give the finished block a final press for a crisp, polished look.
Tips for a Perfect Sunflowers Quilt Block
- Use starch: Lightly starching fabric before cutting prevents stretching and distortion.
- Chain piecing: This method speeds up sewing by stitching multiple pieces without cutting the thread in between.
- Pressing matters: Always press seams as you go to ensure a professional finish and accurate alignment.
Following these tips will help you achieve clean, well-structured quilt patterns that stand the test of time.
How to Use the Sunflowers Quilt Block
This quilt block can be used in many creative ways, such as:
- Wall Hangings: A single sunflower block framed as a decorative wall hanging.
- Table Runners: Combine multiple blocks in a row for a bright and cheerful centerpiece.
- Full Quilts: Repeat the block pattern to create a beautiful sunflower-themed quilt.
Mixing different fabrics and colors allows you to customize the block to match any decor style. Whether you prefer a vintage look or a modern aesthetic, this block can be adapted accordingly.
Conclusion
The Sunflowers Quilt Block Pattern is a fantastic addition to any quilting project. By following this step-by-step tutorial, you can create a stunning quilt block that showcases the beauty of sunflowers.
With its cheerful design and versatile applications, this block is perfect for both beginners and experienced quilters. Get your materials ready, start stitching, and enjoy bringing this radiant flower to life in your next quilt project!