
Creating a cute patchwork rabbit is a fun and rewarding quilting project. This tutorial will guide you through the step-by-step process of making a soft and cuddly rabbit using quilt patterns. Whether you are a beginner or an experienced quilter, this guide will help you bring your fabric bunny to life.
Materials and Fabric Selection
Choosing the right materials is essential for creating a durable and adorable patchwork rabbit. Opting for high-quality fabrics will ensure your quilted rabbit lasts for years to come.
- Fabric Choices: Select cotton quilting fabric in various colors and patterns to create a charming patchwork effect. You will need at least six different fabric prints.
- Additional Supplies: Prepare matching thread, scissors, a rotary cutter, a cutting mat, stuffing material, and a sewing machine.
- Quilting Tools: Use a quilting ruler to ensure precise fabric cutting and a marking pen to outline sewing areas.
Cutting the Fabric Pieces
Before assembling your patchwork rabbit, accurately cutting the fabric pieces is crucial. Following the correct measurements ensures a seamless fit when sewing.
- Body Panels: Cut two pieces of fabric measuring 10” x 6” for the rabbit’s front and back.
- Ears and Legs: Cut four ear pieces (6” x 2”) and four leg pieces (4” x 2”).
- Arms and Tail: Cut four arm pieces (3” x 1.5”) and one tail piece (3” x 3”) for added cuteness.
Assembling the Patchwork Pieces
Now that you have all your fabric pieces ready, it’s time to start assembling the patchwork rabbit. This process involves sewing different fabric prints together.
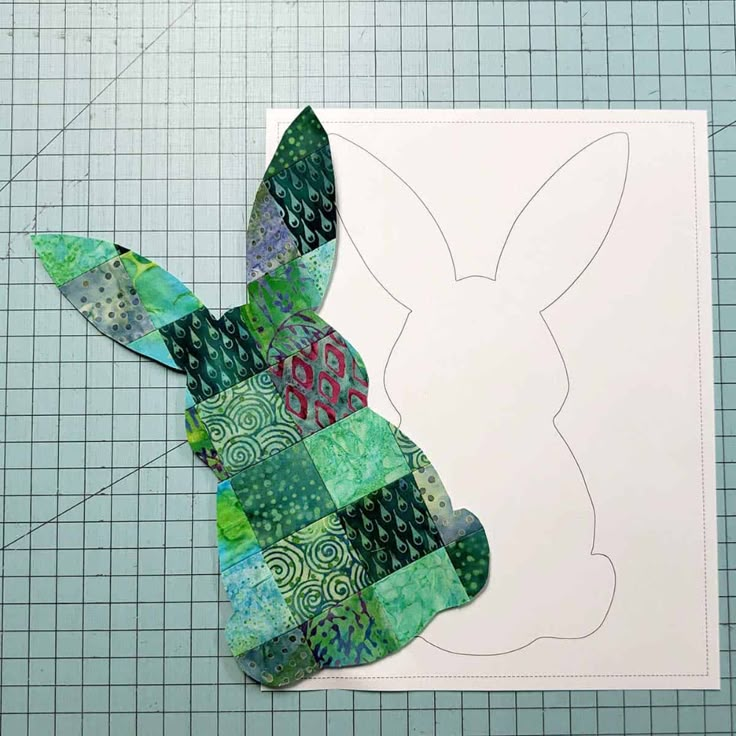
- Creating the Patchwork Effect: Arrange the fabric pieces in a visually appealing way, mixing different patterns and colors.
- Sewing the Front Panel: Stitch together the small squares to form a single front panel. Press the seams open to keep the fabric smooth.
- Joining the Back Panel: Repeat the process for the back panel, ensuring it aligns with the front panel.
Sewing the Rabbit’s Body
Once your patchwork front and back panels are ready, you can start sewing the rabbit’s body together.
- Stitching the Panels: Place the front and back panels right sides together and sew along the edges, leaving an opening at the bottom.
- Shaping the Body: Clip the corners and turn the rabbit right side out to reveal the patchwork design.
- Stuffing the Body: Use soft polyester filling to give the rabbit a plush appearance. Adjust the stuffing to achieve the desired firmness.
Attaching the Ears, Legs, and Arms
Adding ears, legs, and arms brings your patchwork rabbit to life. Carefully sewing these elements ensures durability and a professional finish.
- Sewing the Ears: Fold and stitch the ear pieces together, then attach them to the top of the rabbit’s head.
- Leg and Arm Placement: Position the legs and arms at the appropriate spots, securing them with a strong stitch.
- Tail Attachment: Sew the tail at the back of the rabbit, giving it an adorable finishing touch.
Adding Facial Features
The facial details make your patchwork rabbit even more charming. Hand-stitching the features gives it a personal touch.
- Eyes and Nose: Use embroidery thread to create the eyes and nose with simple stitching.
- Mouth and Whiskers: Stitch a small smile and add whiskers for extra character.
- Final Touches: Check all seams and add any final embellishments, such as a ribbon bow around the neck.

Conclusion
Your cute patchwork rabbit is now complete! This quilted creation makes a perfect handmade gift or a delightful addition to your home decor. With these easy quilt patterns and detailed steps, you can make multiple rabbits using different fabric combinations. Happy quilting!