
Discover the charm of the Amigurumi Magpie Bird Crochet pattern – a delightful handmade project that’s perfect for crochet enthusiasts of all skill levels. In this guide, you’ll learn how to make your very own magpie bird with easy-to-follow steps, detailed instructions, and a complete list of materials. Whether you’re a beginner or an experienced crafter, this project will surely brighten your day.
Using recommended crochet patterns and a helpful crochet app, you’ll be able to track your progress, stay organized, and bring this adorable bird to life with confidence. Let’s dive into this whimsical project and explore the creative world of amigurumi!
What Is Amigurumi Magpie Bird Crochet?
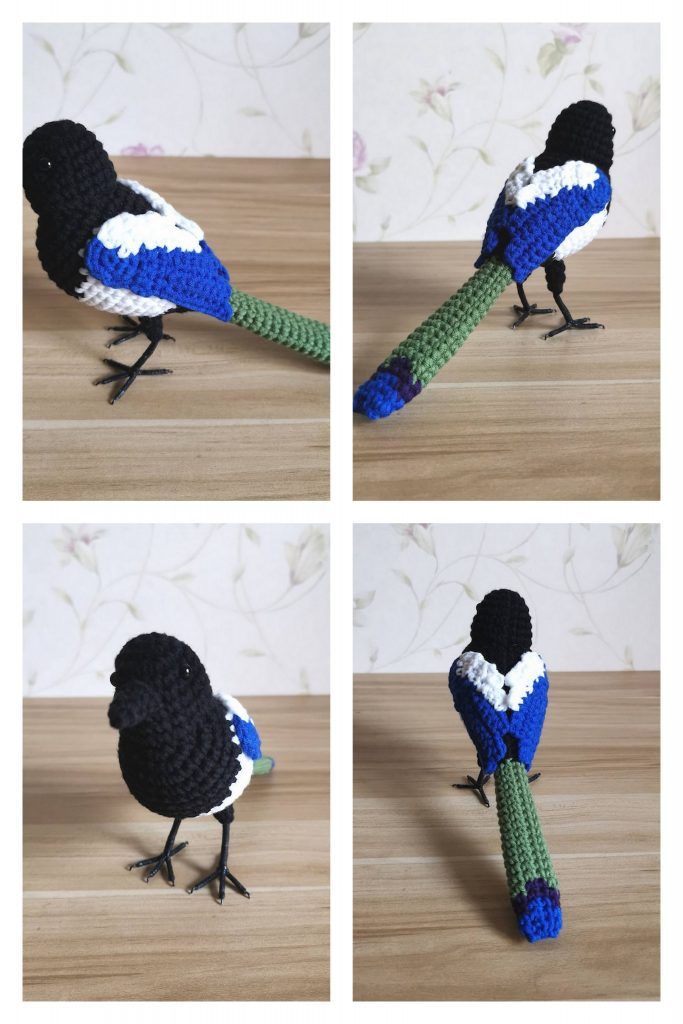
Amigurumi is the Japanese art of crocheting small stuffed creatures, and the magpie bird is a stunning subject with its striking black, white, and blue feathers. The Amigurumi Magpie Bird Crochet project combines artistic flair and technical skill into one rewarding pattern. It’s a great way to express creativity while honing your crochet techniques.
Magpies are intelligent birds, symbolizing joy and communication. Making one in amigurumi form allows crafters to recreate their elegance in a cute and cuddly version. It also makes for a unique gift or a decorative piece for bird lovers and collectors of handmade art.
With the growing popularity of handmade items, crochet projects like this magpie bird are in demand. Not only do they offer personal satisfaction, but they also provide opportunities for sharing on social media or selling in craft markets.
Essential Materials and Tools
Before starting your magpie bird, gather all the required materials. The correct tools and yarns make a big difference in your final result, ensuring clean stitches and realistic proportions. Here’s a list of what you’ll need for this project:
- Yarn: Black, white, and blue worsted weight yarn (100% cotton or acrylic).
- Hook: 2.5 mm or 3.0 mm crochet hook (depending on your tension).
- Fiberfill: For stuffing the body and wings.
- Safety Eyes: 6 mm black eyes or embroidered eyes for child-friendly use.
- Stitch Marker: To track your rounds.
- Yarn Needle: For sewing parts and weaving in ends.
- Scissors: A sharp pair for cutting yarn cleanly.
Each tool has its role in making your crochet pattern flow smoothly. The right crochet hook size ensures even tension, and good-quality yarn creates a polished look. Investing in safety eyes or embroidery thread helps bring your magpie to life with charm and personality.
Don’t forget to use a crochet app to keep track of your stitch counts, progress, and custom notes. These apps are essential for organizing complex crochet patterns like amigurumi animals.
Step-by-Step: How to Crochet a Magpie Bird Amigurumi
Step 1: Create the Head and Body
Start with the head and body using black yarn. This portion is worked in continuous rounds using a magic ring technique. Increase evenly to create a rounded shape for the head, then shift to the body section, gradually decreasing toward the tail.
Stuff the head and body with fiberfill as you go. Ensure the shape stays firm but not overstuffed, maintaining flexibility for later sewing. Place the safety eyes between rows 8 and 9, about 7 stitches apart.
Once the body is done, secure the last stitch and leave a long tail of yarn. This will be used to attach the wings and tail securely.
Step 2: Wings and Tail Feathers
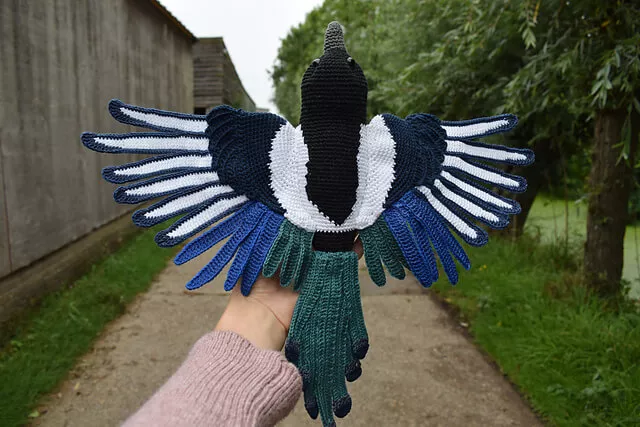
The wings are crafted using blue and black yarn in a flat shape that’s folded and sewn onto the sides of the body. Start with a chain base, then build up the shape with increases and decreases.
The tail feathers are elongated and slightly curved. They should resemble the natural flow of a magpie’s tail. Use black yarn for the base and blue yarn for the tips to mimic real feather coloration.
Make sure both wings and tail are symmetrical. Use your crochet app to check each row of the crochet pattern and keep consistent sizing.
Step 3: Beak, Feet, and Final Assembly
The beak is made with a small triangle shape using black or dark grey yarn. It’s attached just below the eyes. Use tight stitches to give it a firm structure. For child safety, you can embroider it with a yarn needle.
The legs and feet are simple chains with small toes formed using slip stitches and single crochets. Attach the feet to the bottom of the body using a yarn needle.
Once all pieces are made, sew them to the body with care. Double-check symmetry and reinforce with a few extra stitches if needed. Your Amigurumi Magpie Bird is now ready to display!
Why Use a Crochet App for Amigurumi Projects?
When tackling detailed projects like a magpie bird, a crochet app is your best ally. These apps help you organize rows, count stitches, and track the different parts of the pattern. With just a tap, you can mark completed rounds and save progress across multiple projects.
Some apps also let you upload and store your favorite crochet patterns, making it easy to follow step-by-step guides without printing anything. Many include timers, reminders, and visual charts to enhance your crafting experience.
For both beginners and advanced users, the right crochet app can transform your workflow. It reduces errors, saves time, and brings peace of mind when working on complex or multi-part amigurumi.
Tips for Crocheting Realistic Birds
When creating bird amigurumi, colors and proportions are key. The magpie’s distinctive markings – its black wings, white belly, and blue feather accents – are crucial for realism. Use high-contrast yarns to highlight those areas clearly.
Pay close attention to shaping. Stuff gently to maintain a smooth body, but firm enough to hold structure. Lightly shaping the wings and tail with bends or wire (optional for display only) can give your bird a more dynamic pose.
If you’re unsure how to adjust sizing or expressions, many crochet patterns offer customization tips. Join online crochet communities to share your work, ask for advice, and learn from other crafters.
How to Download and Install a Crochet App
To stay organized and follow along with this pattern or others, download a trusted crochet app. Here’s how you can do that easily:
Step 1: Open the App Store (iOS) or Google Play Store (Android) on your device. Type in keywords like “crochet app” or “crochet patterns” in the search bar.
Step 2: Choose an app with high ratings and features such as pattern tracking, stitch counter, and custom project management. Examples include “Crochet Genius,” “LoveCrafts,” or “Row Counter.”
Step 3: Tap “Install” and wait for the app to download. Once installed, open the app, sign up if necessary, and start adding your Amigurumi Magpie Bird Crochet project. Save progress as you go!
Using a crochet app helps keep everything at your fingertips — no more paper notes or lost progress. It’s a game-changer for hobbyists and professionals alike.
Final Thoughts
Creating your own Amigurumi Magpie Bird Crochet is a fun and rewarding experience. This project lets you explore color, texture, and shape while improving your amigurumi skills. With detailed crochet patterns, easy access to digital tools, and a little creativity, you’ll have a beautiful handmade bird to show off.
Using a crochet app enhances the process from start to finish. You’ll stay organized, avoid mistakes, and keep all your projects in one place. Don’t forget to share your finished magpie on social media or with fellow crafters to inspire others!
Ready to take your crochet journey to the next level? Grab your yarn, download your app, and let’s bring the magpie to life!