
If you’re passionate about quilting and looking for a quick, satisfying project, a quilted oven mitt is a perfect choice. It combines creativity, functionality, and the cozy beauty of handmade items. This project is ideal for beginners and seasoned quilters alike.
Oven mitts are used daily in most kitchens, and making your own adds a personalized touch. You can use your favorite quilt patterns, scrap fabrics, or even coordinate them with your kitchen décor. It’s also a thoughtful handmade gift for friends and family.
In this blog post, we’ll walk you through everything you need to know to make a quilted oven mitt, from selecting materials to cutting fabrics, quilting, and final assembly. Plus, we’ll share SEO-friendly tips for enhancing your quilt-making journey.
Choosing the Right Fabrics and Materials
The first step to making a quilted oven mitt is selecting high-quality materials. Choose 100% cotton fabrics as they are heat-resistant and safe for use in the kitchen. Avoid synthetic fabrics which may melt under heat.
You’ll also need Insul-Bright (a heat-resistant batting), regular cotton batting, and coordinating cotton thread. For added thickness, use two layers of batting. This ensures your mitt is both durable and protective.
Choose quilt-friendly fabrics with fun prints, solids, or even seasonal designs. This is a great chance to play with small quilt patterns or showcase leftover quilt blocks from previous projects.
Essential Tools for This Quilt Pattern
Before starting your project, gather your tools. You’ll need fabric scissors or a rotary cutter, a self-healing cutting mat, quilting pins or clips, a sewing machine, and an iron. A walking foot is also helpful when sewing through multiple layers.
Use a quilting ruler to ensure precise measurements. This is essential for cutting your quilt fabric pieces accurately. Accuracy helps all the layers line up properly, making your finished oven mitt more professional-looking.
It’s also a good idea to print or trace a simple oven mitt template onto cardstock or template plastic. You’ll use this to cut your quilted fabric and batting to the correct shape.
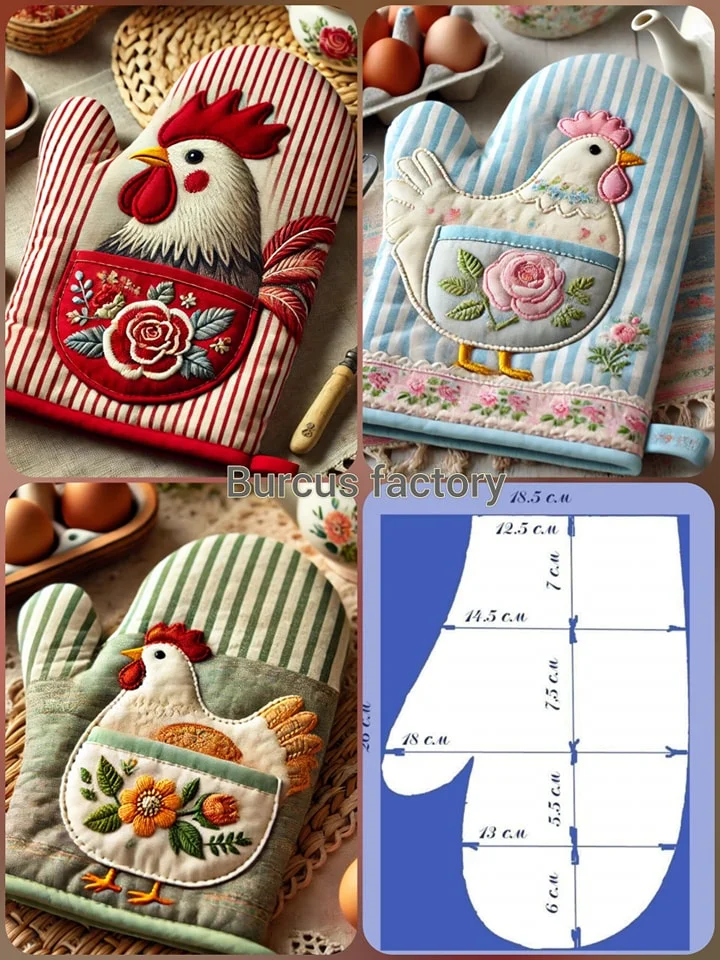
Fabric Cuts and Measurements
Here’s what you’ll need to cut for one quilted oven mitt. You’ll be making a “quilt sandwich,” so it’s important to cut each layer accurately:
- Outer Fabric (Front and Back): Cut 2 pieces – 10″ x 14″
- Lining Fabric (Front and Back): Cut 2 pieces – 10″ x 14″
- Cotton Batting: Cut 2 pieces – 10″ x 14″
- Insul-Bright Batting: Cut 2 pieces – 10″ x 14″
- Bias Binding (for edges): Cut 1 strip – 2.5″ x 40″
- Loop (optional): Cut 1 strip – 2″ x 6″
After cutting, layer each piece into a quilt sandwich: outer fabric right side down, Insul-Bright, cotton batting, and outer fabric right side up. Repeat this for both sides of the mitt.
Use quilting pins or spray adhesive to keep the layers together while you quilt. You’ll quilt the layers before cutting them into the mitt shape, so keep them securely pinned and flat.
Quilting Your Fabric Layers
Now it’s time to quilt your oven mitt fabric! Choose a quilting pattern that suits your style. Simple straight lines or a diamond grid pattern are great options for beginners and add a clean, classic look.
Mark your quilting lines using a fabric-safe marking pen or chalk. Lines spaced 1” to 1.5” apart work well for oven mitts. Then, quilt through all the layers using a walking foot to help with even stitching.
Quilting not only strengthens your fabric sandwich but also adds texture and personality to your oven mitt. This is where your love of quilt patterns can really shine through in your design.
Cutting and Assembling the Oven Mitt
After quilting, place your oven mitt template on the quilted fabric and trace it with chalk. Make sure the thumb faces the correct direction for both sides — one left and one right!
Cut out the oven mitt shape carefully with fabric scissors or a rotary cutter. Do the same with your lining fabric pieces, but without the batting. You should now have four mitt-shaped pieces: two quilted outer layers and two lining layers.
With right sides together, sew the two quilted mitt pieces together using a ½” seam allowance. Repeat with the lining pieces. Trim the seams and clip around the curves to reduce bulk.
Attaching the Lining and Finishing the Edge
Turn the quilted outer mitt right side out. Leave the lining inside out. Slide the lining into the outer mitt so the wrong sides are touching. Align the raw edges at the cuff.
Pin or clip the cuff opening and sew a basting stitch around the edge to hold the layers together. This makes it easier to attach the binding neatly and evenly.
Use your 2.5″ wide bias binding to encase the cuff edge. Fold it in half lengthwise, then sew it around the edge with a ¼” seam. Fold the binding over the edge and stitch it down, either by hand or with your machine.
Adding the Hanging Loop
To make a loop, fold your 2″ x 6″ strip lengthwise, right sides together, and sew down the long edge. Turn it right side out and press flat.
Fold the loop in half and tuck the raw ends into the binding before sewing it down, on the side of the oven mitt. This creates a convenient hanging feature.
A hanging loop not only adds function but also completes the classic look of your handmade quilted oven mitt. It’s a small detail that makes a big difference in the kitchen.
Customizing Your Quilted Oven Mitt Pattern
This quilted oven mitt pattern is highly customizable. You can piece together different fabric strips or blocks to create a patchwork-style mitt before quilting. This is a great way to use up scraps and add charm.
Consider experimenting with various quilt patterns like log cabin, flying geese, or rail fence. These mini quilt blocks look beautiful and elevate the design of your oven mitt.
You can also adjust the size or shape of the mitt, add embroidery, or use contrasting binding for extra flair. The options are endless when you combine creativity with quilting.
Why Quilters Love This Small Quilt Project
A quilted oven mitt is a small project with a big payoff. It doesn’t require a lot of materials or time, but it gives you the satisfaction of completing a useful quilted item.
It’s also a great introduction to quilt patterns for beginners. You learn about layering, quilting, binding, and working with curves — all on a manageable scale.
Plus, it makes a wonderful handmade gift. Whether it’s for a holiday, birthday, or housewarming, a custom quilted oven mitt is always appreciated and admired.
Final Thoughts and Quilt Inspiration
Quilting doesn’t always have to mean making a full-size quilt. Smaller projects like this oven mitt allow you to enjoy the quilting process in less time and space.
If you enjoy this project, consider making matching quilted pot holders, placemats, or even table runners using coordinating quilt fabrics and patterns. Keep experimenting and practicing new quilt techniques.
We hope this quilted oven mitt pattern inspires you to get creative with your sewing machine. Don’t forget to share your creations and explore more quilt patterns to keep your passion alive!