
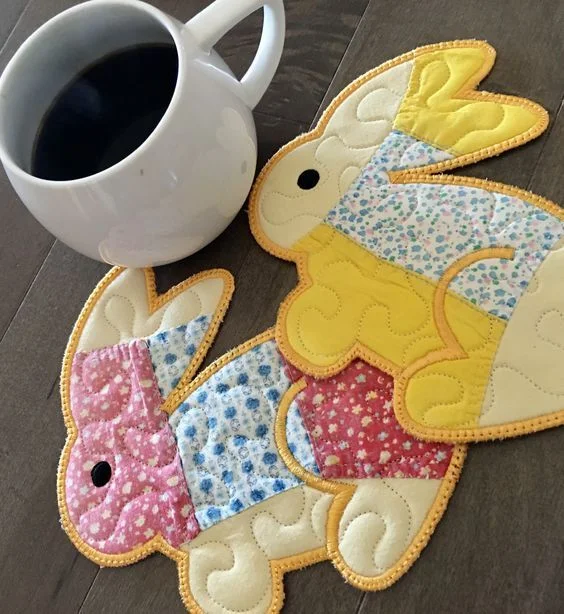
Looking to brighten your table with a cute handmade touch? A Bunny Coaster is the perfect mini project to bring some springtime charm to your home. Whether you’re an experienced quilter or a beginner looking for an easy project, this coaster is fun, practical, and a great way to use your scrap fabrics.
In this guide, you’ll find a full step-by-step tutorial on how to create your own Bunny Coaster using basic quilt techniques. We’ll also talk about the best quilt patterns to choose, color combinations, and how to cut your fabrics to get clean, polished results.
Let’s hop right in and get crafting with this cheerful quilted bunny!
Materials You Will Need
To begin with, you’ll need just a few simple materials. This project is great for using leftover fabric scraps from your past quilt creations. You can also coordinate new fabrics for a fresh and cohesive look.
Here’s what you’ll need:
- Cotton fabric in 2–3 different prints
- Fusible fleece or cotton batting
- Coordinating thread
- Fabric marker
- Scissors or rotary cutter
- Iron and ironing board
- Sewing machine (or hand needle for hand sewing)
Having a good quilt pattern for your bunny shape will help keep everything neat. You can draw one by hand, print a bunny silhouette online, or even trace a cookie cutter for the perfect shape.
Fabric Cutting and Measurements
Start by cutting your fabric according to the size of your bunny shape. We recommend a coaster size of about 6 inches tall by 5 inches wide, which is large enough to hold a mug and still show off the cute bunny features.
Cut the following:
- (2) Bunny shapes from your main cotton fabric (front and back)
- (1) Bunny shape from fusible fleece or cotton batting
- (1) Small triangle for the nose (1″ x 1″)
- (2) Oval pieces for the ears (about 1″ x 2″ each)
It’s important to cut precisely and follow the bunny outline as cleanly as possible. Use fabric clips or pins to hold layers together before sewing to avoid shifting.
Choosing the Right Quilt Pattern for the Bunny
When selecting fabrics for this project, consider small-scale quilt patterns that won’t overpower the small size of the coaster. Florals, polka dots, and gingham are all great choices for a soft, Easter-themed look.
You can even incorporate traditional quilt block designs, like a mini Log Cabin or Nine Patch, if you’d like to piece your bunny’s body before cutting the final shape. This gives a scrappy, patchwork effect that’s charming and unique.
Pastel colors typically work well for springtime projects. Mix solids with patterns to create visual balance and help your bunny features stand out.
Step-by-Step Assembly Instructions
Step 1: Fuse the Batting
Place your fusible fleece to the wrong side of one bunny fabric piece and iron it following the manufacturer’s instructions. This adds structure and gives your quilt coaster that plush, finished feel.
Step 2: Decorate the Bunny
Use small fabric pieces or embroidery thread to add the bunny’s nose and eyes. You can either stitch these by hand or use fusible appliqué methods to secure them. Optional: Use blush-colored fabric paint or thread for the cheeks.
Step 3: Sew the Layers Together
Place the front and back bunny fabrics right sides together, with the fleece side facing out. Sew around the edge using a ¼-inch seam allowance, leaving a 2-inch gap at the bottom for turning.
Clip the curves carefully, especially around the ears. Turn your bunny right side out and press well with an iron. Then, topstitch around the entire edge to close the opening and secure the shape.
Quilting the Bunny Coaster
To enhance the design and give your Bunny Coaster a professional touch, add some quilting lines. You can stitch around the bunny’s outline, inside the ears, or create decorative lines like flowers or hearts.
Quilting not only adds style but also helps the layers stay flat after washing. Use a walking foot on your sewing machine for even stitching, or take your time if quilting by hand.
A good tip: use contrasting thread colors if you want the quilting lines to pop, or matching thread for a subtle look that blends into the background.
Customizing Your Bunny Coaster
One of the great things about this quilt pattern is how easy it is to customize. Try using felt instead of fabric for the nose or add a tiny pom-pom for a tail. You could even embroider a name onto the body to make it personal.
Make a whole set of Bunny Coasters in different colors for a spring brunch or Easter gathering. Tie them together with ribbon and they make adorable handmade gifts.
You can also scale the quilt pattern up or down to create a matching mug rug, placemat, or wall hanging in the same bunny shape.
Tips for Beginners
If this is your first quilting project, don’t worry. The Bunny Coaster is a perfect beginner-friendly option. It’s small, requires only basic stitches, and gives you quick results.
Focus on clean cutting and steady stitching. Use pins or clips to keep layers in place and take your time turning corners and curves. You’ll gain confidence in your quilt skills with each one you make.
Don’t forget to press your fabrics before and after sewing. This keeps your coaster crisp and polished, and it’s one of the simplest ways to elevate the final look.
Caring for Your Bunny Coaster
Since the coaster is made from 100% cotton, it’s machine washable. Wash on a gentle cycle with cold water and lay flat to dry. If needed, give it a light press with a warm iron after drying.
To help it last longer, avoid using bleach or harsh detergents. Treat stains quickly by spot-cleaning with a gentle soap and soft cloth.
Proper care will help your quilt coaster maintain its shape and stitching, allowing you to enjoy your handmade creation for many seasons to come.
Downloading and Saving the Pattern
You can draw your own bunny template or download one online to print at home. Look for simple outlines with recognizable bunny features like long ears and a round body.
Save your quilt pattern in a dedicated folder on your computer or tablet. You can also print it and store it in a binder if you like keeping physical patterns.
If you use a quilt app, many now let you scan and store patterns digitally, making it easy to access and organize your collection of cute seasonal coasters and other mini projects.
Final Thoughts
Creating your own Bunny Coaster is a satisfying and joyful project that adds a handmade touch to your home. Whether you’re decorating for spring or just want a cozy place to rest your cup of tea, this little bunny brings both function and fun.
Don’t be afraid to get creative with fabrics, threads, and embellishments. With endless quilt patterns available, you can make each bunny unique and totally you.
So gather your fabric scraps and sewing supplies, and enjoy this charming DIY that blends quilting skill with bunny-inspired cuteness!