
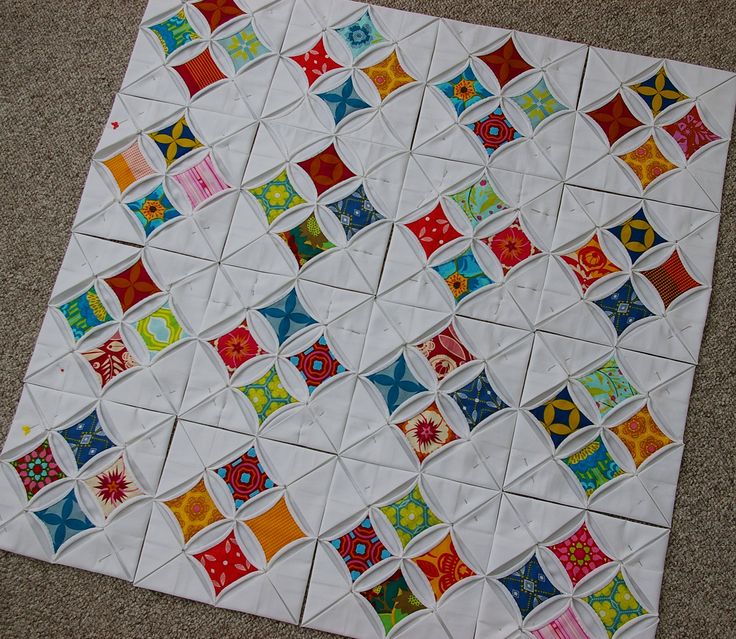
The Cathedral Windows quilt is a timeless classic that brings elegance and depth to any quilt project. With its folded fabric technique and intricate appearance, it resembles stained-glass windows found in old cathedrals. Though it may look complex, this pattern is surprisingly beginner-friendly when broken down into steps.
In this free tutorial, we’ll walk you through the process of making Cathedral Windows quilt squares, including all the fabric cuts and measurements you’ll need. You don’t need batting or backing for this design, as the folded layers give it structure and weight. That makes it perfect for wall hangings, pillows, or centerpiece quilts.
Using traditional or modern quilt patterns, you can create breathtaking variations with colorful fabric centers and neatly folded windows. The Cathedral Windows style is perfect for scrap busting, fussy cutting, or showcasing small prints.
Materials Needed for Cathedral Windows Quilt Squares
Before diving into the steps, let’s look at the materials you’ll need. This quilt technique relies on folded fabric and minimal sewing, so you won’t need batting or interfacing. Choose high-quality quilting cotton for both the base and the window fabrics.
Here’s a basic materials list for one Cathedral Window square:
- Base fabric (solid color): One 10″ x 10″ square
- Window fabric (prints or color accents): One 2.5″ x 2.5″ square
- Sewing tools: Thread, scissors, pins, iron, ruler, sewing machine
The main (base) fabric forms the folded frame, while the smaller square in the center acts as the decorative “window.” You can make a single square or connect multiple quilt squares for a larger quilt. The modular nature of this pattern allows for creative flexibility.
Cutting Your Fabric Squares
Start by cutting your base fabric into 10” x 10” squares. These larger squares will be folded multiple times to create the cathedral window effect. Make sure the edges are straight and clean for a precise finish.
For the windows themselves, cut 2.5” x 2.5” squares from your print fabrics. You can use a single fabric design or mix and match different prints to add character. This is a great opportunity to use up fabric scraps from other quilt patterns.
Cutting accurately is crucial for this project. Use a rotary cutter and quilting ruler to ensure all edges are straight. The uniformity of your cuts will make a big difference when folding and assembling the blocks.
Folding the Base Square – Creating the Foundation
Take your 10” x 10” square and fold it in half, pressing firmly with an iron to make a crease. Unfold it, then fold it in half the other way and press again. This will create a cross-crease in the center of the square.
Now, fold each corner of the square into the center, pressing as you go. You should now have a smaller square (approximately 5” x 5”) with four folded triangles meeting in the center. This is the first layer of folding.
Repeat this process once more. Fold each corner of the new square into the center again, creating another layer of folded fabric. Press well to make sharp, clean folds. This compact square forms the base of the Cathedral Windows quilt block.
Stitching the Edges for Stability
Once your base square is folded, stitch about 1/8″ from the edge around the perimeter to secure the folds in place. This step helps maintain the square’s shape and prevents the fabric from unfolding during the next steps.
You can stitch by hand or use your sewing machine. A straight stitch will work perfectly for this part of the project. Use matching thread for a clean look, or contrast thread for a decorative edge.
Make sure the folds are crisp and even. This stitched base is now ready for the small window square, which will be tucked under the fabric flaps to form the signature look of Cathedral Windows quilt patterns.
Adding the Window Fabric – Signature Style
Open the last set of folded corners to reveal the inner square. Place your 2.5” x 2.5” window fabric right in the center. The edges of this small square should touch the inner folds of your base.
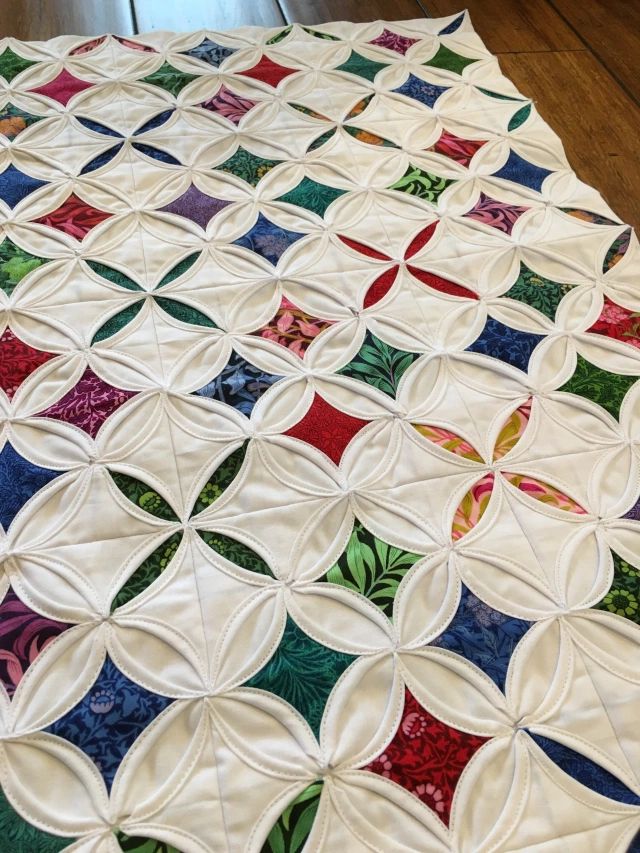
Now fold the flaps back over the corners of the window square. Pin them in place to hold the shape. You’ll see the curved “window” effect starting to appear as the corners arch over the small square beneath.
This step is where the Cathedral Windows magic happens! The contrasting window fabric brings color and depth to your quilt square, and the gentle arches formed by the folds create a stained-glass illusion.
Stitching the Cathedral Arches
To finish the window, sew along the curved edges of the four folded flaps. This can be done by hand with a decorative stitch or by machine with a small, straight stitch close to the folded edge.
Sew slowly and precisely, curving smoothly around the edge to capture the window fabric beneath. Repeat for all four sides of the square. Once complete, your Cathedral Window will be securely framed by the base fabric.
These gentle arches are the defining feature of Cathedral Windows quilt patterns. They bring elegance and texture, making this block a favorite among quilters who love both form and function.
Joining Multiple Cathedral Window Blocks
Once you’ve made a few blocks, you can join them to form a larger quilt. Place two completed blocks side by side, right sides together, and stitch them along one edge with a ¼” seam allowance. Press the seam open.
Continue adding blocks row by row, then connect the rows together to complete your quilt top. The window centers will align in a grid pattern, creating a cohesive and striking design.
You can make a full Cathedral Windows quilt, a table runner, cushion cover, or wall hanging. This versatile technique lets you create stunning results without complicated piecing.
Tips for Perfect Cathedral Windows Quilt Blocks
Use a hot iron and starch spray to help hold your folds in place. The crispness of the folds greatly impacts the final appearance of your blocks. Press as you go to keep everything even and flat.
Always check that your window fabric is centered and pinned securely before stitching the arches. If you’re working with directional prints, make sure the design is facing the right way before sewing it down.
Experiment with different base sizes to create varied block dimensions. While 10” x 10” is a good standard, you can try smaller or larger bases to see what works best for your quilt project.
Final Thoughts on Cathedral Windows Quilt Patterns
The Cathedral Windows quilt is a truly unique and elegant project that brings old-world charm to modern quilting. Despite its intricate look, it’s a relaxing and rewarding project once you master the folds and stitching.
This free pattern gives you the freedom to personalize your quilt squares with colorful fabrics, artistic arrangements, and creative flourishes. Whether you’re making a pillow cover or an entire quilt, Cathedral Windows will leave a lasting impression.
Don’t forget to share your creations online with other quilters. The beauty of this pattern is its flexibility—no two quilt patterns will ever be exactly alike. Happy quilting!