
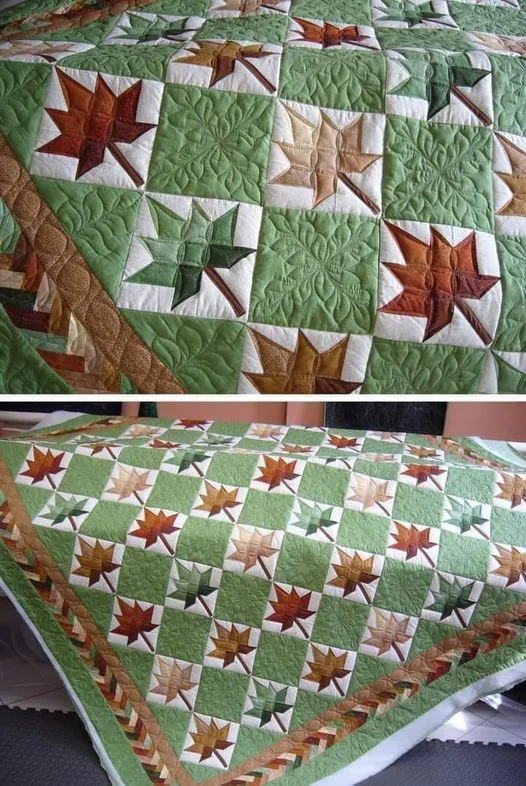
If you’re looking for a classic and charming block to add to your next quilt, the Maple Leaf Quilt Block is a perfect choice. With its strong roots in traditional quilting, this block brings together simple shapes and bold seasonal themes, making it especially popular during autumn—but it can be used year-round with the right fabric choices.
In this step-by-step tutorial, we’ll walk you through everything you need to create your very own Maple Leaf Quilt Block using a free pattern. Whether you’re incorporating it into a sampler quilt or repeating it for a full quilt top, this block is as versatile as it is beautiful.
So grab your favorite fabrics and let’s dive into this cozy, creative quilt block project. Don’t forget—experimenting with fabric colors is half the fun. Happy quilt!
What Is the Maple Leaf Quilt Block?
The Maple Leaf Quilt Block is a traditional block that represents the changing seasons, especially fall, when maple leaves turn vibrant shades of red, orange, and gold. This block is made up of squares, half-square triangles (HSTs), and a small stem unit.
Quilters love this block for its balance of simplicity and symbolism. While it’s made with basic techniques, it holds a powerful visual identity that stands out in any quilt layout. With its clean lines and leaf-like structure, it adds a cozy and nature-inspired touch to your quilting projects.
The block typically finishes at 12” x 12”, but you can easily scale it up or down depending on your quilt plan. It’s a beginner-friendly pattern that also allows more advanced quilters to play with color gradients and custom layouts.
Materials You’ll Need
Before you begin cutting and sewing, make sure you have the following materials and tools ready. This list is designed for making one 12” x 12” finished block.
Fabric:
- Fabric A (leaf color) – 1 fat eighth or large scrap
- Fabric B (background) – 1 fat eighth or large scrap
- Fabric C (stem – brown or contrasting solid) – 1 small scrap (1½” x 4½”)
Tools:
- Rotary cutter and cutting mat
- Quilting ruler
- Iron and ironing board
- Pins or clips
- Sewing machine with ¼” foot
- Neutral thread for piecing
Optional: Fabric marking pen or pencil for drawing diagonal lines on your HST units.
Cutting Instructions
Careful and accurate cutting is key to making clean, crisp quilt blocks. Use a sharp rotary cutter and double-check your measurements as you go. Below are the cuts for one Maple Leaf block.
From Fabric A (Leaf Fabric):
- (4) 3½” x 3½” squares
- (2) 4” x 4” squares (for HSTs)
From Fabric B (Background):
- (2) 4” x 4” squares (for HSTs)
- (3) 3½” x 3½” squares
From Fabric C (Stem):
- (1) 1½” x 4½” rectangle
From the background fabric (Fabric B), you’ll also cut:
- (2) 1½” x 1½” squares (for stem unit)
Lay out your pieces before you begin sewing to ensure everything is positioned correctly.
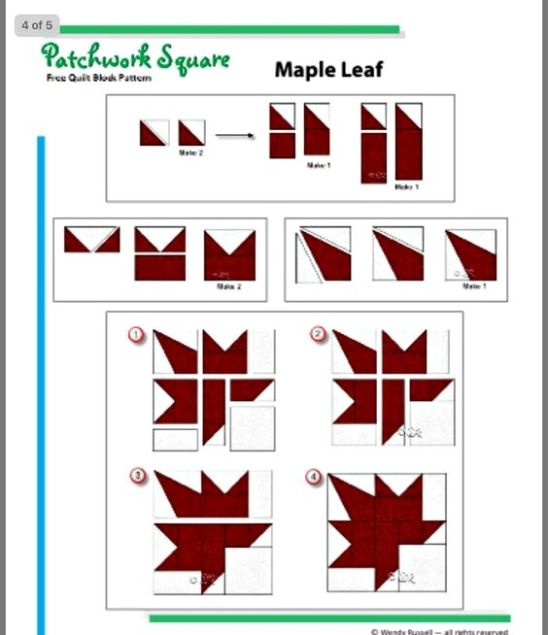
Step-by-Step Assembly
Now comes the fun part—putting your Maple Leaf Quilt Block together! We’ll break this into four steps: HSTs, stem unit, block layout, and final assembly.
Step 1: Make the Half-Square Triangles (HSTs)
Pair your two 4” x 4” leaf fabric squares with the two 4” x 4” background squares. Place them right sides together.
- Draw a diagonal line across each background square.
- Sew a ¼” seam on both sides of the line.
- Cut along the drawn line to create two HSTs per pair (4 total).
- Press seams to the darker fabric and trim each HST to 3½” x 3½”.
These four HSTs form the pointed sections of the maple leaf, giving the block its signature look.
Step 2: Create the Stem Unit
The stem is a tiny but crucial detail. It’s made using the stitch-and-flip technique, which makes it both secure and visually clean.
- Take the 1½” x 4½” stem fabric rectangle.
- Place a 1½” x 1½” background square on each short end, right sides together.
- Draw a diagonal line on each small square. Sew along the lines.
- Trim ¼” outside the seam line and press the corners open.
The result is a clean stem unit measuring 3½” x 3½”. This will sit at the base of the leaf in the final layout.
Step 3: Arrange the Block Layout
Lay out your pieces in a 3×3 grid to form the maple leaf:
Row 1: HST | HST | Leaf square
Row 2: HST | Leaf square | Background square
Row 3: Stem unit | Leaf square | Background square
Take a moment to rotate the HSTs so the triangle points create the correct shape of the leaf. The orientation is important for achieving the full leaf effect.
At this stage, you can take a photo of your layout to reference as you sew rows together.
Step 4: Sew Rows and Assemble
Now that your pieces are laid out, begin sewing the rows together:
- Sew each row using a ¼” seam allowance.
- Press rows in alternating directions to reduce bulk.
- Sew the rows together to complete your block.
- Press the final seams and square up the block to 12½” x 12½” (it will finish at 12” once quilted and bound).
Congratulations! You’ve now made a beautiful Maple Leaf Quilt Block—free pattern, full of heart.
Color & Fabric Tips
This block is ideal for celebrating fall with warm tones like rust, maroon, gold, and brown. But don’t be afraid to branch out and try non-traditional palettes.
- Try batiks for a natural texture.
- Use low-volume backgrounds to let the leaf shine.
- Go modern with solid colors and bold contrasts.
“Don’t forget to experiment with different color combinations!” A set of Maple Leaf blocks in various colors can make a stunning full quilt that feels dynamic and expressive.
Layout Ideas for Full Quilts
Once you’ve mastered this block, consider using it to make a full quilt or table runner. Here are a few layout ideas:
- Grid Layout – Repeated blocks in rows and columns for a clean, traditional look.
- On-Point Layout – Tilt each block 45° for a diagonal design.
- Alternating Blocks – Combine with other seasonal or star blocks for a sampler quilt.
This versatile quilt pattern is excellent for wall hangings, holiday throws, or even a quilted pillow cover.
Final Thoughts: Make It Your Own!
The Maple Leaf Quilt Block is a timeless treasure in the quilting world. Whether you’re making a single block or an entire quilt, this free pattern is a joy to sew and easy to personalize.
Now that you’ve completed your first block, why not keep going? Try making a whole row, a seasonal table runner, or a multi-colored wall hanging. The possibilities are endless, and this pattern is a perfect addition to your quilting library.
If you enjoyed this tutorial, explore more quilt patterns and free block ideas right here on the blog. Don’t forget to share your work on social media with hashtags like #MapleLeafQuiltBlock or #QuiltPatternLove.
Happy quilt!