
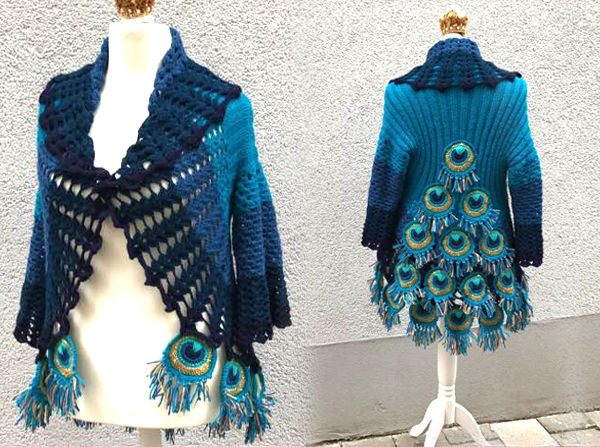
Creating your own garments through crochet is one of the most empowering and satisfying forms of handmade artistry. Among the most striking projects you can make is the Peacock Coat, a garment that blends bold colors, elegant patterns, and cozy texture into one beautiful statement piece. In this tutorial, you’ll learn how to crochet a peacock-inspired coat using vibrant tones and textured stitches.
This guide will walk you through everything you need—from selecting materials and choosing your yarn palette to following a step-by-step construction process. Even if you’ve never made a coat before, this tutorial simplifies the pattern and makes it accessible. Whether you’re looking to expand your skillset or create a unique coat for yourself or a loved one, this pattern will inspire and guide you.
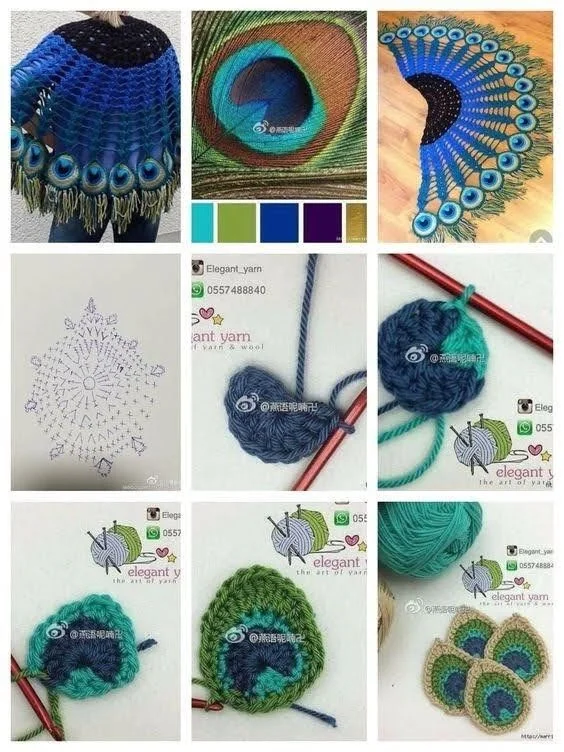
The Peacock Coat draws inspiration from the beauty of peacock feathers—featuring vivid hues of green, blue, turquoise, and gold, layered in intricate stitch work. It’s not just a crochet project; it’s a work of wearable art.
Materials You’ll Need for the Peacock Coat
Before starting your crochet journey, it’s essential to have all materials prepared. This ensures a smooth workflow and reduces the need to pause mid-project. The Peacock Coat requires more yarn than smaller projects, but it’s absolutely worth the effort.
Materials List:
- Yarn: 4 to 6 skeins of worsted weight yarn (colors: peacock blue, green, gold, black, and teal)
- Crochet hook: Size 5.0 mm (H/8) or size needed for gauge
- Scissors, stitch markers, and a tapestry needle
- Measuring tape and buttons (optional)
Worsted weight yarn offers durability, drape, and warmth—making it the perfect choice for a coat. Choosing peacock-inspired colors will help bring out the coat’s layered, feathery effect. If you prefer a more neutral version, the pattern still works beautifully with earth tones or pastels.
Make sure to test your gauge before starting. This will ensure the coat fits well and doesn’t end up too large or too tight. Most crochet patterns provide a gauge swatch, and it’s an important step for wearables.
Planning Your Coat and Understanding the Pattern
The Peacock Coat pattern is constructed in panels: two front sections, a back panel, two sleeves, and a collar. This modular method allows you to focus on one piece at a time, making it more manageable for beginners or intermediate crocheters.
You’ll work the back and front panels first, incorporating color changes for the feathered look. Once the body is complete, the sleeves are worked in the round or flat, depending on your preference. A wide collar or hood can be added last for a stylish finishing touch.
We recommend printing or downloading your crochet pattern before starting. Highlight or mark the rows where color changes occur and make notes if needed. Planning will save you time and prevent confusion during complex sections.
Step-by-Step Instructions – Back and Front Panels
The back panel serves as the foundation for the coat. Begin by chaining a base row that matches your bust measurement divided by two, with added ease. For example, chain 80–100 stitches, depending on your size and desired fit.
Work in double crochet (dc) or half double crochet (hdc) rows, alternating colors every few rows to replicate the peacock feather effect. You can also use fan stitches, puff stitches, or shell stitches to add texture and depth.
For the front panels, divide the back panel width by two and create two identical pieces. Make sure color transitions match the back panel for a cohesive design. These will be joined later along the shoulders and sides to form the coat body.
Constructing the Sleeves – Elegance in Motion
Sleeves can be worked directly into the armholes of the assembled coat or made separately and sewn in. For this coat, we recommend working in the round for a seamless finish. Begin by joining yarn to the armhole and crocheting in spiral or joined rounds.
Use single crochet (sc) or half double crochet (hdc) stitches to keep the fabric dense and warm. Decrease every few rows to taper the sleeves slightly toward the wrist. To add visual interest, alternate colors in peacock feather-inspired stripes.
You can finish the cuffs with a row of shell stitches or ribbing (front post/back post double crochet) for a snug and decorative effect. Remember to try the coat on as you go to make sure sleeve length and fit are just right.
Adding the Collar and Optional Hood
Once your panels and sleeves are assembled, it’s time to crochet the collar. Attach yarn to the neckline and work in rows of half double crochet for a flat collar, or switch to shell or fan stitches for a more dramatic look.
If you’d like to add a hood, chain a base row along the neckline (usually around 50–60 stitches), then work upward in rows. Join the top edges and fasten off. The hood can be left simple or lined with a contrasting color for flair.
Buttons or a tie-front closure can be added at this point. A peacock feather appliqué, toggle buttons, or fringe can be used to embellish your collar or hood. This is where your creativity shines—there’s no wrong way to finish your masterpiece!
Assembly and Finishing Touches
Lay all your pieces flat and use a tapestry needle to seam the sides and shoulders. Make sure your edges are aligned and secure. Seaming can be done using a whip stitch, mattress stitch, or slip stitch with a hook.
After sewing, weave in all ends with care. Trim loose yarn and make sure each seam is secure. This will ensure the durability and longevity of your coat, especially if you plan to wear it often.
Lastly, block your finished garment if needed. Lightly spray with water, lay flat, and shape it to your measurements. Let it dry naturally—this step helps set the stitches and smooth out any curling or puckering.
Styling Your Peacock Coat
Your Peacock Coat is now ready to wear! This stunning piece pairs well with jeans, boots, and solid-colored basics. The coat becomes the centerpiece of any outfit due to its bold design and texture.
Use it during transitional seasons like fall and spring, or layer it over a turtleneck in colder weather. It’s both stylish and functional, offering warmth without sacrificing elegance. Plus, it’s a great conversation starter—everyone will ask where you got it!
Don’t forget to take photos of your finished piece and share it with fellow crochet lovers. Whether you upload it to Ravelry, Pinterest, or a Facebook crochet group, your creativity deserves to be seen.
Tips for a Successful Crochet Coat Project
Always read the crochet pattern in full before beginning. Understanding the flow of the pattern will save you time and confusion. If the pattern includes stitch charts, use them as visual aids when needed.
Color planning is especially important in a peacock-themed garment. Try to arrange your yarn shades ahead of time in a feather-inspired gradient. This will keep your color transitions smooth and visually appealing.
Lastly, be patient with yourself. Garment projects take time, and mistakes happen. Keep your tension steady, measure frequently, and enjoy the process. Each stitch brings you closer to a one-of-a-kind coat you’ll be proud of.
Where to Find More Crochet Patterns Like This
If you enjoyed making the Peacock Coat, there’s a world of similar crochet patterns out there. Look for “boho crochet coats,” “festival cardigans,” or “mandala jackets” to discover more colorful, wearable art pieces.
PATTERN HERE
Crochet – Tutorial
FULL PATTERN ACCESS
You will be redirected to another site
Websites like Ravelry, Etsy, and LoveCrafts offer thousands of downloadable patterns. You can also check out YouTube tutorials or join a crochet app community to share your work and get feedback from others.
Don’t hesitate to experiment with your own designs after completing this pattern. You now have the foundation to create coats, ponchos, and wraps that reflect your style and skill. Keep exploring, and never stop crocheting.