
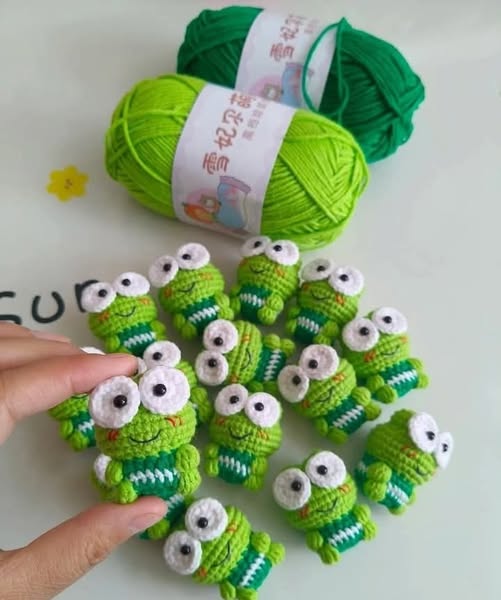
Are you a fan of adorable amigurumi and looking for your next fun and quick project? The Crochet Mini Frog – Free Pattern is a charming little amphibian that will brighten your day and make the perfect gift or desk companion. Whether you’re a beginner looking for a bite-sized project or a seasoned crocheter adding to your collection of crochet patterns, this tutorial will walk you through every stitch and detail.
In this article, we’ll explore the complete step-by-step instructions on how to make a Crochet Mini Frog, along with a detailed list of materials used. By the end of the tutorial, you’ll be ready to hop into this creative adventure with confidence!
Why Crochet Mini Projects?
Mini crochet projects, especially those like the Crochet Mini Frog, have grown in popularity for a reason. They’re quick to make, require minimal yarn, and are incredibly satisfying. They’re also ideal for using leftover yarns from other crochet projects.
Crafting small animals like frogs taps into the world of amigurumi – the Japanese art of crocheting tiny stuffed creatures. The Mini Frog stands out among crochet patterns because of its quirky charm and simple construction.
Whether you want to create keychains, small gifts, or decorations, this frog is a versatile option. Plus, it’s a great beginner-friendly project if you’re just getting into crochet.
Materials You’ll Need
Before diving into the stitches, make sure you have the following supplies ready. This list keeps it simple and budget-friendly while ensuring professional-looking results.
- Yarn: Worsted weight cotton or acrylic in green, white, black, and pink
- Hook: 2.5mm or 3.0mm crochet hook (depending on your yarn)
- Fiberfill stuffing
- Yarn needle for sewing parts together
- Scissors and optional stitch markers
Make sure to choose a high-contrast yarn color for the eyes if you want the facial features to pop. Cotton yarn provides great stitch definition, while acrylic offers softness and stretch. Either works beautifully for crochet mini projects.
Basic Stitches and Skills Required
You don’t need to be a crochet expert to make this frog! Just a few basic stitches and techniques will carry you through.
- Magic ring (also known as adjustable ring)
- Single crochet (sc)
- Increase (inc)
- Decrease (dec)
- Slip stitch (sl st)
Familiarity with working in the round is important, as most crochet patterns for amigurumi are done in spiral rounds. Stitch markers can help keep track of your rounds, especially on tiny projects like this one.
Step-by-Step: Crochet Mini Frog Body
Let’s begin with the frog’s body, which is the main part of the project. This part is worked in continuous rounds, starting from the top down.
Round 1: Make a magic ring and work 6 sc into the ring. (6)
Round 2: Inc in each stitch around. (12)
Round 3: 1 sc, inc around. (18)
Rounds 4-6: Sc in each stitch around. (18)
Round 7: 1 sc, dec around. (12)
Round 8: Sc in each stitch around. (12)
Now lightly stuff the body with fiberfill. You want it to be plump but not overstuffed. Close off the body by decreasing in each stitch and fasten off, leaving a long tail for sewing if needed. Your frog’s body is now complete!
Making the Frog’s Legs
The mini frog has four stubby little legs, and each leg is worked separately. You’ll repeat this pattern four times.
Round 1: Magic ring with 5 sc. (5)
Round 2: Sc in each stitch. (5)
Round 3: 1 sc, inc around. (8)
Round 4: Sc in each stitch. (8)
You can slightly stuff the legs or leave them unstuffed for more flexibility. Once done, sew the legs to the bottom of the frog’s body, two on each side. The legs should be evenly spaced to give your frog a balanced appearance.
Crafting the Eyes
The eyes are one of the cutest features of the Crochet Mini Frog. Each eye is made separately using white and black yarn for a cartoonish effect.
White Part (Make 2)
Round 1: Magic ring, 6 sc. (6)
Round 2: 1 sc, inc around. (9)
Black Pupil (Make 2)
Use black yarn, make a magic ring with 4 sc. Pull tight.
Sew the black pupils onto the center of the white circles. Then attach each completed eye onto the top of the frog’s head, giving them a slightly outward angle for a playful look.
Adding Final Details
Now that your frog has a body, legs, and eyes, it’s time for the finishing touches that bring it to life. Start with the mouth – a simple embroidered line or a felt smile does wonders.
You can use pink yarn to stitch a small blush on each cheek, or use a light dab of pink blush powder or fabric paint. These little features give your mini frog loads of personality.
Want to go further? Add a small crochet lily pad, or make tiny accessories like a bowtie or flower to customize your frog even more. The possibilities with crochet patterns are endless!
Tips for a Polished Finish
One way to ensure a professional-looking result is to keep your tension consistent throughout. Using the same type and brand of yarn also contributes to a cohesive design.
If your frog turns out too tight or too loose, adjust your hook size. A smaller hook makes tighter stitches, which is ideal for amigurumi so the stuffing doesn’t show through.
We also recommend weaving in ends securely and trimming closely. Neat finishing work enhances the quality and longevity of your crochet creations.
Creative Variations of the Mini Frog
Once you master the basic pattern, have fun creating different versions of the Crochet Mini Frog! Try these creative tweaks:
PATTERN HERE
Crochet – Tutorial
FULL PATTERN ACCESS
You will be redirected to another site
- Rainbow Frogs: Use colorful yarn to create vibrant frog friends.
- Prince Frog: Add a tiny golden crown made from yellow yarn or felt.
- Holiday Themes: Dress up your frog with a Santa hat, bunny ears, or a heart belly for Valentine’s Day.
Experimenting with crochet patterns like this allows you to personalize each frog for holidays, gifts, or your own collection.