
Creating your very own Whale Shark Amigurumi is a rewarding and adorable crochet adventure. Whether you’re an experienced crocheter or just diving into the world of amigurumi, this project is perfect for anyone who loves ocean-themed crafts. In this complete tutorial, we’ll guide you through every step of the process — from choosing materials to finishing the final stitch.
Using the right crochet pattern can make a huge difference in how your finished whale shark looks. In this guide, you’ll not only find a clear step-by-step tutorial but also helpful tips to make your work easier and more fun. Let’s explore how to make this majestic sea creature come to life through crochet.
With SEO-friendly keywords such as crochet and crochet pattern, this article is also perfect for bloggers, small craft businesses, or Etsy shop owners looking to attract ocean-loving customers. Let’s get started!
Materials You’ll Need
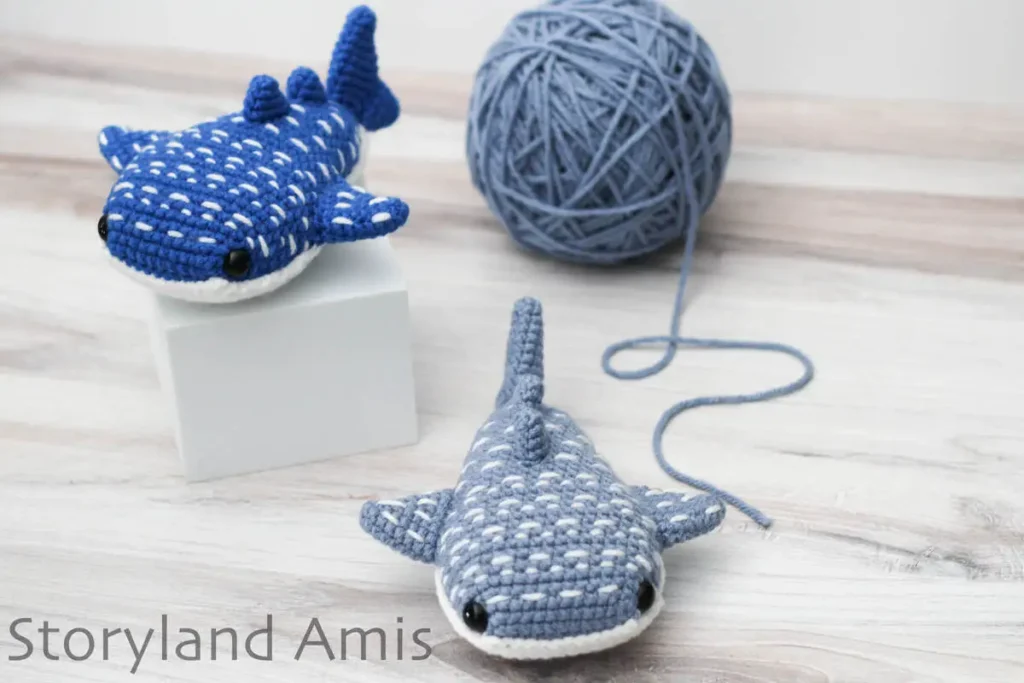
Before you start your crochet pattern, make sure you have all the necessary materials. For this Whale Shark Amigurumi, you’ll need medium-weight yarn (worsted or cotton), a 3.0 mm to 4.0 mm crochet hook, fiberfill stuffing, safety eyes, scissors, and a yarn needle. Choose yarn colors that reflect the real whale shark, such as navy blue or gray with white for the underbelly and spots.
Using high-quality yarn will make your crochet project smoother and your amigurumi look cleaner. Cotton yarn is great for amigurumi because it holds its shape well, while acrylic yarn is softer and budget-friendly. You can also use embroidery floss or scrap yarn for added details, like fins or mouth outlines.
Don’t forget the safety eyes — usually 8mm to 12mm in size — which give your whale shark a cute, expressive look. Alternatively, you can stitch the eyes with black yarn for a baby-safe version. Having everything ready before you begin will make your crafting process seamless and enjoyable.
Understanding the Crochet Pattern
A good crochet pattern should be easy to follow, even for beginners. Our Whale Shark Amigurumi pattern is worked mostly in continuous rounds using single crochet stitches. The body is crafted first, followed by the fins, tail, and detailing such as eyes and spots.
The pattern uses common abbreviations: sc (single crochet), inc (increase), dec (decrease), sl st (slip stitch), and MR (magic ring). Familiarizing yourself with these abbreviations ahead of time will help you stay on track and avoid confusion. For beginners, using stitch markers at the end of each round can also be a lifesaver.
If you’re new to amigurumi, don’t worry — this crochet project is simple enough to learn as you go. Watching YouTube tutorials or following visual guides can help you better understand shaping and stitch placement. Practice makes perfect!
Step-by-Step Guide: Whale Shark Body
Start by making a magic ring and working six single crochet stitches into it. From there, you’ll increase each round to gradually shape the whale shark’s rounded head and tapered body. The body is usually around 6–10 inches long when finished, depending on your yarn and hook size.
After you reach the widest point of the body, you’ll start decreasing stitches to shape the tail end. Make sure to stuff the body firmly but not too tight, so the shape holds without stretching the yarn. Keep adjusting the stuffing as you go to make sure it distributes evenly.
This part of the crochet pattern forms the foundation of your amigurumi. Take your time, count your stitches often, and don’t be afraid to pull back and redo a row if something looks off. Precision in this part pays off in the final result.
Adding the Fins and Tail
Whale sharks have distinct wide fins and a long tail, which give them their graceful silhouette. These parts are crocheted separately and then sewn onto the body. Each fin typically begins with a magic ring, followed by a few rounds of increasing, then flat rows to form the fin’s shape.
The tail is made using a similar method and is often split at the end to mimic the real whale shark’s tail. Be sure to position the fins symmetrically so your amigurumi looks balanced. A little pinning before sewing helps to align everything correctly.
Attaching the parts securely is just as important as making them. Use a long yarn tail and your yarn needle to sew each fin and the tail tightly onto the body. This ensures durability, especially if your crochet toy will be played with often or gifted to children.
Adding the Details – Eyes and Spots
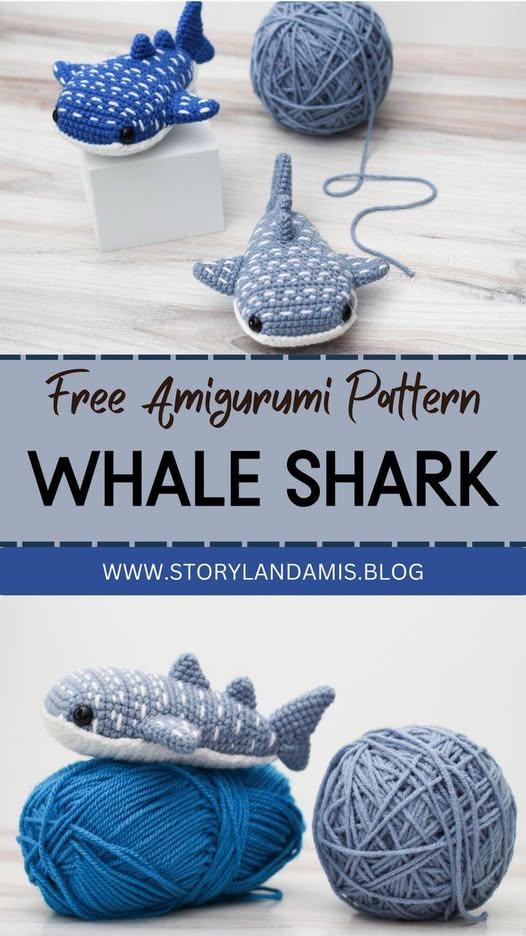
Once your whale shark is fully assembled, it’s time to bring it to life! Use safety eyes or stitch on eyes with black yarn to give your amigurumi personality. You can also add a small white yarn reflection dot to each eye for a lively effect.
The signature spots on a whale shark are what make it instantly recognizable. Use white yarn or felt circles to create tiny spots across the top of the body and fins. Stitch or glue them carefully and evenly spaced to keep the design clean and visually appealing.
This is where you can get creative and customize your crochet pattern. Maybe your whale shark has heart-shaped spots or a unique smile! The detailing stage is the perfect opportunity to add your personal touch and make your project stand out.
Finishing Touches and Assembly Tips
After everything is attached and all threads are woven in, give your whale shark a gentle shaping by pressing and adjusting the stuffed areas. If any parts seem loose, reinforce the stitches with extra sewing for durability.
You may also want to block your finished piece slightly — spray with water and let it dry to settle the yarn and create an even surface. This makes a big difference in the overall look of your finished crochet toy.
If you’re gifting or selling your whale shark amigurumi, consider adding a handmade tag or care instructions. A little packaging effort goes a long way, especially if you’re trying to build a brand using your crochet patterns.
Tips for Success with Crochet Pattern Projects
One of the best things about amigurumi is its flexibility. You can make your whale shark larger or smaller just by adjusting the yarn weight and hook size. Chunky yarn creates oversized plushies, while fine yarn makes mini versions.
Keep your tension consistent throughout the project. Uneven tension can cause parts to look mismatched or affect the stuffing distribution. Practicing the crochet pattern a few times with scrap yarn can help improve your technique before working on the final version.
Always read through the entire crochet pattern before starting. Understanding the flow of the project helps prevent mistakes and makes the process much smoother. And remember — have fun! Crocheting should always bring joy.
Show Off Your Whale Shark Amigurumi!
After all your hard work, don’t forget to take photos of your finished whale shark! Share your creation on social media using hashtags like #whalesharkamigurumi or #crochetpattern to connect with fellow crafters and gain inspiration.
Joining online crochet communities or posting in crochet groups is a great way to get feedback and make friends. You might even find tips for new crochet patterns or customers for your handmade items.
Be proud of your work. Every stitch, every detail — it all comes together in a unique, loveable crochet creation that showcases your skill and creativity. Happy crocheting!
Conclusion
Creating a Whale Shark Amigurumi Crochet – Pattern is more than just a fun project — it’s a delightful way to express your creativity and love for marine life. With just some yarn, a hook, and your imagination, you can bring this gentle giant to life.
PATTERN HERE
Crochet – Tutorial
FULL PATTERN ACCESS
You will be redirected to another site
We’ve walked through everything from materials to step-by-step instructions and added tips to make your crochet pattern a success. Now it’s your turn to dive into the craft and enjoy the process.
Whether you’re making it for yourself, as a gift, or for your shop, this project is sure to impress. So grab your hook and yarn — your adorable whale shark awaits!