
The Sunbonnet Sue block pattern is one of the most beloved and nostalgic quilt designs in the quilting world. With her recognizable bonnet and sweet, faceless profile, Sunbonnet Sue has made her way into quilts for generations. Whether you’re brand new to quilting or simply want a relaxing and rewarding project, this tutorial will walk you through how to create your very own Sunbonnet Sue quilt block. Let’s dive in!
What Is the Sunbonnet Sue Quilt Pattern?
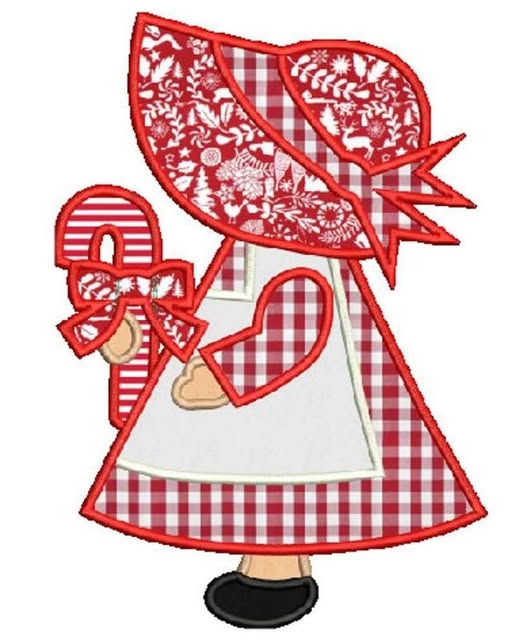
The Sunbonnet Sue quilt pattern dates back to the early 20th century and features a charming little girl dressed in a bonnet and dress. Typically done in applique, each block shows Sue in different poses or clothing styles. The pattern has become a symbol of traditional American quilting and storytelling.
Many quilters love this pattern because it allows them to express creativity through fabric choice and detail. You can dress up Sue in floral prints, plaids, or even holiday-themed fabric, making her a versatile character. The whimsical design is especially popular in baby quilts, memory quilts, and wall hangings.
Sunbonnet Sue is also a fantastic introduction to applique quilting. Since the shapes are simple and rounded, beginners find the pattern approachable. As you build your quilt block, you’ll also practice essential quilting skills like fabric tracing, fusing, and sewing clean curves.
Materials You’ll Need
Before you start creating your Sunbonnet Sue quilt block, gather the following materials to ensure a smooth crafting experience. Having everything on hand will make the process more enjoyable and efficient.
You will need:
- Background fabric (one 10″x10″ square per block)
- Scraps of colorful fabric for the dress, bonnet, and shoes
- Fusible webbing (like HeatnBond Lite or Wonder Under)
- Iron and ironing board
- Scissors or rotary cutter
- Pencil or fabric marking pen
- Sewing machine or needle for hand applique
- Thread in coordinating colors
- Quilting pins or clips
Optional items include embellishments like rickrack, lace trim, or tiny bows, which can add a personal touch to your Sunbonnet Sue. You might also want a printed Sunbonnet Sue template, which can easily be found online or drawn freehand for a more artistic take.
Step-by-Step Instructions
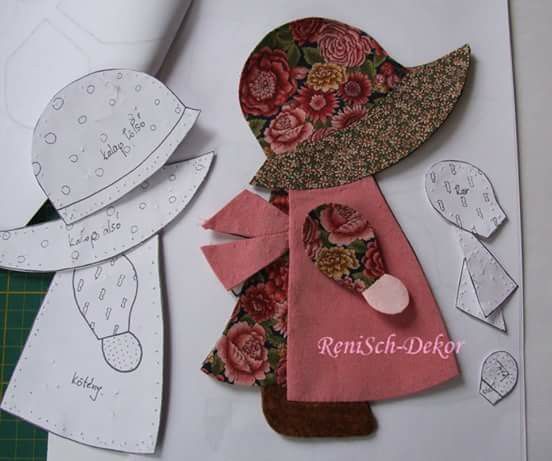
1. Prepare Your Fabric and Templates
Begin by choosing your background fabric and ironing it flat. Print or draw your Sunbonnet Sue template and cut out each shape: bonnet, dress, arm, and shoe. Trace these shapes onto the paper side of your fusible webbing. Cut them out roughly, leaving a bit of margin around each traced shape.
Iron each webbed shape onto the back of your selected fabric scraps, using the iron’s dry setting (no steam). Once cooled, cut out the fabric shapes exactly along the traced lines. Carefully peel off the paper backing to reveal the adhesive side of each shape.
2. Build and Fuse the Design
Lay your background square right side up. Position each Sunbonnet Sue shape on the fabric in the correct order: first the shoes, then the dress, arm, and finally the bonnet on top. Make sure everything is aligned and balanced. Once you’re happy with the arrangement, press with your iron according to the fusible webbing instructions to set everything in place.
Take your time here—precision pays off! You’ll start to see Sunbonnet Sue come to life. This step is especially fun for kids or groups who want to get involved in laying out the design.
3. Sew the Edges of the Applique
To make your quilt block sturdy and long-lasting, stitch around the edges of each shape. Use a tight zigzag stitch or a decorative blanket stitch for a clean finish. You can do this with a sewing machine or by hand if you prefer a traditional look.
Make sure to match your thread colors to the fabric or use a contrasting thread for a bold outline. This stitching not only secures the pieces but adds an extra visual dimension to your quilt pattern. Once all the pieces are stitched, trim the block to size if needed.
Personalizing Your Sunbonnet Sue
One of the best parts of working with the Sunbonnet Sue quilt pattern is the ability to customize her look. From seasonal outfits to themed designs, the possibilities are endless. Use Christmas prints for a holiday quilt or bright floral fabrics for a springtime look.
You can also add accessories to Sue—try adding a small basket, an umbrella, or even a tiny pet by her side. Some quilters enjoy making a series of blocks showing Sue doing different activities like gardening, baking, or reading, creating a visual story through quilting.
Don’t forget about embellishments. Lace trim on the dress, embroidered flowers, or buttons for shoes can give your block extra character. These details make your quilt not just a pattern but a personal creation filled with charm and warmth.
Finishing the Quilt Block
Once your applique is stitched down, press your block again to flatten any puckering. If you plan to make a full quilt, repeat the process to create multiple Sunbonnet Sue blocks. You can alternate them with plain blocks or coordinating patchwork squares for variety.
Join the blocks with a 1/4″ seam allowance and press the seams open or to one side. Consider adding a border around each block or sashing between rows for a clean layout. Once you’ve arranged the layout, sew your quilt top together and continue with batting, backing, and binding.
Whether you’re making a mini quilt, wall hanging, or full-size bed quilt, the finished project will carry a timeless, heartwarming look. The Sunbonnet Sue design has graced quilts for over a hundred years, and now your creation becomes part of that beautiful legacy.
Tips for Beginners
If this is your first applique quilt pattern, go slow and enjoy the process. Use sharp scissors for clean cuts and always test your stitches on scrap fabric before sewing the real block. Working with fusible webbing might take a little practice, but it’s a fantastic way to keep pieces secure before stitching.
Don’t be afraid to experiment with different stitches. A raw edge with straight stitching gives a casual, folk-art look, while satin stitches are more polished. Also, consider pre-washing your fabrics to avoid any shrinking or bleeding of colors later.
Lastly, have fun with it! Quilting is meant to be creative and relaxing. The Sunbonnet Sue block lets you explore both in a lighthearted and nostalgic way. Mistakes can become design features—and every block you make adds to your quilting journey.
Share Your Sunbonnet Sue Quilt
Now that you’ve completed your Sunbonnet Sue quilt block, why not share your work with others? Take a photo and post it on quilting forums, Instagram, or Facebook groups using hashtags like #SunbonnetSue or #QuiltPattern. You’ll find a supportive community ready to cheer you on!
You could also consider gifting your block or using it in a baby quilt, wall hanging, or decorative pillow. These handmade items bring joy and warmth wherever they go. Quilting is more than stitching fabric—it’s stitching memories, love, and creativity.
Whether you’re just starting or already on your quilting path, Sunbonnet Sue is a delightful pattern to explore. Embrace the process, personalize your blocks, and let your creativity shine. Happy quilting!