
Creating a Scrappy Flag Quilt Block is a fun and meaningful way to celebrate your love for country, tradition, and quilting. This charming block uses leftover fabric scraps to create a star-spangled design that’s full of texture and personality. Whether you’re honoring a national holiday, crafting a heartfelt gift, or simply enjoying the beauty of patchwork, this quilt pattern will guide you to a satisfying finish.
In this tutorial, you’ll learn how to make a Scrappy Flag Quilt Block step by step, using basic quilting techniques that are friendly even to beginners. We’ll cover everything you need to know — from the list of materials to detailed construction tips — so you can create a vibrant flag-inspired block that fits perfectly into your next quilt project.
Materials You’ll Need
Before diving into the cutting and stitching, gather your materials. One of the great joys of a scrappy quilt pattern is using what you already have — especially those small bits of fabric you’ve been saving for the perfect project.
- Red, white, and blue fabric scraps (cotton, varying patterns and textures for extra character)
- Rotary cutter, cutting mat, and acrylic ruler
- Sewing machine with 1/4” foot
- Iron and ironing board
- Thread (neutral or matching your scraps)
- Basic quilting tools: pins, seam ripper, fabric scissors
Feel free to play with tones and prints. The scrappier, the better! If you’re missing some colors, swap in alternatives or try tea-dyeing lighter scraps for a vintage effect. This quilt pattern is all about creativity and resourcefulness — not perfection.
Cutting Your Fabric Scraps
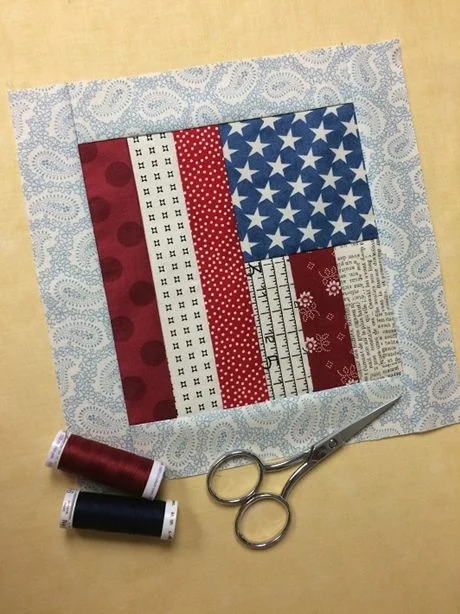
For a single block that finishes at approximately 10.5″ x 13.5″, you’ll want to cut your fabric into a mix of strips and squares. The classic flag layout includes red and white stripes with a blue square or rectangle in the upper left corner.
- Cut red and white strips measuring 1.5″ x 10.5″ — you’ll need 4 red and 3 white (or vice versa, depending on your preference).
- For the blue field, cut a square or rectangle approximately 4.5″ x 4.5″ or 5″ x 5″. This will be placed on the upper left corner.
- Optional: Cut small white stars or use a fabric print that already includes stars for the blue field.
If you’re using truly scrappy strips (uneven or different widths), simply trim everything down after sewing. The freedom in this quilt pattern lies in its flexibility. As long as you maintain the general flag proportions, you’re on the right track.
Assembling the Stripes
Now that your fabric is cut, let’s start with the stripes. Begin by laying out your red and white strips in alternating order. Starting with a red strip on top gives a traditional flag look, but feel free to customize the sequence.
Sew the strips together using a 1/4″ seam allowance, taking care to align edges as you go. Press each seam open or to one side as you add new strips to keep the block flat. Use steam for crisp, clean lines — especially helpful with scrap fabric that may be a bit wrinkled.
Once all strips are sewn together, check the overall measurement of your block. Trim the edges to make sure everything is squared up and consistent. This striped background will serve as the base for adding the blue field in the next step of the quilt pattern.
Adding the Blue Star Section
Next, it’s time to attach the blue portion that represents the star field. Take your blue square or rectangle and position it in the top left corner of your striped block. You can either appliqué it on top or piece it into the stripe layout.
If you’re piecing it in, you’ll need to separate the first few stripe sections. For example, remove the top three strips and replace part of them with the blue fabric. Stitch the blue rectangle to a few short red and white strips to complete the row, then reassemble your block.
Optional: Add small stars to the blue field using white fabric and fusible web. You can machine-stitch or hand-stitch these stars in place. Alternatively, choose a blue print that already features stars — a clever shortcut that keeps this quilt pattern quick and fun.
Pressing and Squaring the Block
After all components are sewn together, give your entire block a good press. Make sure all seams are flat and crisp. Take your ruler and check the block’s dimensions — ideally around 10.5″ x 13.5″, though this may vary based on your fabric scraps and seam accuracy.
If your edges are a little uneven, no worries — square them up carefully with your rotary cutter. This step ensures your Scrappy Flag Quilt Block will fit perfectly with other blocks if you decide to make a full quilt using this pattern.
You now have a finished block that bursts with patriotic energy and personal touch. The slight irregularities in color, shape, or texture only add to the handmade charm of this design. That’s the beauty of a scrappy quilt — it’s uniquely yours.
Customization Ideas
The Scrappy Flag Quilt Block is already special, but there are so many ways to personalize it even more. Try changing up your color palette — for example, using pinks and purples for a more whimsical take or vintage prints for an antique Americana vibe.
Consider embellishing your block with embroidery. Add hand-stitched stars, the year, a name, or a short patriotic quote. These little details can make your block even more meaningful, especially if it’s a gift or part of a commemorative quilt.
Want to go even bigger? Sew multiple flag blocks together to create a full quilt top. You can alternate them with solid blocks, sashing, or even turn them on different angles for a creative layout. There’s no wrong way to make it your own.
Wrapping It All Up
You did it! Whether you’re making just one block or creating an entire quilt full of scrappy flags, this project is a joyful mix of creativity, tradition, and storytelling. Using scraps means every piece holds a little memory — and together they wave a beautiful, handmade tribute.
Don’t forget to label your finished block or quilt. Include your name, date, and any story behind it. It’s not just a quilt pattern — it’s a piece of history, stitched by you.
We’d love to see what you create! Share your Scrappy Flag Quilt Block on social media using hashtags like #ScrappyFlagQuilt or #QuiltPatternLove and inspire others to dive into their scrap bins and start sewing. Happy quilting!