
Zipper pouch bags are the perfect beginner sewing project for anyone wanting to create something both practical and pretty. Whether you’re storing makeup, art supplies, or quilting tools, a handmade zipper pouch showcases your style and creativity. Even better, this tutorial uses quilt and quilt pattern techniques that add structure, charm, and durability to your finished bag.
In this tutorial, you’ll learn how to make a zipper pouch bag from scratch using a simple quilt pattern. We’ll walk you through every step—from choosing materials to adding the zipper and finishing touches. Let’s dive in and start quilting!
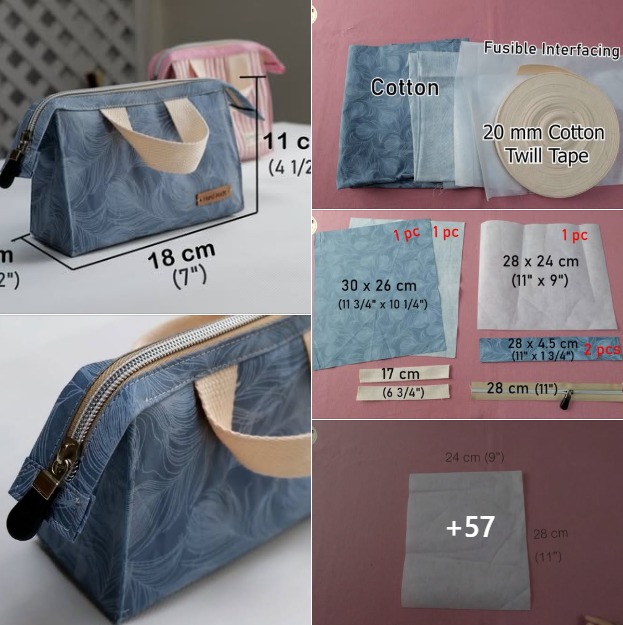
Materials You’ll Need
Before we begin, let’s gather the necessary materials. This project doesn’t require a lot of supplies, and most of them can be found in your sewing room or local craft store. It’s also a great way to use up leftover quilt fabric from previous projects.
Materials list:
- 2 fat quarters of cotton fabric (one for exterior, one for lining)
- Quilt batting (low-loft cotton or polyester)
- 1 nylon zipper (7–9 inches)
- Coordinating thread
- Quilting ruler and rotary cutter
- Scissors or pinking shears
- Pins or sewing clips
- Sewing machine with zipper foot
- Optional: iron-on interfacing for more structure
Using quilt batting and cotton fabric allows you to incorporate any quilt pattern you love. This is a fantastic opportunity to experiment with patchwork or small-scale quilting on the bag’s exterior.
Cutting and Preparing Your Pieces
Now that your materials are ready, it’s time to cut the fabric pieces. For a standard-size zipper pouch, you’ll want your fabric slightly larger than your zipper so you can trim it neatly later. If you’re using a quilt pattern, decide whether to piece together your exterior first.
Cut the following:
- (2) 9” x 6” pieces from exterior fabric
- (2) 9” x 6” pieces from lining fabric
- (2) 9” x 6” pieces of quilt batting
If you want to quilt the exterior, layer one piece of batting with one piece of exterior fabric (wrong side down on the batting) and stitch in straight lines or diagonals—whatever quilt pattern you like. Repeat this for the second exterior panel. You’ve now created a quilted base that will add dimension and strength to your zipper pouch.
Installing the Zipper
Don’t worry—zippers may seem intimidating, but they’re much easier than they look. With a few simple steps, you’ll have yours installed perfectly.
First, place one quilted exterior piece right side up. Lay your zipper on top of it, teeth down, with the zipper pull on the left. Then, place your lining fabric right side down, sandwiching the zipper. Clip or pin in place, and sew with your zipper foot close to the teeth.
Once done, fold both fabrics back so the zipper is exposed and press with an iron. Topstitch along the edge for a neat, professional look. Repeat the process for the other side of the zipper with your remaining quilted exterior and lining pieces. When you’re finished, you should have a neat zipper running across the middle, with quilted and lining fabric on both sides.
Sewing the Pouch Together
With the zipper installed, it’s time to construct the pouch. Unzip the zipper halfway—this step is crucial so you can turn the pouch right side out later. Match the two quilted exterior pieces right sides together, and do the same with the two lining pieces.
Pin or clip all around the edges, aligning seams near the zipper. Sew around the entire pouch with a ¼” seam allowance, leaving a 3” gap at the bottom of the lining for turning. Clip corners to reduce bulk, but don’t cut through the stitching.
If you’d like to create boxed corners for a flat bottom, pinch each bottom corner and sew a straight line 1” from the point. Trim off the excess. Repeat on both lining and exterior. These corners give your zipper pouch a more polished, professional shape.
Turning and Finishing the Bag
Turn your pouch right side out through the gap in the lining. Carefully poke out the corners with a blunt tool like a chopstick or the end of a pencil. Once fully turned, tuck in the raw edges of the lining gap and sew it closed with a straight stitch, either by machine or by hand.
Push the lining back inside the pouch and give the whole bag a good press with your iron. Zip it up—and just like that, your quilted zipper pouch is finished!
This simple design can be made over and over again with different quilt patterns, fabric combinations, and zipper colors. The quilted exterior adds both texture and charm, making it feel like a special handmade gift or accessory.
Customization Ideas
One of the best things about this project is how customizable it is. Use your creativity and try different quilt patterns and colors to match your style or the season.
You can personalize your pouch by:
- Using patchwork or log cabin quilt blocks on the exterior
- Adding embroidery or applique to the front panel
- Using bold or novelty zippers for a fun pop of contrast
- Creating a handle or wrist strap on one end
- Adding decorative quilting stitches in bright thread
If you’re feeling adventurous, try making a set of three pouches in small, medium, and large sizes with matching quilt patterns. They make perfect travel companions or gifts for friends and family.
Why Quilters Love Zipper Pouches
This project is especially beloved by quilters because it lets you showcase mini quilt patterns in a practical way. Instead of storing your patchwork in a drawer, you’re turning it into something useful. Every time you zip open your bag, you’re reminded of the joy of quilting.
Whether you use traditional quilt blocks like Flying Geese, Nine Patch, or something modern and abstract, your pouch becomes a canvas for your quilting passion. Plus, they’re quick to make—ideal for using up scraps or testing out new quilt patterns before committing to a full-size quilt.
Quilters also love sharing these creations in quilt groups and on social media. It’s a great way to inspire others while celebrating your own creative growth.
Share Your Quilt Pouch with the World!
Now that you’ve completed your zipper pouch, it’s time to show it off! Take a photo of your finished pouch and share it in your favorite quilting group or on social media with hashtags like #quiltpouch or #quiltedbag.
If you’ve used a favorite quilt pattern or came up with your own design, mention that too—it helps others get inspired and build community. You could even start a mini swap with other quilters and trade handmade pouches around the world.
There’s no limit to how many quilted pouches you can make. Each one is an opportunity to try a new quilt pattern, express your creativity, and create something beautiful and functional. So grab your fabric, fire up your sewing machine, and let the quilt journey continue—one zipper pouch at a time!