
If you’re looking for a practical, beginner-friendly quilting project that brings charm and function to your kitchen, you’re going to love this one! A fabric baking tray holder (also known as a tray cozy or oven tray carrier) is a beautiful, handmade solution to protect your hands and surfaces from hot dishes. It’s an ideal way to use your favorite fabrics, practice a quilt pattern, and create something that’s both decorative and useful.
In this tutorial, we’ll walk you through every step of making your very own quilted fabric tray holder. This project is accessible even if you’re new to quilting and requires only basic sewing skills. Let’s dive in!
Why Make a Fabric Baking Tray Holder?
If you’re someone who enjoys baking or often brings hot dishes to family gatherings, a fabric tray holder is a must-have. It’s designed to hold and insulate baking trays, protecting your hands and tabletops from heat. Unlike traditional pot holders, it fits perfectly around rectangular or square pans and looks far more elegant.
It’s also a great opportunity to experiment with quilt techniques on a small scale. You can use leftover fabric scraps, test out a new quilt pattern, or simply have fun with colors and prints that match your kitchen décor.
Most importantly, it’s a satisfying project that can be completed in an afternoon. Whether you’re sewing one for yourself, gifting to a baking enthusiast, or creating a whole set, this tray holder will quickly become a kitchen essential.
Materials You’ll Need
Here’s a list of materials to gather before you start:
- 2 pieces of cotton fabric (for the outer and lining): 15” x 20”
- 1 piece of insulated batting (like Insul-Bright): 15” x 20”
- 1 piece of cotton batting (for quilting texture): 15” x 20”
- Coordinating thread
- Pins or clips
- Sewing machine
- Rotary cutter and cutting mat
- Fabric scissors
- Iron and ironing board
- Bias tape (optional, for binding)
- Marking tool or chalk
Optional but fun:
- A printed quilt pattern
- Embellishments such as appliqué, embroidery, or custom stitching designs
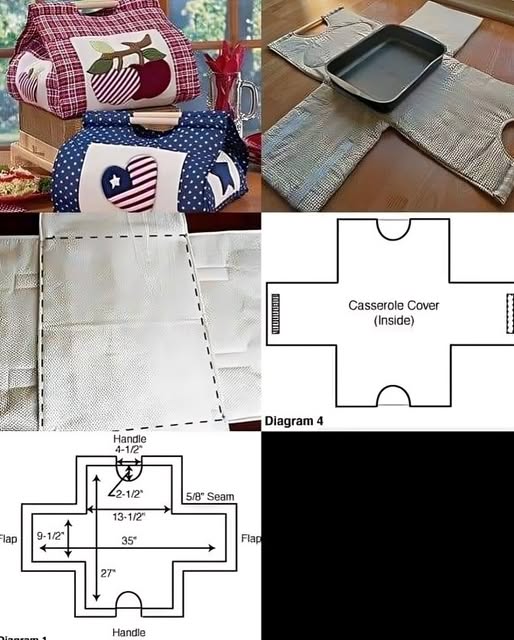
Preparing the Fabric and Batting
To begin, layer your materials in a quilt sandwich. First, place your lining fabric right side down. Next, layer the cotton batting, then the insulated batting, and finally your outer fabric, right side up. This layered setup ensures both heat protection and the classic quilted texture.
Secure the layers together with safety pins or quilting clips. Now’s the perfect time to draw a quilt pattern on your fabric. You could go with diagonal lines, grids, or even a diamond shape pattern. This will not only add a decorative touch but also hold all the layers together effectively.
Press the entire sandwich with a warm iron to flatten the layers. This helps make the quilting step easier and gives you a smooth working surface.
Quilting the Layers
Using your sewing machine, stitch along the lines of your quilt pattern. If you’re a beginner, start with basic straight lines spaced evenly—say, 2 inches apart. If you feel more confident, try cross-hatching or echo quilting. Either way, your goal is to keep the layers together while adding a beautiful quilted effect.
Take your time during this step. Quilting is what gives your fabric tray holder that cozy, padded look. It also reinforces the structure, making it more durable for hot dishes and regular kitchen use.
Once the quilting is complete, trim any uneven edges and ensure your piece is a neat rectangle. This makes the following steps smoother and ensures a professional finish.
Shaping the Corners and Finishing the Edges
To allow your tray holder to form a shallow box shape around your baking dish, you’ll box the corners. Fold the rectangle in half lengthwise and widthwise to find the center. Mark each corner 2.5” in from each edge to form a small square. Cut out each of the four corner squares.
Once you’ve cut the corners, fold the raw edges of one corner together to form a straight line (right sides facing) and stitch with a 1/4” seam. Repeat for all four corners. When turned right side out, the fabric tray holder will resemble a shallow fabric box—just the right size to cradle your baking tray!
If you’d like to give your edges a more finished look, you can bind the top edge using bias tape. Simply fold the tape over the raw edge and sew it in place. Binding adds a polished touch and strengthens the edge for long-term use.
Personalization Ideas
Now comes the fun part—making your fabric tray holder your own! Choose fabric that matches your kitchen theme or the occasion you’ll be baking for. Holiday prints, floral patterns, modern solids—anything goes!
Try using different quilt patterns for each holder you make. A log cabin block, chevron stripes, or classic squares can all look fantastic. You can also personalize your holder with custom embroidery, monograms, or themed appliqué—like cupcakes, utensils, or even your favorite quote.
You might even consider making a matching set with oven mitts, potholders, or table runners using the same fabrics and quilt motifs. These make excellent gift sets for weddings, housewarmings, or birthdays.
Care Tips and Use
Your quilted fabric baking tray holder is machine washable—just use gentle detergent and cold water. Hang to dry or tumble dry on low heat to preserve the batting. If needed, you can press it with a warm iron to keep it looking neat and crisp.
To use, simply place your baking tray inside the cozy right after removing it from the oven. The holder will insulate the bottom and sides, protecting your table or countertop. Just remember, it’s still important to use oven mitts when handling extremely hot trays, especially if you didn’t include extra hand grips.
This project is not only functional but also adds warmth and a homemade touch to any kitchen or dining table.
Share Your Quilt Creations!
Now that you’ve completed your beautiful, functional quilted fabric baking tray holder, it’s time to show it off! Don’t keep your creativity hidden—share photos of your project with your quilting group, on social media, or in your favorite DIY forums.
Use hashtags like #QuiltedKitchen, #TrayHolderDIY, and #QuiltPatternProject to connect with other makers. Your unique take on this project could inspire others to try quilting or personalize their kitchens with fabric creations.
Whether you make one or a dozen, this project is a wonderful way to bring the art of quilting into daily life. Happy quilting—and happy baking!