
If you’re on the lookout for a fun and beginner-friendly quilt pattern that bursts with personality and style, the Square Burst Quilt Block by Stephanie Sliwinski is a delightful choice. This block is full of visual movement, blending traditional quilt construction with a modern twist. It’s an excellent project whether you’re piecing together a full-size quilt or just trying out a new block for a sampler.
This tutorial will walk you through everything you need to know to create the Square Burst Quilt Block—from materials to step-by-step instructions. Even if you’re new to quilting, this guide is written with clarity and encouragement to help you feel confident at your sewing machine. We’ll also share ideas for customizing your quilt to suit your unique taste and design preferences.
By the end of this tutorial, you’ll have a vibrant quilt block that looks complex but is deceptively simple to make. So gather your fabrics, warm up your iron, and let’s get started on this exciting quilt journey!
Materials You Will Need
Before diving into the steps, it’s important to gather all the supplies you’ll need for this quilt pattern. The Square Burst Quilt Block doesn’t require a lot of fabric, making it perfect for using up those beautiful scraps or fat quarters in your stash.
Here’s a basic materials list:
- Fabric in 3-4 contrasting colors (scraps, fat quarters, or yardage)
- Rotary cutter and cutting mat
- Quilting ruler (6.5” square or larger is ideal)
- Sewing machine with a ¼” presser foot
- Coordinating thread
- Iron and pressing surface
- Pins or fabric clips
Make sure to pre-wash your fabrics if you’re mixing fabric types or using vibrant colors. Press them well before cutting to ensure precision and reduce stretching or distortion as you sew your quilt blocks together.
If you’re planning on making multiple blocks to turn into a full quilt, multiply the materials accordingly. This block finishes at 12.5” square, making it versatile for combining into larger layouts.
Cutting the Fabric
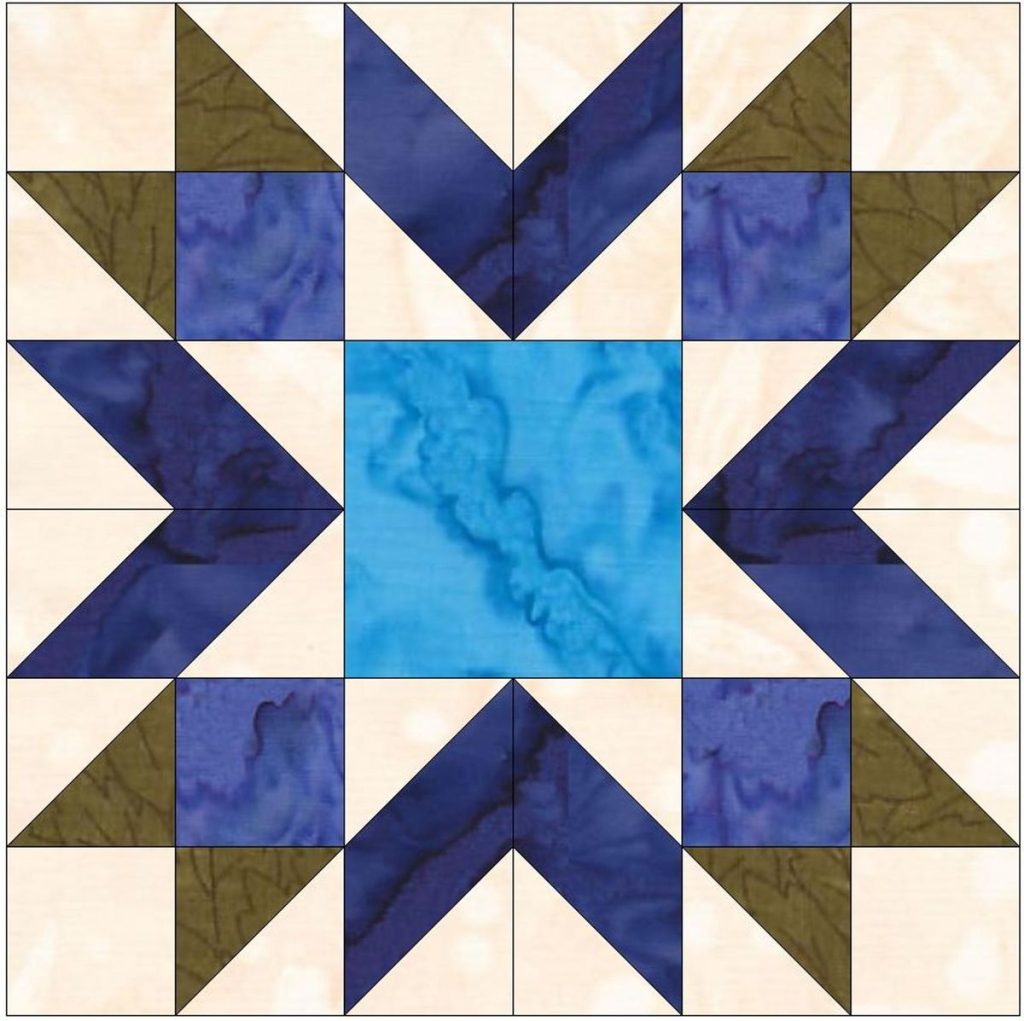
To create the signature “burst” look of the Square Burst Quilt Block, you’ll need a combination of squares and rectangles in different sizes. Below is a sample cutting plan for one block using four fabrics: A (center), B (inner burst), C (outer burst), and D (background).
Cutting instructions for one 12.5″ block:
- Fabric A: (1) 2.5″ x 2.5″ square (center)
- Fabric B: (4) 2.5″ x 2.5″ squares
- Fabric C: (4) 4.5″ x 2.5″ rectangles
- Fabric D (background): (4) 4.5″ x 2.5″ rectangles and (4) 6.5″ x 2.5″ rectangles
It’s helpful to label your pieces with sticky notes or fabric markers to stay organized. Accurate cutting is essential in quilting, so take your time measuring and use your ruler and rotary cutter to get clean, straight edges.
This block comes together in rings—starting from the center square and working your way outward with surrounding frames. Think of it like building concentric squares that expand the pattern.
Assembling the Center Burst
Now it’s time to sew! Start by piecing the central square and its first border. This center burst sets the tone for the rest of the block, so keep your seams accurate and consistent.
- Sew Fabric B pieces to each side of the Fabric A center square. Use a ¼” seam allowance and press seams outward. You’ll now have a small square unit made of five pieces.
- Attach the longer rectangles from Fabric C to the top and bottom of your square unit. Then sew the remaining Fabric C pieces to the left and right sides, framing the center with a second burst.
- Press all seams open or to one side, based on your personal preference or pattern requirements. A flat block is easier to join later and reduces bulk.
At this point, your block should resemble a small window, with the central fabric drawing attention and the first two color rings creating visual impact. This is where the “burst” starts to come to life in the quilt pattern.
Adding the Outer Frame
The final layer of the Square Burst Quilt Block involves sewing the outer frame using the background fabric (Fabric D). This balances the design and gives the block its signature size.
- Sew the 4.5″ rectangles from Fabric D to the top and bottom of your current square. Press seams as you go.
- Next, sew the 6.5″ rectangles to the sides. These longer strips will finish the framing and square up your block to the proper size.
- After pressing your block thoroughly, trim it to 12.5″ square using a ruler and rotary cutter. This ensures your blocks will fit together perfectly in your final quilt layout.
Congratulations—you’ve completed the Square Burst Quilt Block! It’s crisp, clean, and ready to be part of a larger project or stand alone in a mini quilt.
Customization Ideas
The Square Burst Quilt Block is extremely adaptable and offers plenty of room for creative expression. Whether you prefer a modern aesthetic or something more vintage, this quilt pattern can reflect your unique style.
Try playing with monochromatic color schemes for a sleek, minimal look, or go bold with rainbow fabrics to make a vibrant statement piece. Reversing the color placement or alternating fabric choices in each block adds depth and texture to your overall quilt.
You can also experiment with fussy cutting the center square—choosing a fabric print that features a specific motif, like a flower or animal, can give each block its own personality. Use metallic threads, hand-stitching, or sashiko accents for even more individuality.
Turning Blocks into a Quilt
If you’re making more than one Square Burst block, the options are endless for assembling them into a complete quilt. The repeating motif creates a beautiful geometric rhythm, and sashing or alternating backgrounds can give the design variety.
Here are a few layout suggestions:
- Straight Set: Arrange all blocks in rows and columns with no sashing for a clean, grid-like appearance.
- Sashed Layout: Add 2” strips between blocks to highlight each burst individually.
- On-Point: Rotate each block 45 degrees and use setting triangles to form a diagonal layout.
For a throw quilt, consider making 20 blocks in a 4×5 layout. Add a border around the quilt to frame the design and increase the size. Finish with your preferred batting, backing, and binding method.
Final Thoughts and Invitation
Quilting is more than just fabric and thread—it’s storytelling, relaxation, and joy stitched into every block. The Square Burst Quilt Block by Stephanie Sliwinski is a rewarding project for beginners and seasoned quilters alike. Its bold design, straightforward construction, and endless customization possibilities make it a valuable addition to your quilting repertoire.
We hope this tutorial has inspired you to pick up your rotary cutter and try something new. Whether you make one block or twenty, the important thing is to enjoy the process and express your creativity through every stitch.
Have you made the Square Burst Quilt Block? Share your creation on social media with the hashtag #SquareBurstQuiltBlock and tag your favorite quilting community. We can’t wait to see what beautiful quilts you bring to life!