
The Chandelier Quilt Pattern is a stunning design that adds elegance and charm to any space. Its geometric layout mimics the glimmer of a chandelier, and while it looks intricate, it’s surprisingly easy to make. Whether you’re a quilting newbie or a seasoned stitcher looking for a satisfying weekend project, this tutorial will walk you through everything from fabric selection to the final stitch.
In this beginner-friendly guide, you’ll find a comprehensive step-by-step tutorial, a list of essential materials, creative ideas for personalizing your quilt, and a cheerful invitation to share your creation with others. Let’s dive into the sparkle of this beautiful quilt pattern together!
What is the Chandelier Quilt Pattern?
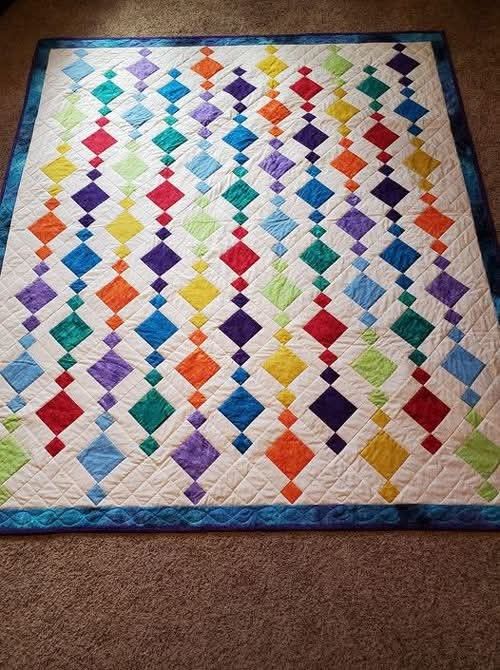
The Chandelier Quilt Pattern is known for its cascading diamond shapes that resemble a crystal chandelier’s gentle drape. It’s made up of repeating blocks that create a flowing, connected look when sewn together. The balance of negative space and structured shapes gives this quilt a modern feel, even when made with traditional fabrics.
This quilt pattern is perfect for showcasing fabric collections or scrap bins. Each block offers a chance to highlight beautiful prints while maintaining a cohesive overall design. It’s a popular choice for beginners due to its simple construction and visually impressive results.
Whether you’re making a lap quilt, a bed topper, or a wall hanging, the chandelier layout brings a sense of movement and grace to the finished piece. This makes it not just a quilt, but a piece of textile art you’ll be proud to display or gift.
Materials You’ll Need
Before we begin the tutorial, let’s gather everything you’ll need for your Chandelier Quilt. You don’t need fancy tools—just some basic quilting supplies and a bit of time and creativity.
Here’s your shopping list:
- Fabric:
- 1 charm pack (5” squares) or 42 precut 5″ squares
- 1¼ yards of background fabric (solid or low-volume print)
- ½ yard for cornerstones or inner blocks
- ½ yard for binding
- 3½ yards for backing
- Batting: Crib-size or twin-size batting, depending on final dimensions
- Tools:
- Rotary cutter and cutting mat
- Quilting ruler (6.5” square and long 6×24” ruler recommended)
- Sewing machine with ¼” foot
- Thread, pins, and iron
If you’re new to quilting, don’t worry—this quilt pattern doesn’t require specialty rulers or complex piecing. Just follow the step-by-step instructions below and you’ll be quilting with confidence.
Step-by-Step Tutorial
Step 1: Cutting Your Fabrics
Start by cutting your charm squares into 5” squares if you’re using yardage. From your background fabric, cut 3” x 5” rectangles (you’ll need 42 of them) and 1½” squares for sashing and block connections. From the cornerstone fabric, cut 1½” squares. Finally, cut border strips if you want a finished edge around your quilt.
Step 2: Assembling the Blocks
Each chandelier block uses one charm square and one background rectangle. Sew the rectangle to the bottom of the charm square, right sides together, with a ¼” seam. Press the seam open or to the darker side. Repeat until all 42 blocks are assembled. Layout your blocks in rows of 6 across and 7 down (or adjust to your desired size).
Step 3: Adding Sashing and Cornerstones
To create the chandelier effect, you’ll add 1½” strips of background fabric between each block. Place a 1½” cornerstone square at the intersections. Sew the blocks into rows, adding vertical sashing between them. Then join the rows with horizontal sashing and cornerstones. This step pulls the entire quilt pattern together and gives it the chandelier flow.
Quilting and Binding Your Chandelier Quilt
Step 4: Preparing the Quilt Sandwich
Lay out your quilt backing (right side down), batting, and quilt top (right side up) to create your quilt sandwich. Smooth out any wrinkles and baste with pins or spray adhesive.
Step 5: Quilting the Layers
You can quilt the layers together with straight-line quilting using your regular sewing machine. Stitch in the ditch along the sashing lines or echo the chandelier shapes with diagonal lines. If you’re feeling adventurous, free-motion quilting can add texture and elegance.
Step 6: Binding the Edges
Cut your binding fabric into 2½” strips, join them into one long strip, and press in half lengthwise. Attach the binding to the front of the quilt using a ¼” seam, then fold it over to the back and stitch it down by hand or machine. Now your quilt is ready to dazzle!
Personalizing Your Chandelier Quilt
One of the joys of quilting is making a project uniquely yours. With the Chandelier Quilt Pattern, there are many ways to customize the look and feel of your quilt to suit your taste or the recipient’s style.
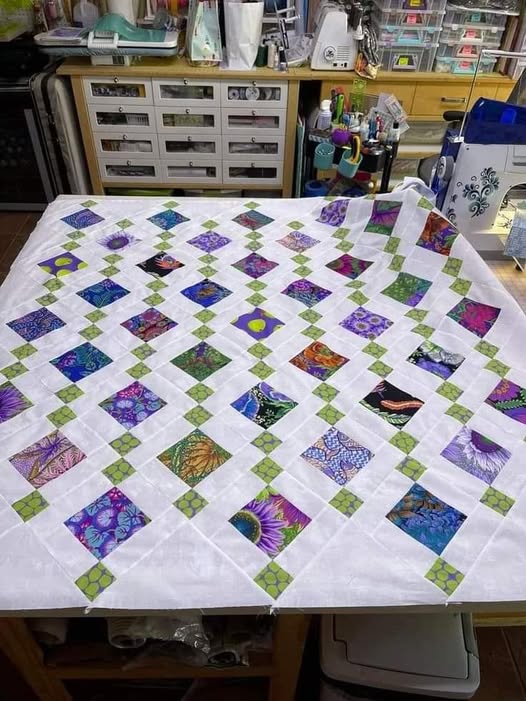
You could choose a bold, high-contrast palette with dark background and bright prints for a modern twist, or go soft and romantic with pastels and florals. Switching the color of your sashing or adding borders in a vibrant print can drastically change the overall vibe of the quilt.
Consider using novelty prints or themed fabrics for baby quilts, holidays, or special gifts. You can even make each block from scraps for a truly one-of-a-kind look. With this quilt pattern, creativity is not only welcome—it’s encouraged!
Tips for Beginners
If you’re new to quilting, here are a few helpful tips to make your first Chandelier Quilt a success:
- Chain piece your blocks: Sew all your block pieces in one go to save time and maintain consistency.
- Press as you go: Ironing seams after each step makes your blocks lay flat and align more precisely.
- Measure twice, cut once: Accurate cutting is the secret to quilt blocks lining up perfectly.
Most importantly, don’t stress over imperfections. Quilting is about the joy of creating something beautiful with your hands. Every quilt tells a story, and yours starts with this radiant quilt pattern.
Share Your Sparkling Creation!
Now that you’ve completed your Chandelier Quilt, it’s time to show it off! Whether you gift it, keep it, or hang it up proudly, don’t forget to share your finished project online or with your local quilting group.
You can post photos on Instagram or Pinterest using tags like #ChandelierQuilt or #QuiltPattern to connect with fellow quilters and inspire others. If you followed this tutorial, we’d love to see how it turned out—every version is a masterpiece in its own right.
Happy quilting, and may your next project shine just as bright!