
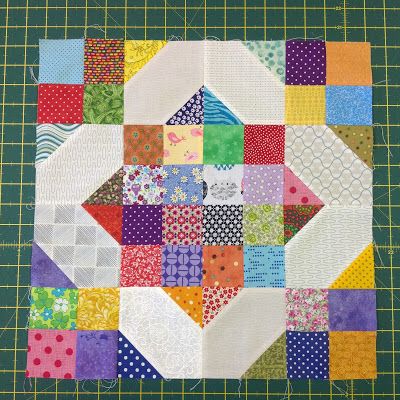
If you’re new to quilting or just looking for a classic, charming project to add to your collection, the Arkansas Crossroads quilt pattern is a perfect place to start. This traditional design combines simplicity and elegance, allowing quilters of all skill levels to create a stunning piece. With its balanced grid of squares and X-shaped intersections, this quilt is both eye-catching and straightforward to construct.
In this tutorial, you’ll find everything you need to get started—from a full list of materials to step-by-step instructions, creative customization tips, and inspiration to make it your own. Whether you’re crafting a throw for your couch, a gift for a loved one, or simply exploring the world of quilts, this pattern is a timeless treasure you’ll enjoy stitching together.
Let’s dive into the beauty of the Arkansas Crossroads quilt pattern and discover how easy and rewarding it is to bring it to life with fabric and imagination.
Materials You’ll Need
Before you begin cutting and stitching, make sure you have everything prepared. Having your materials organized will make the quilting process much smoother and more enjoyable. For the Arkansas Crossroads quilt, you’ll mostly work with two contrasting fabrics to emphasize the “crossroads” effect.
Here’s a basic materials list for a lap-size quilt (approximately 60″ x 72″):
- 1½ yards of Fabric A (solid or print for the “X” blocks)
- 1½ yards of Fabric B (solid or print for the background)
- ½ yard of binding fabric
- 3½ yards of backing fabric
- Batting to fit your finished quilt size
- Rotary cutter, ruler, and cutting mat
- Iron and ironing board
- Sewing machine with ¼” foot
- Thread (coordinating or contrasting, based on your preference)
- Pins or clips
When choosing fabrics, go for bold contrasts if you want your crossroads to really pop. Solids work beautifully, but don’t be afraid to experiment with prints, florals, or batiks to give your quilt a unique look.
Cutting Instructions
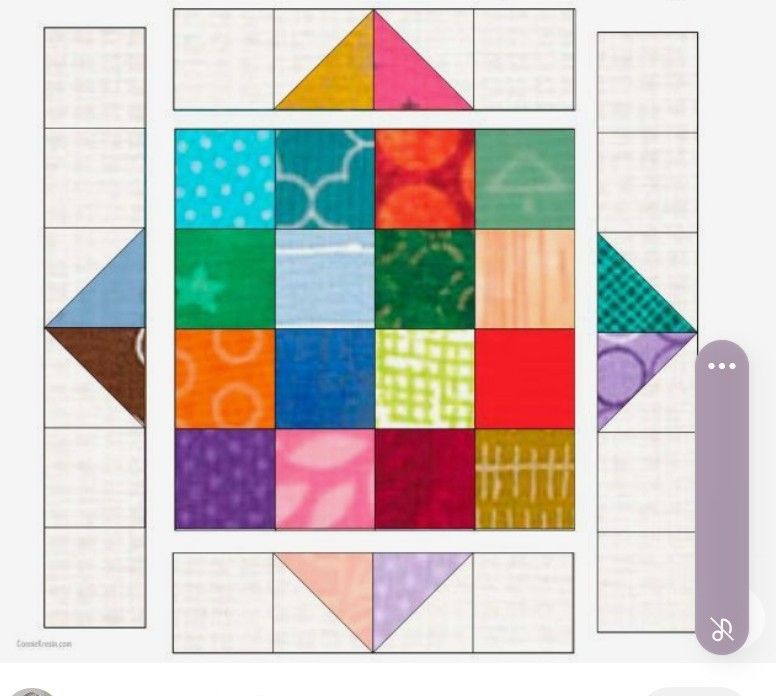
The Arkansas Crossroads quilt pattern is composed of alternating 4-patch blocks and “X” blocks. You’ll be cutting several 2½” squares to construct both block types. Precision in cutting is key to achieving crisp intersections and straight lines.
For each block unit, cut the following:
- (2) 2½” x 2½” squares from Fabric A
- (2) 2½” x 2½” squares from Fabric B (for 4-patch blocks)
- (4) 2½” x 2½” squares from Fabric A
- (1) 4½” x 4½” square from Fabric B (for X blocks)
Repeat this cutting process until you have enough pieces to make the full quilt top. For a 6-block by 8-block layout (48 blocks total), you’ll need 24 of each block style. Don’t forget to cut a few extra squares in case of mistakes or trimming adjustments.
Once your pieces are cut, arrange them into neat stacks. Label your blocks with sticky notes or keep them separated in small trays. A little organization upfront saves time and stress later in the process.
Piecing the 4-Patch Blocks
The 4-patch blocks are quick and satisfying to assemble. These alternate with the “X” blocks to form the grid of the Arkansas Crossroads quilt. They consist of two squares of Fabric A and two squares of Fabric B sewn together in a checkerboard layout.
Start by sewing two squares together, one Fabric A and one Fabric B, using a ¼” seam allowance. Press the seams to the darker fabric. Repeat for the second pair of squares. Then, join the two units together, making sure the colors alternate diagonally.
Press the finished 4-patch block flat. Each finished block should measure 4½” square. Make all 24 of these blocks, or as many as your design requires. This step is a great time to practice consistency in seam allowance, which will help with alignment later.
If you’re working with scrappy fabrics, mix and match colors to create a playful and vibrant look. The 4-patch is incredibly versatile and forgiving, making it ideal for beginners who want to experiment with fabric combinations.
Creating the “X” Blocks
The “X” blocks are what give the Arkansas Crossroads quilt pattern its name. These blocks feature a larger center square (Fabric B) with smaller Fabric A squares at each corner to form an “X” when joined together with other blocks.
To make an “X” block, take the 4½” Fabric B square and the four 2½” Fabric A squares. Place one Fabric A square in each corner of the larger square, right sides together, and sew diagonally from corner to corner across the small square.
Trim ¼” away from the stitched line, press open the corner triangles, and repeat on all four corners. This snowball technique creates the angled look of the X. Once completed, the block should also measure 4½” square, like the 4-patch blocks.
Construct 24 of these “X” blocks. Keep your seams sharp and your points aligned for the best visual effect. When combined with the 4-patch blocks, these units form a clean, interlocking pattern that truly stands out.
Assembling the Quilt Top
Now that all your blocks are complete, it’s time to lay out your quilt top. Alternate the 4-patch and X blocks in a grid pattern, starting with a 4-patch in the top-left corner. The finished layout should have rows that go: 4-patch, X, 4-patch, X, and so on.
Join the blocks into rows using a ¼” seam allowance. Once all your rows are assembled, press the seams in alternating directions for each row. This will help your intersections nest neatly when you join the rows together.
Next, sew the rows together, one at a time, taking care to match up the seams where blocks meet. After all the rows are sewn together, press the entire quilt top thoroughly. At this point, your Arkansas Crossroads quilt top is complete and ready for layering.
This is a wonderful moment to step back and admire your work. Seeing the classic pattern come together block by block is deeply satisfying, especially when each intersection aligns cleanly and every “X” stands out clearly.
Quilting and Binding
Once your quilt top is done, you’re ready to make the quilt sandwich. Layer your quilt backing (right side down), batting, and quilt top (right side up), smoothing each layer to remove any wrinkles.
Use safety pins, basting spray, or thread basting to hold the layers together. Quilt as desired—straight-line quilting along the seams works beautifully and is beginner-friendly. If you’re feeling adventurous, free-motion quilting in a contrasting thread can add artistic flair.
After quilting, trim the edges to square the quilt. Prepare your binding strips by cutting 2½” wide strips from your binding fabric. Sew the strips end to end, fold in half lengthwise, and attach to the quilt’s edge using a ¼” seam. Fold over and hand-stitch or machine-stitch to the back to finish.
With the binding in place, give your quilt one last press. Now it’s truly complete—your Arkansas Crossroads quilt is ready to be enjoyed, gifted, or proudly displayed.
Customization and Creative Ideas
The beauty of the Arkansas Crossroads quilt pattern lies in its adaptability. Try switching up the fabrics—use patriotic colors for a Fourth of July theme, or soft pastels for a baby quilt. You can even create a rainbow effect by assigning each row a different color.
If you have fabric scraps left over from other projects, this pattern is a great way to use them up. Each 4-patch block and X block can feature different prints for a scrappy, eclectic vibe that’s full of personality.
For an extra twist, add a border around the quilt or incorporate sashing between blocks to make the pattern stand out more. Embellish with embroidery or applique to give your quilt a personal touch that makes it truly one of a kind.
Share Your Quilt Project
Congratulations on completing your Arkansas Crossroads quilt! Whether this was your very first quilt or one of many, you’ve created something meaningful and beautiful. This classic quilt pattern is a celebration of tradition and creativity—and you brought it to life.
We’d love to see your finished project! Share your quilt on social media using hashtags like #ArkansasCrossroadsQuilt and #QuiltPattern to inspire others. Join quilting groups online or participate in quilt shows to connect with fellow quilters.
Keep quilting, keep learning, and most of all, enjoy every stitch of the journey. The world of quilts is vast and wonderful, and this is just the beginning!