
The Double Windmill quilt block is a striking and energetic design that brings motion and symmetry to any quilt project. With its bold angles and rotating shapes, it adds visual interest and can be customized in countless ways. Whether you’re creating a full quilt or adding a standout feature to a patchwork piece, this block is a fun challenge with satisfying results.
Perfect for both beginners and experienced quilters, the Double Windmill pattern is constructed using half-square triangles (HSTs) and squares. It may look intricate at first glance, but the steps are simple and straightforward. Once you master this block, you’ll want to include it in everything from wall hangings to tote bags.
In this tutorial, we’ll walk you through the entire process—from selecting fabrics and cutting your pieces to assembling the block and exploring creative customization ideas. The tone is light, beginner-friendly, and focused on making quilting fun and approachable. Let’s get started on this gorgeous quilt pattern!
Materials You’ll Need
Before diving into the step-by-step instructions, make sure you have the right materials on hand. You can use fabrics from your stash, scraps from past projects, or purchase new prints that coordinate well. The Double Windmill block works beautifully with both bold prints and subtle solids.
Here’s what you’ll need to create one 12.5″ x 12.5″ unfinished block (which becomes 12″ x 12″ finished in a quilt):
- 2 contrasting fabric colors (Fabric A and Fabric B) – fat quarters or scraps
- Rotary cutter and cutting mat
- Quilting ruler
- Pencil or fabric marker
- Sewing machine and thread
- Iron and ironing board
- Optional: starch or pressing spray for crisp seams
If you’re planning to make a full quilt, consider repeating the Double Windmill block across multiple rows or alternating it with simpler quilt blocks for balance.
Cutting Your Fabric Pieces
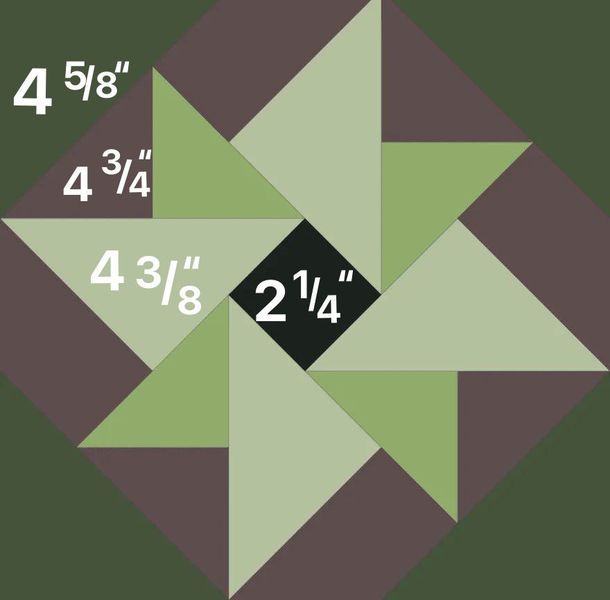
Accurate cutting is essential for the Double Windmill quilt pattern to align perfectly. Below are the cutting instructions for one 12.5″ block. You’ll be creating eight HSTs and four solid squares to build the block’s pinwheel-style structure.
From Fabric A:
- Cut 2 squares at 5″ x 5″
- Cut 2 squares at 4.5″ x 4.5″
From Fabric B:
- Cut 2 squares at 5″ x 5″
- Cut 2 squares at 4.5″ x 4.5″
The 5″ squares will be used to create half-square triangles (HSTs), while the 4.5″ squares are used to fill in the rest of the block. You can mix up your fabrics to create a more scrappy look, or stick with just two colors for a modern and clean style.
Creating Half-Square Triangles (HSTs)
Now that your pieces are cut, it’s time to create the HSTs that form the spinning motion of the Double Windmill. This step is simple and repeatable, making it a great way to practice precision in your quilt blocks.
- Pair one 5″ square of Fabric A with one 5″ square of Fabric B (right sides together).
- Draw a diagonal line from corner to corner on the back of one square.
- Sew a line 1/4″ on each side of the diagonal line, then cut along the marked line.
Press your HSTs open and trim them to 4.5″ x 4.5″ to match the rest of the pieces. Repeat this process for all four pairs, resulting in a total of 4 HSTs. These triangles will create the “blades” of the windmill when arranged properly.
This block layout is one of the reasons the Double Windmill pattern is so loved—it combines traditional quilting techniques with a fresh, dynamic design.
Assembling the Block
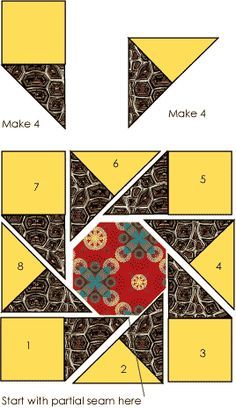
Once all your units are prepared, lay them out on a table or design board to visualize the pattern. The block will be a 4 x 4 layout composed of your HSTs and solid squares, alternating to form a spinning windmill effect.
- Arrange the units in four rows of four:
- Each row will contain a combination of HSTs and 4.5″ squares, alternating the direction of the HSTs to create the pinwheel illusion.
- Start with one row at a time. Sew the four units together, pressing seams toward the solid squares to reduce bulk.
- Join the rows together, pinning carefully at the seam intersections to maintain alignment.
After all four rows are joined, press the entire block flat. Use a square ruler to trim the block to exactly 12.5″ x 12.5″ if necessary. Your Double Windmill quilt block is complete!
Customization Ideas and Layout Variations
The Double Windmill block is incredibly versatile and works beautifully in both traditional and modern quilts. Once you’ve mastered one block, consider trying these creative variations:
- Scrappy Style: Use different fabrics for each triangle for a colorful, patchwork feel.
- Rainbow Effect: Use graduated shades of color to create a fading or ombré windmill look.
- Quilt Pattern Mixing: Combine Double Windmill blocks with other quilt patterns like Log Cabin or Pinwheel to make a sampler quilt.
- Mini Blocks: Shrink the block to 6.5″ unfinished for smaller projects like cushions, potholders, or table runners.
You can also add sashing between blocks or create borders to frame each Double Windmill section. These additions elevate your quilt and allow for more creative expression.
Tips for Beginners
If you’re new to quilting or trying the Double Windmill block for the first time, here are a few helpful tips:
- Use starch when pressing your fabric before cutting—this helps maintain accuracy.
- Chain piece your HSTs to save time and thread.
- Press seams carefully to reduce bulk, especially where multiple HSTs meet.
- Check alignment often before sewing rows together—small shifts can distort the overall pattern.
The more you practice, the better your points and seams will align. Don’t worry if the first block isn’t perfect—quilting is about growth, creativity, and joy!
Finishing Touches and Project Ideas
Once your block is complete, you can use it in a wide range of projects:
- Make a table topper using four Double Windmill blocks
- Create a decorative pillow with one bold block
- Sew an entire lap quilt with alternating windmill colors
- Use the block on the front of a tote bag for a stylish accessory
For those who love blending quilting with function, adding this quilt pattern to home décor and fashion pieces is a great way to show off your skills.
Share Your Double Windmill Block!
Now that you’ve completed your Double Windmill block, why not share your masterpiece with the world? Quilting is a community full of inspiration, encouragement, and creativity. Whether you’re part of a local guild or post online, your work could inspire someone else to try this beautiful quilt pattern.
Tag your photos with #DoubleWindmillBlock or #QuiltWithJoy on Instagram or Pinterest, and don’t forget to mention the fabrics or colors you used! Every version of this block tells a different story, and yours is one-of-a-kind.