
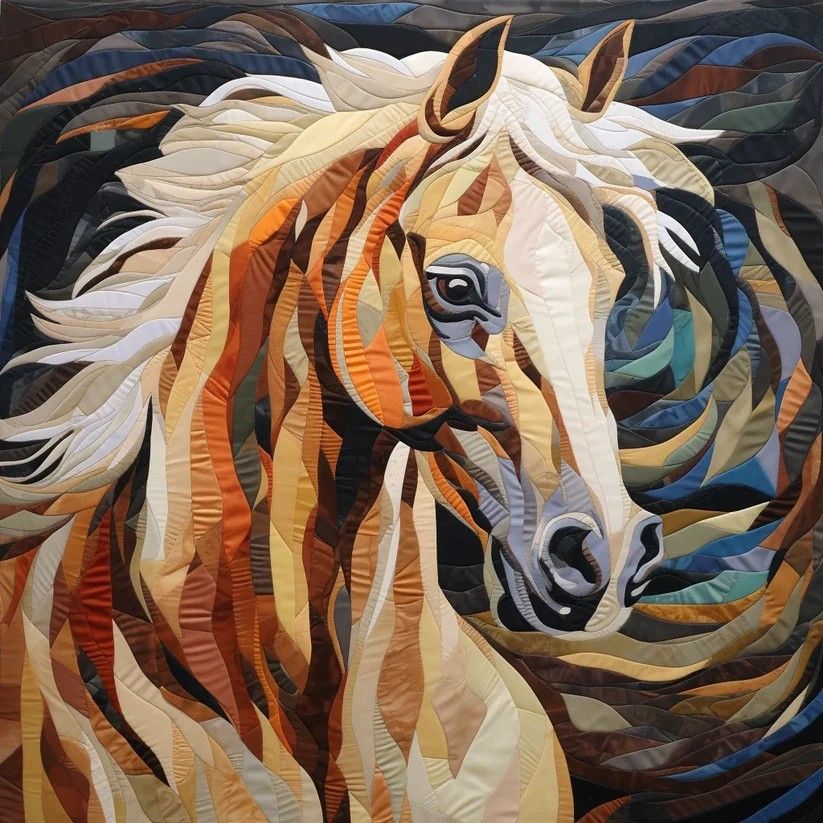
There’s something timeless and heartwarming about quilts that tell a story, especially when that story involves the majestic beauty of horses. Whether you’re a fan of equestrian themes or simply looking to try a new quilt pattern that adds character to your space, the Horse Quilt Pattern is a charming choice. This step-by-step tutorial will walk you through the process from start to finish, offering helpful guidance for beginners and creative ideas for personalization.
Let’s dive into the world of quilting and bring your horse-themed vision to life—one fabric square at a time!
Materials You’ll Need
Before you begin crafting your horse quilt, gather all the materials needed to make the process smooth and enjoyable. Start by choosing high-quality quilting cotton in various shades. You’ll need neutral tones like browns, grays, and whites to bring the horse motifs to life, along with background colors that complement your home decor or personal taste.
You’ll also need a few standard quilting supplies. Make sure you have a rotary cutter, cutting mat, quilting ruler, pins or clips, fabric scissors, and a reliable sewing machine. Don’t forget the batting and backing fabric for your quilt sandwich, and matching thread for stitching.
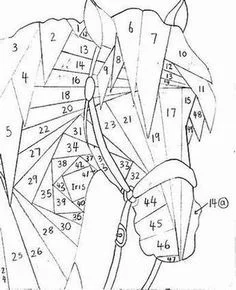
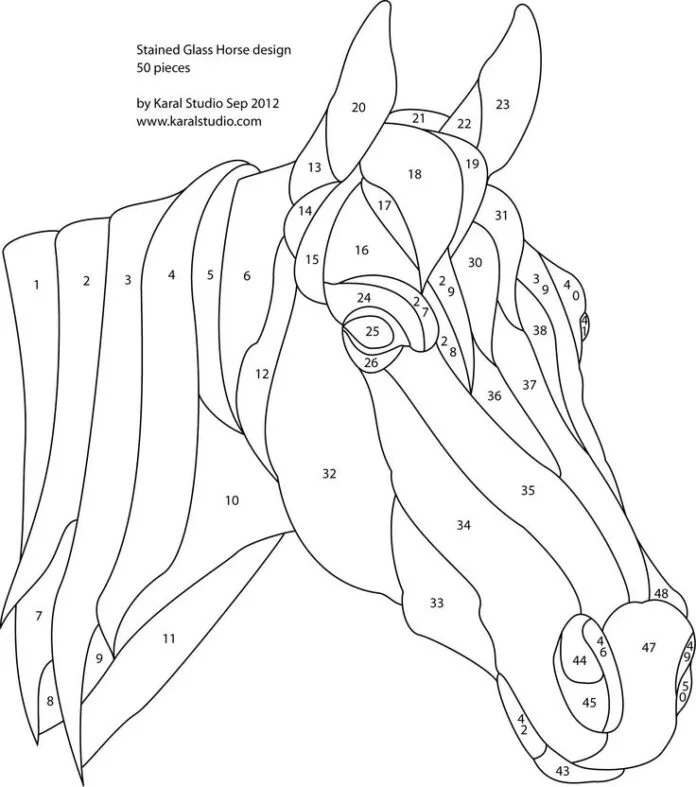
Lastly, you’ll need your horse quilt pattern. Many beginner-friendly templates are available online, including printable paper-piecing patterns or applique outlines. Choose a pattern that suits your confidence level and matches the horse design you want—whether realistic or more whimsical.
Cutting and Preparing Your Fabric
Begin by washing and pressing your fabric. This pre-shrinking step ensures your finished quilt won’t warp or shrink unevenly. Once your fabric is pressed, use your rotary cutter and quilting ruler to cut the pieces according to your quilt pattern’s instructions. Accuracy here is crucial to help your blocks fit together neatly.
If your pattern uses applique techniques, trace the horse silhouettes onto fusible web and then iron them onto the fabric before cutting them out. For pieced blocks, you’ll be cutting shapes like squares, rectangles, and triangles. Label each piece with a small sticky note to keep things organized.
Once your fabric is cut and ready, lay out your pieces to visualize how your quilt blocks will come together. This is a great opportunity to play with color combinations and fabric placement before sewing anything. It helps you catch design inconsistencies early and adjust your layout if needed.
Sewing the Quilt Blocks
Now it’s time to sew your quilt blocks. Start with the smaller elements first, such as the horse’s head or body sections. Carefully align your pieces right sides together and sew with a ¼ inch seam allowance. Press each seam as you go to keep your blocks flat and precise.
If you’re working with applique designs, attach your horse shapes to the background fabric using a zigzag or blanket stitch. This step can be done by machine or hand, depending on the look you want to achieve. A contrasting thread color can add extra detail, while a matching thread makes the shapes blend more subtly.
Once your individual blocks are complete, begin assembling them into rows. Be sure to double-check alignment before sewing the rows together. Use pins to ensure your seams nest nicely, especially at corners and intersections. After joining all rows, press your quilt top thoroughly.
Assembling the Quilt Sandwich
The quilt sandwich consists of three layers: the quilt top, batting, and backing. Lay your backing fabric face down on a clean surface, smooth it out, and tape it in place. Then layer the batting over it, followed by your completed quilt top, right side up. Make sure all layers are wrinkle-free.
Baste the layers together using safety pins or temporary adhesive spray. Start from the center and work outward to avoid puckering. This step secures the quilt sandwich while you quilt and helps prevent shifting.
Once your quilt sandwich is ready, it’s time to quilt! For beginners, straight-line quilting is a great option. Stitch-in-the-ditch along seam lines is easy and effective. You can also experiment with gentle curves or even use a walking foot for more even stitching. The goal is to hold the layers together while adding texture and interest.
Binding the Quilt
Binding gives your quilt a finished edge and adds another opportunity for creativity. Cut strips of fabric 2½ inches wide and sew them together to create a long binding strip. Fold it in half lengthwise and press.
Attach the binding to the front of the quilt by aligning the raw edges and sewing with a ¼ inch seam allowance. Miter the corners by folding the fabric at a 45-degree angle before turning to the next side. Once all edges are sewn, fold the binding over to the back and hand-stitch or machine-stitch it down.
Take your time during this step—binding is the final touch, and clean edges make your quilt look polished and professional. Choose a binding color that frames your design well, either matching the background or adding contrast.
Personalization Ideas
One of the joys of working with a horse quilt pattern is the chance to make it your own. You can personalize your quilt by choosing fabrics that reflect your love of horses—like denim for a western look or floral prints for a soft countryside feel. You can even add embroidered names or quotes that make your quilt truly one-of-a-kind.
Consider incorporating horse-themed fabric panels or novelty prints as centerpieces or accents. You can also use fabric paint to add details like eyes, manes, or horseshoes. For a child’s quilt, include the child’s initials or birthday stitched into the quilt.
If you’re making a quilt as a gift, tailor it to the recipient’s personality or favorite horse breed. A gray dappled horse for an Andalusian lover, or a chestnut brown block for someone who adores Quarter Horses, makes the quilt extra meaningful.
Tips for Beginners
If this is your first quilt project, start small. A horse quilt wall hanging or baby quilt is more manageable and helps build your confidence. Take breaks, stay organized, and don’t be afraid to make mistakes—they’re part of the learning process.
Use a design wall (or floor space) to keep your blocks in order. Take photos along the way so you can reference your layout. And remember: pressing your seams is just as important as sewing them. A well-pressed quilt looks crisp and lays flatter when finished.
Don’t hesitate to join quilting communities or online groups for support. Many fellow quilters are happy to share advice, resources, and even free quilt pattern recommendations. You’re not alone on this journey!
Share Your Horse Quilt with the World
Creating a horse quilt is more than just sewing—it’s an expression of your creativity and passion. Whether your quilt ends up as a cozy throw, a decorative wall hanging, or a treasured gift, it’s something to be proud of. Let it gallop into the hearts of others!
We’d love to see what you’ve created. Share your finished quilt on social media or quilting forums using the tag #HorseQuiltPattern. You can also inspire others by leaving comments or tutorials of your own—every quilt has a story worth sharing.
Now saddle up and start stitching—your next masterpiece awaits!