
If you’re looking for a playful and eye-catching quilt pattern, the Twister Block is a must-try. With its pinwheel illusion and clever cutting technique, this block offers a magical transformation that adds motion and whimsy to any quilt. Whether you’re a seasoned quilter or just starting your quilting journey, this tutorial will guide you step-by-step to create your very own Twister Block quilt with confidence and creativity.
In this beginner-friendly guide, you’ll learn the essential materials needed, how to piece and cut your fabric, and how to customize your quilt block for stunning results. Let’s dive in and discover the delightful world of Twister Blocks!
What Is a Twister Block?
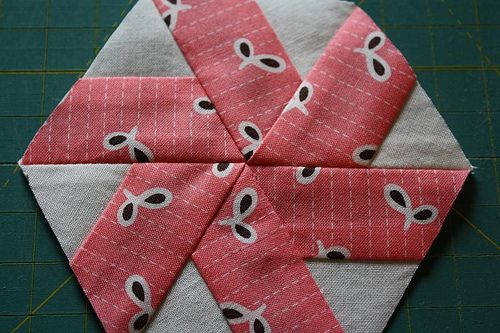
The Twister Block is a clever design that starts with a simple patchwork of squares and border strips, which are later transformed into pinwheel blocks through a specific cutting method using a Twister ruler. This technique gives the illusion of complex piecing while keeping the process straightforward and fun.
Many quilters love the Twister quilt pattern because it creates a sense of motion—almost like the blocks are dancing. It’s perfect for baby quilts, seasonal wall hangings, table toppers, or even full-size quilts. The effect is dramatic, yet the process is accessible for beginners with some basic quilting knowledge.
What’s even better is that once you learn the basic technique, you can apply it to endless color combinations and layouts. From scrappy looks to coordinated palettes, the Twister Block offers tons of possibilities for customization and creativity.
Materials You Will Need
Before you begin, gather the following materials. Having everything ready will make the process smoother and more enjoyable.
Materials:
- Fabric squares (5″ precuts or charm packs work great)
- Border fabric (for the outer edge of the square grid)
- Twister ruler (Mini, Lil’, or large depending on your desired block size)
- Rotary cutter and cutting mat
- Quilting ruler (for accurate cuts)
- Sewing machine with ¼” foot
- Thread (neutral or matching colors)
- Iron and ironing board
- Batting and backing (if finishing into a quilt)
- Quilting pins or clips
If you don’t have a Twister ruler, templates are available online to print and cut from acrylic or cardboard. However, investing in a proper Twister tool ensures accuracy and makes the process easier in the long run.
Step-by-Step: How to Make a Twister Block
- Create a Square Grid
Start by laying out your fabric squares in a grid (for example, 5×5 squares). Make sure to plan the color layout if you’re going for a specific design or color flow. Add a border using strips cut to the same width as your squares (usually 5″).
Sew the squares together row by row, then sew the rows to each other. Press all the seams flat, either open or to the side, depending on your preference. Then, sew the border strips around the square layout to complete the frame.
- Cut Using the Twister Ruler
Place the Twister ruler on your pieced top, aligning it with the seam lines. The tool is designed to center over each intersection of four squares. Cut around all four sides using your rotary cutter, being careful to keep everything aligned.
As you cut each block, set it aside in order. You’ll soon notice that the twisted pinwheel shapes begin to form naturally once you start reassembling the pieces. It’s like quilting magic!
- Reassemble and Sew the Blocks
Take your newly cut Twister pieces and begin to arrange them in rows, preserving the original layout. You’ll start to see the pinwheel effect emerge. Sew the new blocks together row by row and press the seams as you go.
Once all rows are completed, sew them together to form your new Twister Block layout. Add borders if desired, and your block is now ready to be quilted or included in a larger project.
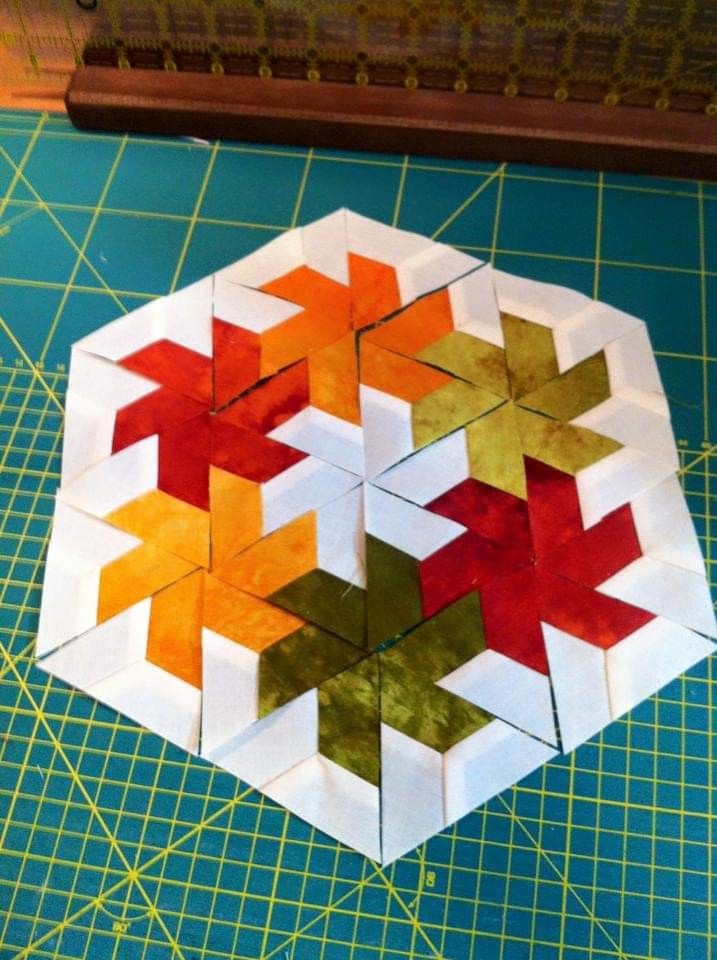
Customization Ideas for Your Twister Quilt
One of the best things about the Twister quilt pattern is its versatility. You can easily personalize your block by changing up fabric colors, sizes, or themes. Here are some creative ideas to spark your inspiration:
- Seasonal Quilts: Use holiday-themed fabric to create festive wall hangings or table runners. Think red and green for Christmas, pastels for spring, or oranges and browns for fall.
- Gradient or Ombre Effects: Arrange fabric squares from dark to light to create a beautiful gradient flow that adds depth and movement to the pinwheels.
- Scrappy Style: Use leftover charm squares or fabric scraps from other projects. The scrappy look adds a cozy, rustic vibe and makes your quilt eco-friendly.
Don’t forget to play with scale! A small Twister ruler creates tiny, intricate blocks perfect for pillows or mini quilts, while a larger ruler is great for statement-making quilts.
Tips for Success
If you’re new to quilting or just new to the Twister technique, here are some handy tips to make your experience smooth and satisfying:
- Use Starch: Lightly starch your fabric before sewing the initial square grid. This will help keep your fabric stable during the cutting and resewing steps.
- Label Rows: As you cut and rearrange, label your rows or blocks to avoid mixing them up. It’s easy to lose track during this part of the process.
- Test Block First: If it’s your first time trying a Twister quilt pattern, make a single test block with a small 3×3 layout to get a feel for the technique before committing to a full quilt.
And most importantly—relax and have fun! The Twister method is designed to surprise and delight. Even if it looks complicated, once you try it, you’ll see just how achievable it is.
Finishing Your Quilt
Once your Twister Block is complete, decide how you want to finish your project. You can:
- Add borders to frame your design
- Add batting and backing, then quilt as desired (stitch-in-the-ditch, free-motion, or straight-line quilting all work beautifully)
- Bind your quilt using a fabric that complements your design
Whether you make a single block or a full quilt top using repeated Twister Blocks, your finished piece will be a showstopper that reflects your creativity and skill.
Share Your Twister Quilt with the World!
Quilting is not just a hobby—it’s a way to connect with a global community of makers. Once you finish your Twister Block quilt, share your masterpiece online or with your local quilt guild. Post your photos on Instagram or Pinterest using hashtags like #TwisterQuilt or #QuiltPattern and inspire others with your design.
You never know who you’ll encourage to pick up a rotary cutter and dive into the world of quilting. Every quilt has a story—let yours be a twister of color, creativity, and joy.
Are you ready to try the Twister Block quilt pattern? Gather your fabric, grab your ruler, and twist your way into a fun and rewarding quilt project!