
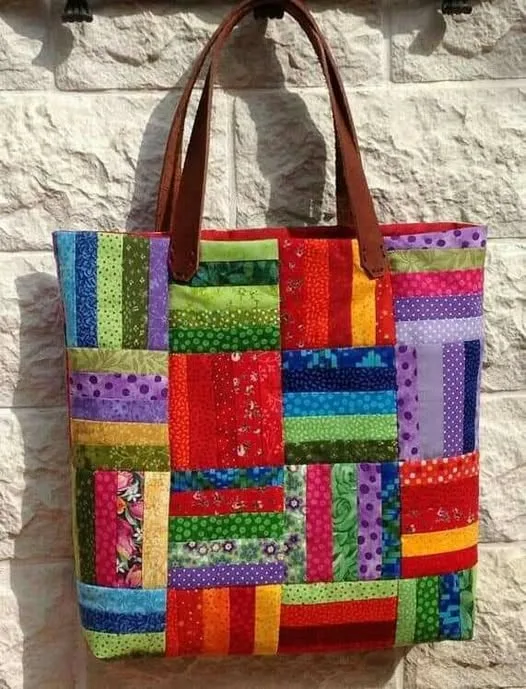
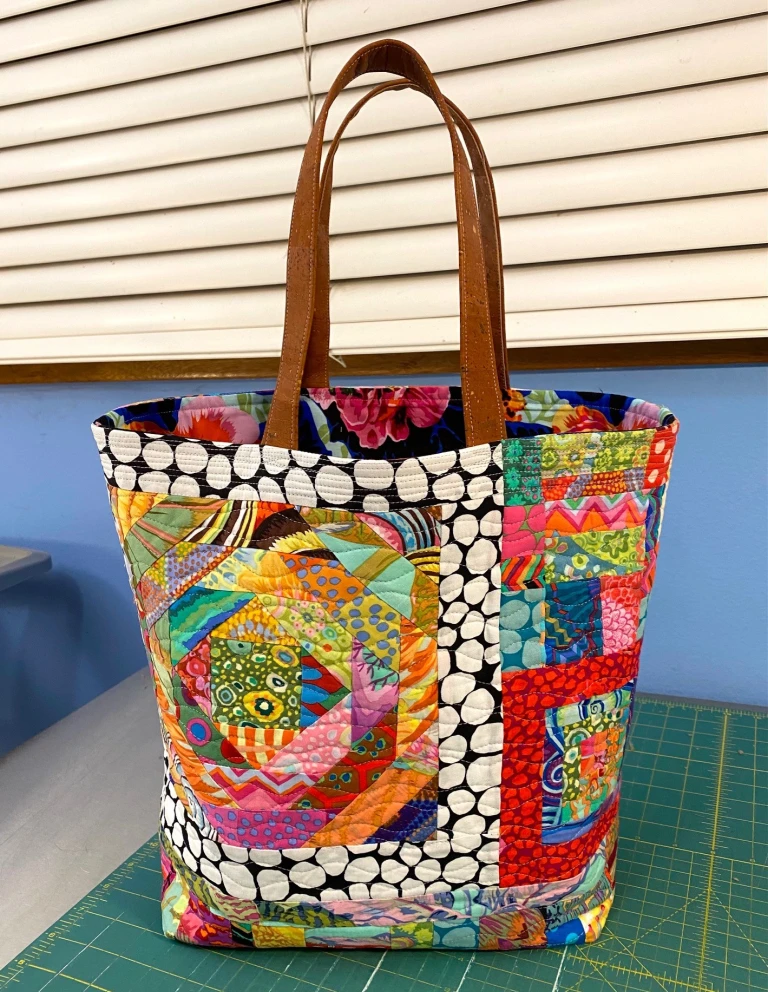
Making your own Frankenbag is a fun and rewarding project that combines scrap quilting techniques with practical sewing skills. Whether you’re new to quilting or already an experienced maker, this project is perfect for giving new life to leftover fabrics. The Frankenbag gets its name from the way it’s pieced together – much like a patchwork quilt – using different fabrics to create a unique, colorful, and functional bag.
In this tutorial, we will guide you through every step of the process, from gathering materials to adding those final creative touches. By the end, you’ll have a one-of-a-kind bag that not only looks amazing but also tells a story through its fabrics. This is a project where there are no “rules” for matching – the charm is in the mismatched quilt pattern pieces.
Let’s dive in and start making your Frankenbag. You don’t need to worry about perfection – the beauty of this project is in its relaxed, creative approach. Think of it as a quilt in bag form: bold, colorful, and totally yours.
Materials You Will Need
Before you begin, make sure you have everything ready. Working with a full set of materials at hand makes the process smoother and more enjoyable. You’ll need an assortment of fabric scraps – cotton fabrics work best, especially quilting cotton – in various colors and patterns. These will form the “quilt” panels for your Frankenbag.
Other essentials include fusible interfacing to give the bag structure, a lining fabric for the inside, and matching thread. You’ll also need a sewing machine, quilting ruler, rotary cutter or fabric scissors, and pins or clips. Handles can be made from fabric, leather, or pre-made bag straps – whichever matches your vision.
Optional items include batting if you want a more quilted, padded look, and embellishments like buttons, appliqué, or embroidery to personalize your bag. The key is to see this as a quilt project that just happens to become a bag – meaning you can go as colorful and creative as you wish.
Preparing Your Quilt Pieces
The first step in this quilt-inspired bag project is creating your patchwork panels. Cut your fabric scraps into rectangles or squares – sizes can vary, as this adds to the quirky charm of the Frankenbag. Using a quilting ruler will help keep your edges straight for easier sewing.
Lay out your fabric pieces in a way that pleases your eye. Don’t overthink color coordination – the magic of a Frankenbag is in its “imperfectly perfect” mix of prints and shades. Once you’re happy with the layout, begin sewing pieces together using a ¼-inch seam allowance, pressing seams open as you go.
Continue adding more pieces until you have two quilted panels that are large enough for the front and back of your bag. If you’re adding batting for extra padding, quilt the panels now by sewing straight or decorative lines across the fabric. This will help the Frankenbag maintain its quilt pattern aesthetic while adding durability.
Assembling the Bag Panels
Once your quilt panels are ready, it’s time to assemble the bag. Place the two quilted panels right sides together and sew along the sides and bottom, leaving the top open. If you want a boxed-bottom look, measure and sew a small square across each bottom corner, then cut away the excess fabric.
To give your bag structure, iron fusible interfacing onto the wrong side of the lining fabric. Cut your lining to the same size as your quilt panels, then sew the lining pieces together in the same way, leaving a small opening at the bottom for turning later.
Place the quilted outer bag inside the lining (right sides facing each other), matching the seams. Pin or clip around the top edge and sew all the way around. This step merges the quilt pattern exterior with the functional inner lining.
Adding the Handles
Handles can completely change the style of your Frankenbag. For a fabric handle, cut two long strips of fabric, fold them lengthwise, sew, and turn right side out. Add interfacing or batting inside if you want them sturdier. Alternatively, you can use leather straps for a more professional look.
Measure and mark where you want the handles to be placed, making sure they are even on both sides. Sew them securely to the bag before turning it right side out. Reinforce the stitching by sewing an X shape at the base of each handle.
If you’d like, you can also add adjustable straps for a crossbody version or shorter handles for a tote-style bag. Since this is a quilt project, you can even piece together handle strips from smaller fabric scraps to match the Frankenbag’s patchwork design.
Finishing Touches
After attaching the handles, pull the outer bag through the opening left in the lining. Sew the opening closed, either by machine with a topstitch or by hand for a cleaner finish. Push the lining inside the bag and give the top edge a neat press.
To make your Frankenbag even more unique, add embellishments like fabric flowers, appliqué shapes, or hand embroidery. You could also topstitch around the top edge of the bag for a more polished look. Since this is essentially a quilt pattern project, any quilting details you add will enhance its charm.
Finally, check all your seams and straps for strength. This is especially important if you plan to use your Frankenbag for carrying heavier items. Once you’re satisfied, your bag is ready for use – or to be given as a thoughtful handmade gift.
Creative Customization Ideas
One of the best things about the Frankenbag is that no two are ever the same. You can go with a bold, colorful look using vibrant quilt fabrics, or opt for a more muted palette with neutral tones for everyday wear. Try mixing fabrics with different textures for a more tactile, interesting design.
If you enjoy free-motion quilting, you can add swirling or geometric stitch patterns to your bag panels before assembly. This not only makes the quilt pattern more visible but also adds an extra layer of artistry to the bag.
You can also adapt the size of your Frankenbag to fit your needs – make a smaller one for a lunch tote or a larger version for a weekend bag. The same basic tutorial applies, but with fabric panel sizes adjusted to your preference.
Why This Project is Perfect for Beginners
The Frankenbag is an ideal introduction to quilting because it allows for creative freedom without rigid rules. You’ll practice basic sewing skills like straight-line stitching, pressing seams, and assembling layers – all while working on a fun and useful project.
It’s also a great way to use up leftover fabric scraps from other quilt projects. Instead of letting those pieces pile up, you can turn them into a stylish accessory that’s both functional and sustainable. This is a core value of quilting – making something beautiful from what you already have.
Beginners will appreciate that mistakes don’t stand out in this type of quilt pattern project – they blend right in, adding to the Frankenbag’s unique personality.
Share Your Frankenbag Creations
Part of the joy of quilting and sewing is sharing your finished creations with others. Once you’ve made your Frankenbag, take some photos and share them with quilting groups online, or post them on social media using hashtags related to quilt and handmade bags.
You might inspire someone else to try their hand at this project, or even start a scrap fabric exchange with fellow quilters. This kind of creative community is what keeps the quilting tradition alive and evolving.
So, grab your fabric scraps, follow this tutorial, and let your creativity run free. Your Frankenbag will be more than just a bag – it will be a quilt story you can carry with you everywhere.