
Creating a quilt is more than just sewing pieces of fabric together—it’s about telling a story through color, texture, and design. The Nana Flower Quilt Pattern is a charming and beginner-friendly project that combines the warmth of traditional quilting with the beauty of floral motifs. Whether you are a complete beginner or someone looking to add a new design to your collection, this tutorial will guide you through each step, making the process both enjoyable and rewarding.
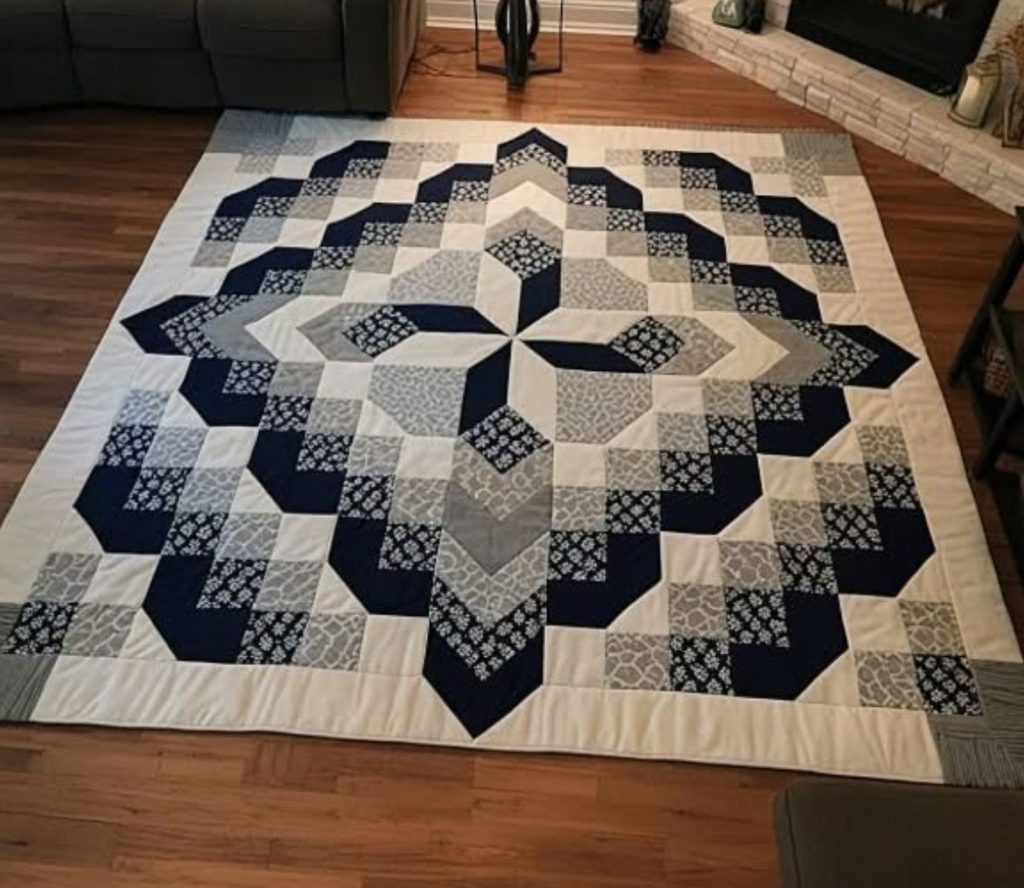
The Nana Flower design is known for its bright, petal-like shapes arranged in a circular or blooming pattern, which makes it perfect for gifts, home décor, or as a treasured keepsake. Its floral inspiration brings a touch of nature into your sewing space, and the design can be adapted for any season by simply changing the fabric colors. You don’t need to be an expert—this quilt pattern is forgiving and flexible.
In this tutorial, you’ll find a detailed list of materials, clear step-by-step instructions, tips for personalizing your work, and encouragement to make this quilt truly yours. By the end, you’ll have a beautiful finished piece that showcases your creativity and dedication, as well as the timeless appeal of quilting.
Materials You Will Need
Before diving into the process, gathering the right materials will make the quilting experience much smoother. The Nana Flower quilt pattern uses a mix of bright fabrics for the petals and a softer, contrasting fabric for the background. You can opt for solid fabrics, patterned designs, or even scrap fabrics for a patchwork feel.
Here’s what you’ll need:
- Fabric for petals: Choose a variety of prints and solids to create depth and vibrancy.
- Background fabric: A light or neutral color to make the flowers pop.
- Fabric for the quilt backing: This can be a single fabric or pieced together from scraps.
- Batting: Cotton or polyester, depending on the desired weight of your quilt.
- Thread: Matching or contrasting, depending on the effect you want.
- Cutting tools: Rotary cutter, cutting mat, and quilting ruler.
- Sewing machine: With a walking foot if possible.
- Iron and ironing board: For pressing seams as you go.
- Pins or clips: To hold fabric in place.
Selecting fabrics is one of the most enjoyable parts of quilting. The Nana Flower quilt pattern thrives on contrast, so choose petal fabrics that stand out against your background. If you prefer a softer, vintage feel, go for muted pastels. For a bold and modern look, pick high-contrast colors like bright yellows, reds, and blues.
Cutting Your Fabric
Once your fabrics are ready, the first step is precise cutting. Quilting is all about accuracy, and clean cuts will make the sewing process much easier. The Nana Flower quilt features petal shapes, a center circle, and background pieces.
For each flower block, cut:
- Petals: 8 pieces (you can use a petal-shaped template or modify a simple oval).
- Center circle: 1 piece (around 3-4 inches in diameter).
- Background squares or wedges: Enough to fill the block size you choose (commonly 12” x 12”).
Templates are your best friend here. You can make your own from cardboard or plastic, or find printable templates online. Trace them onto the wrong side of your fabric and cut carefully with scissors or a rotary cutter. Remember to leave a ¼-inch seam allowance around each piece for sewing.
A tip for beginners: stack your fabric in small layers and cut several petals at once to save time. Just make sure the layers are smooth and aligned so all shapes turn out uniform.
Assembling the Flower Block
Now comes the fun part—bringing your quilt block to life. Start by arranging your petal shapes in a circle on top of the background fabric. Play around with color placement before sewing; sometimes a small change in arrangement can make the design pop even more.
Sew two petals together along one side, right sides facing, using a ¼-inch seam allowance. Continue joining petals in pairs, and then join the pairs together until you have a complete flower shape. Press the seams open or to one side after each step to keep your block flat.
Place the center circle over the middle where all petals meet. You can attach it using appliqué techniques—either by hand with an invisible stitch or by machine with a zigzag or blanket stitch. This detail adds texture and secures the petals in place.
Joining the Blocks
Once you’ve made several flower blocks, it’s time to join them together to form your quilt top. You can arrange them in rows or create a more scattered, garden-like effect. Between blocks, you may choose to add sashing (strips of fabric between blocks) to give each flower space to shine.
Lay out all your blocks on a flat surface or design wall before sewing them together. This will help you visualize the overall look and adjust color placement. When you’re happy with the arrangement, sew the blocks together row by row, pressing the seams as you go.
Adding borders is optional but can frame your quilt beautifully. A border can be a single fabric strip, pieced scraps, or even more flower designs to make the quilt larger.
Quilting and Finishing
Once your quilt top is ready, make a “quilt sandwich” by layering the backing fabric (right side down), batting, and quilt top (right side up). Smooth out each layer and pin or baste them together so they don’t shift while quilting.
For the quilting itself, you can follow the outlines of the flowers for a custom look or use an all-over pattern like meandering loops. Hand quilting adds a charming, traditional touch, while machine quilting offers speed and precision. The Nana Flower quilt pattern works well with both approaches.
After quilting, trim away any excess batting and backing fabric. Bind the edges with strips of fabric folded in half, sewing them around the perimeter of the quilt. This gives your quilt a neat, finished edge and adds another design opportunity—choose a binding color that complements your flowers.
Personalization Ideas
One of the best things about the Nana Flower quilt pattern is how easily it can be customized. If you love bright colors, use bold, saturated fabrics for a cheerful quilt. For a softer, romantic feel, opt for pastel shades and vintage floral prints.
You can also experiment with the size of the flowers. Large blocks create a dramatic, modern statement, while smaller flowers add detail and charm. Try making a matching pillow or table runner using leftover flower blocks for a coordinated home décor set.
Another fun idea is to make the flowers seasonal—spring pastels, summer brights, autumn earth tones, or even a winter-themed version in icy blues and silvers. Each color palette brings a new personality to the same quilt pattern.
Tips for Beginners
If you’re new to quilting, here are a few tips to make the process smoother:
- Start small: Instead of a full-size quilt, try making a baby quilt or wall hanging first.
- Press as you go: Pressing each seam helps keep your quilt flat and professional-looking.
- Don’t stress over perfection: Quilts are handmade treasures, and small imperfections add to their charm.
Remember, quilting is as much about the journey as it is about the finished product. Enjoy the process, take breaks when needed, and celebrate each step along the way.
Share Your Nana Flower Quilt
Quilting is even more rewarding when shared with others. Once you’ve completed your Nana Flower quilt, show it off! Post pictures on social media, share them with quilting groups, or give your creation as a heartfelt gift. Each quilt you make carries your creativity, time, and love stitched into every seam.

If you enjoyed this tutorial, consider trying different quilt patterns to expand your skills. Each new project will teach you something new and open up fresh creative possibilities. Most importantly—have fun, and let your quilting journey bloom just like your Nana Flower Quilt.