
Making your own kitchen apron is a rewarding and fun project that allows you to add a personal touch to your cooking space. Whether you’re a complete beginner or someone who already enjoys sewing, creating a handmade apron can be a delightful way to express your style while making something functional. With just a few basic materials, you can transform simple fabrics into a stylish and practical piece for your kitchen.
In this tutorial, we’ll guide you step-by-step on how to make a kitchen apron using a simple sewing method. We’ll also incorporate quilting techniques, so your apron will have a charming quilt pattern that makes it truly unique. From choosing the right materials to adding personal details, this guide is perfect for anyone who loves to mix creativity with everyday practicality.
By the end of this article, you’ll not only have a beautiful apron ready to wear but also the confidence to try more quilting projects in the future. Using quilt techniques in small items like aprons is a great way to practice before diving into bigger projects like full quilts or wall hangings. So, let’s get started and bring some handmade joy into your kitchen!
Materials You Will Need
Before starting, gather all the materials you’ll need to make your kitchen apron. Choosing the right fabric and tools will make the sewing process easier and ensure a beautiful finished product. For this apron, we recommend using cotton fabric for its durability and ease of sewing, but feel free to get creative with prints and colors. If you love quilting, you can even use quilt pattern fabric scraps to give your apron a patchwork charm.
Here’s a basic list of materials for your project:
- Main fabric: 1 yard (cotton or cotton blend)
- Contrasting fabric: ½ yard for pockets and straps
- Batting (optional): for a quilted apron look
- Quilt pattern template (optional) for design inspiration
- Scissors or rotary cutter
- Pins or sewing clips
- Measuring tape or ruler
- Thread in coordinating color
- Sewing machine
Having everything prepared in advance will make the process smooth and enjoyable. If you’re using a quilt pattern approach, cut your fabric pieces beforehand according to your chosen template. This will help you assemble the apron more efficiently and keep all elements aligned.
Cutting the Fabric
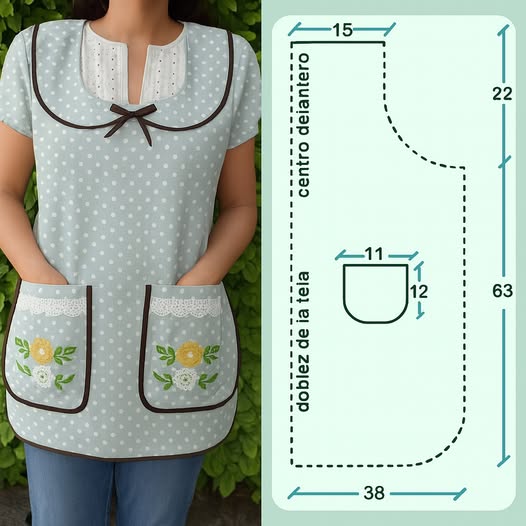
The first step is to cut your fabric into the required shapes for the apron. You can either use a store-bought pattern or draft your own on a large piece of paper. A standard kitchen apron has a rounded top, wide enough to cover the chest, and a skirt section that reaches mid-thigh or knee length. For beginners, starting with a simple rectangular skirt and slightly curved top is the easiest approach.
If you’re incorporating a quilt pattern, cut several smaller fabric squares or rectangles to piece together before shaping them into the apron form. For example, you might create a patchwork front using 5” x 5” fabric squares sewn together. This not only adds visual interest but also gives your apron a textured, cozy look. Remember to press the seams flat after sewing each row of quilt squares.
Once you’ve prepared the main apron body, cut additional pieces for the straps (two long pieces for the waist and one for the neck) and a pocket or two if you want them. Pockets are a wonderful addition, making your apron more functional while offering another opportunity for creative quilt designs.
Assembling the Apron Body
To assemble the apron, start by working on the quilted front if you’re using one. Layer your quilted section with batting and a backing fabric, then stitch along the seams or follow your quilt pattern design to secure the layers together. This step adds durability and gives your apron a padded feel, which is especially useful for protecting your clothing while cooking.
Once the quilted panel is ready, place it right side up and position your apron shape template on top. Trace and cut to form the final apron shape. Be sure to leave a ½-inch seam allowance around the edges to make hemming easier. If you’re not quilting, simply cut your main fabric directly into the apron shape.
Finish the edges by folding them twice (¼ inch each time) and sewing along the fold to prevent fraying. Alternatively, you can use bias tape for a clean, colorful edge. Bias tape works particularly well if you’re making a quilt-style apron, as it can accentuate the patchwork design.
Adding the Straps and Pockets
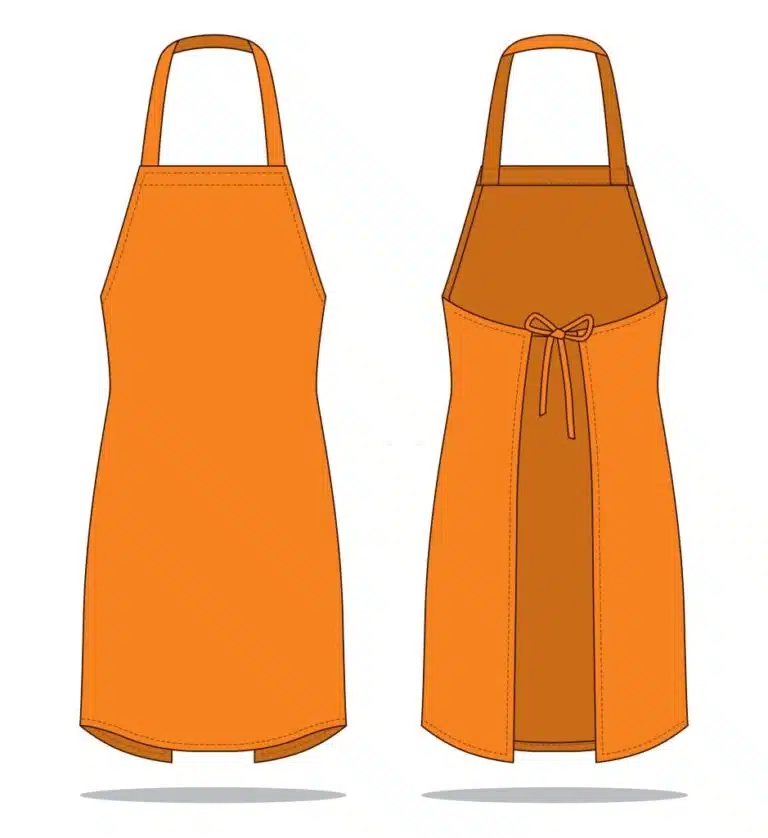
Next, attach the straps. Fold each strap piece lengthwise, right sides together, and sew along one long edge. Turn them right side out, press flat, and topstitch for extra durability. Position the neck strap at the top corners of the apron and the waist straps at the sides. Secure them with reinforced stitching, as these areas will take the most stress during wear.
For pockets, cut one or more rectangles from your contrasting fabric or leftover quilt pattern pieces. Finish the top edge of each pocket with a double fold hem, then press and topstitch. Position the pockets on the apron body where they’ll be most useful for you, pin them in place, and sew along the sides and bottom, leaving the top open.
Pockets made from quilt blocks are an excellent way to tie the design together. For example, a single 9-patch quilt block can make a charming pocket that also serves as a focal point of your apron.
Final Touches and Personalization
Now comes the fun part—personalizing your apron. You can add embroidery, applique, or decorative quilting stitches to make your piece one-of-a-kind. If you’ve used a quilt pattern for the main body, try echo quilting around the shapes to give extra dimension. Contrasting thread can also make your stitching stand out and highlight the design.
You can also customize your apron to match your kitchen décor or seasonal themes. For example, use floral quilt fabrics for a spring look, red and green for Christmas, or warm earth tones for autumn. Adding a ruffle to the bottom hem or lace trim to the pocket can give your apron a vintage charm.
Another idea is to create a matching set of quilted kitchen accessories, such as pot holders or table runners, using the same fabrics as your apron. This not only makes your kitchen look coordinated but also lets you practice and perfect your quilting skills on small projects.