
If you love to quilt and enjoy adding a touch of charm to your kitchen, chicken pot holders are the perfect project for you. These adorable and functional pieces not only protect your hands from hot dishes but also bring a cozy farmhouse feel to your space. The beauty of this project is that it’s simple enough for beginners yet still offers room for creativity for more experienced quilters.
In this tutorial, we’ll guide you step-by-step through the process of creating your own chicken pot holders, using a quilt pattern that is both fun and practical. Whether you’re making them for yourself or as a thoughtful handmade gift, this project is bound to make you smile. So, gather your materials and let’s get quilting!
Before we dive into the instructions, remember that this project is also a great opportunity to play with fabric scraps. You can mix colors, patterns, and textures to create unique chicken pot holders that truly stand out. Let’s start with what you’ll need.
Materials You’ll Need
To get started on your chicken pot holders, you won’t need a huge supply list. Most of the items may already be in your quilting stash. Here’s what you should gather before beginning:
- Cotton fabric in a variety of prints (body, wings, comb, and beak of the chicken)
- Heat-resistant batting (such as Insul-Bright) for protection
- Regular cotton batting for extra softness
- Thread in coordinating or contrasting colors
- Fabric scissors or rotary cutter
- Quilting ruler
- Pins or fabric clips
- Sewing machine (or needle if sewing by hand)
When selecting your fabric, keep in mind that high-quality cotton is the best choice for durability and ease of sewing. Using bold colors and playful prints will make your chicken pot holders pop in your kitchen. If you have chicken-themed prints, now’s the time to use them!
You will also need to prepare your workspace before starting. A clear table, good lighting, and all your tools within reach will make the quilting process smoother. Once you have everything ready, it’s time to start cutting.
Cutting Your Fabric Pieces
To make the chicken pot holders, you’ll be cutting out several shapes that will form the body and details of the chicken. This is where your quilt pattern comes into play.
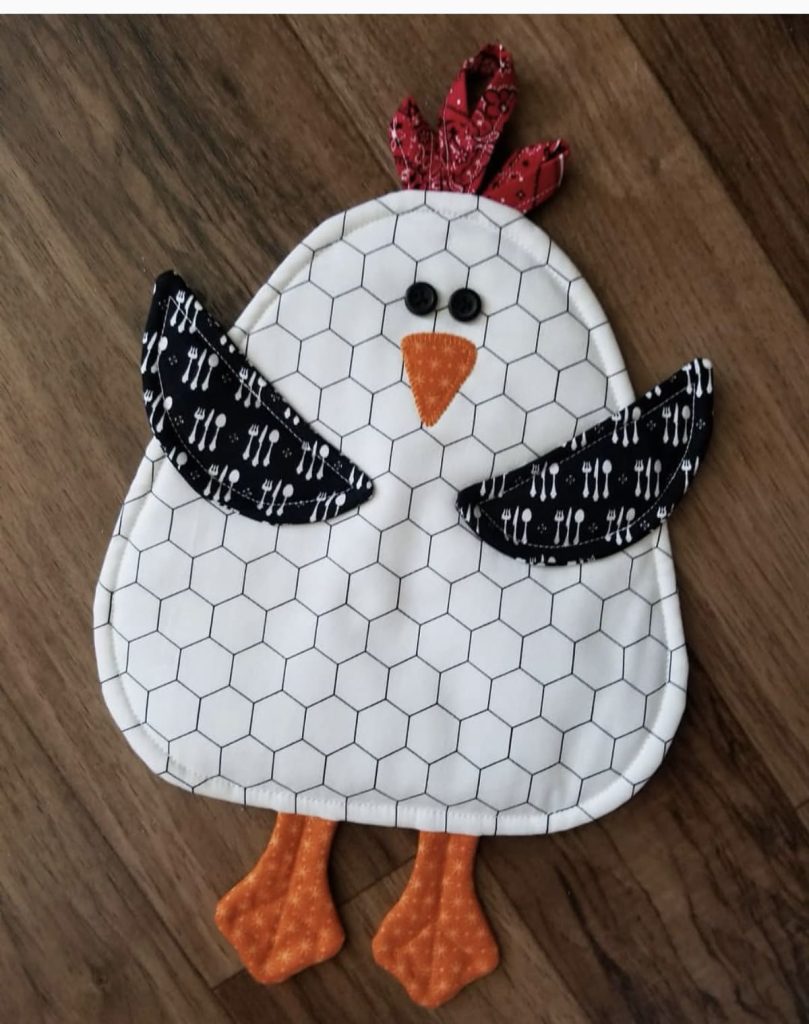
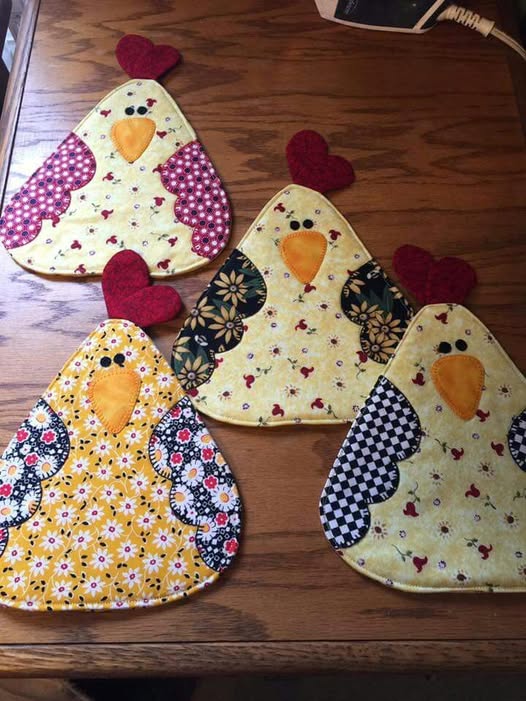
- Body of the chicken – Cut two identical pieces from your main fabric, using a simple chicken-shaped template or oval shape with a pointed head.
- Wings – Cut two smaller shapes from coordinating fabric to give your chicken a layered quilt look.
- Comb and beak – Use bright fabrics like red for the comb and orange or yellow for the beak. Cut these in small triangle or crown-like shapes.
- Batting – Cut the same shapes as the chicken body from both heat-resistant batting and regular cotton batting for extra insulation.
Accuracy is key when cutting your pieces. Using a rotary cutter and quilting ruler will give you clean edges, which helps the pot holders keep their shape after sewing. Always double-check your cuts before moving to the next step.
If you want to make multiple chicken pot holders at once, consider cutting all your pieces in a production-line style. This will save time and allow you to mix and match fabrics easily.
Assembling the Layers
Once all your pieces are cut, it’s time to assemble the layers. Think of it as building a quilt, but on a smaller scale.
First, lay down one piece of your chicken body fabric right side down. On top of that, place your batting layers – heat-resistant batting first, then cotton batting. Finally, place the other piece of chicken body fabric right side up. You now have a sandwich-like stack.
Next, position your comb and beak between the layers at the head area, making sure they are facing inward so they’ll pop out when turned right side out. Pin everything securely in place so nothing shifts while sewing.
This is also the stage where you can add extra decorative quilting lines. Stitching a quilt pattern across the body can help hold the layers together and add a beautiful texture to your pot holder.
Sewing the Chicken Pot Holder
With your layers pinned, it’s time to sew. Using a quarter-inch seam allowance, sew around the edges of the chicken shape, leaving a small opening at the bottom for turning it right side out.
Be sure to backstitch at the beginning and end to secure the seams. As you sew, take your time around curves, pivoting with the needle down when needed to keep the shape smooth.
After sewing, carefully trim any excess batting from the edges to reduce bulk. Turn the chicken right side out through the opening, pushing out all the curves and details. You’ll see your adorable chicken form taking shape right away.
Once turned, press the edges flat with an iron and topstitch all around the edge to close the opening and give the pot holder a crisp finish.
Adding the Wing Detail
The wing adds a charming touch to your chicken pot holder and gives it more of a quilted feel.
Place your wing pieces right sides together and sew around, leaving a small gap for turning. After turning the wing right side out, press it flat and topstitch around the edge. You can even add extra quilt pattern stitching across the wing for added texture.
Attach the wing to the body by sewing along the top edge only, allowing it to lift slightly like a real wing. This little detail adds dimension and personality to your chicken.
If you want, you can also embroider or stitch a small eye on your chicken, making it even more expressive.
Personalization Ideas
One of the best parts of making chicken pot holders is customizing them to your taste. The quilt pattern allows you to play with different fabrics and layouts.
You can create a patchwork-style chicken using multiple fabric scraps, giving it a truly one-of-a-kind look. For a rustic farmhouse feel, use gingham, polka dots, and floral prints. For a more modern twist, try bold solids or geometric patterns.
Another fun idea is to make a whole set of chickens in different colors – one for each season or holiday. Imagine a pastel chicken for spring, a red and green chicken for Christmas, or even a black and orange chicken for Halloween!
Caring for Your Chicken Pot Holders
Since these pot holders will be used in the kitchen, they will need to withstand heat and regular washing.
Always use heat-resistant batting to ensure safety when handling hot dishes. Avoid using synthetic fabrics, as they may melt when exposed to high temperatures. Cotton fabrics and batting are the safest choices for quilting pot holders.
To clean, simply toss them in the washing machine on a gentle cycle, then lay flat to dry. If you’ve added decorative quilting stitches, this will help the pot holders keep their shape over time.
Share Your Creations!
Now that you’ve learned how to make these adorable chicken pot holders, it’s time to put your skills to work. Whether you’re quilting for yourself or making gifts, these fun kitchen accessories are sure to impress.
If you follow this quilt pattern, you’ll have a set of chicken pot holders that are not only functional but also full of personality. Remember, every chicken you make can be completely unique depending on your fabric choices and details.
We’d love to see your finished creations! Share your photos with fellow quilters and inspire others to bring a little farmhouse charm into their kitchens. Happy quilting!