
If you love crafting and want to create something unique while recycling old materials, this tutorial is for you! Today, we’ll learn how to make charming card caddies using old CDs, fabric scraps, and used buttons. This creative project is perfect for organizing your cards, receipts, or even small quilting supplies. Plus, it’s a wonderful way to give new life to those leftover scraps and unused buttons that are gathering dust at home.
The best part? You don’t need to be an expert quilter to try this out. Whether you’re familiar with quilt patterns or just starting your crafting journey, this project is approachable and fun. So, grab your materials, and let’s dive into this inspiring DIY!
Materials You’ll Need for Your Card Caddy
Before we start, let’s gather all the supplies. This project is perfect for upcycling and uses items you might already have:
- Old CDs or DVDs (1 or 2, depending on the size of your card caddy)
- Fabric scraps (cotton or quilting fabric works best)
- Used buttons (any size and color for decoration)
- Batting or quilt batting scraps (thin padding to give structure)
- Scissors or rotary cutter
- Sewing machine or needle and thread for hand sewing
- Fabric glue or hot glue gun (optional, for buttons)
- Ribbon or bias tape (for handles or edging)
- Pins or fabric clips
- Ruler or measuring tape
- Iron (to press fabric and seams)
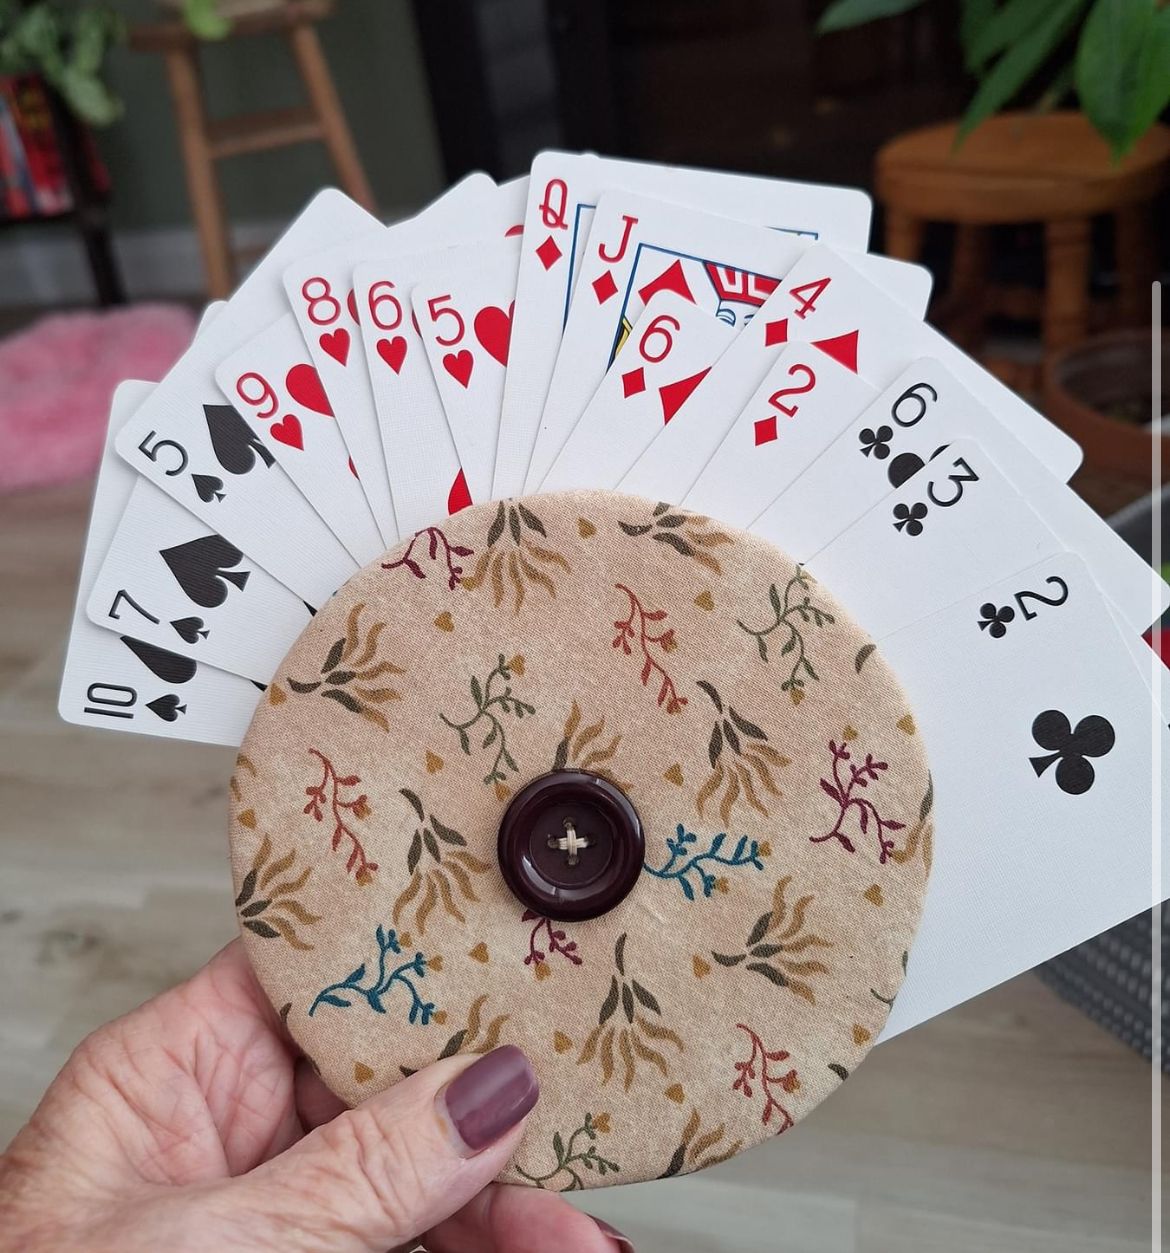
Using old CDs as a base adds a fun twist and sturdy support to your card caddy, while the fabric scraps bring in beautiful color and texture — just like in your favorite quilt pattern projects. The buttons add a charming vintage or playful touch that makes each caddy unique!
Step-by-Step: How to Make Your Card Caddy
Step 1: Prepare the CD Base
Start by cleaning your old CDs to remove dust and fingerprints. These will be the foundation of your card caddy. If you want to customize the look, consider painting or decorating the CDs with markers or washi tape, but this is optional.
Once the CDs are ready, cut two fabric squares large enough to cover each CD completely with about an inch of extra fabric on all sides for folding and seam allowance. These fabric pieces can be from your scrap pile — don’t hesitate to mix patterns and colors for a patchwork look inspired by your favorite quilt patterns.
Step 2: Create the Quilted Fabric Covers
Take the fabric squares and place a piece of batting or quilt batting scrap in between two layers of fabric, forming a quilted sandwich. Pin or clip these layers together.
Now, sew around the edges, leaving a small opening to turn the fabric inside out. Once turned, press the edges flat with an iron and sew the opening closed with a neat stitch.
This quilted fabric will protect the CDs and give your card caddy a soft, padded feel. It’s a mini quilt pattern in itself!
Step 3: Attach Fabric Covers to CDs and Assemble the Caddy
Next, place the quilted fabric-covered CDs face-to-face so the fabric sides are on the outside. Sew or glue along the edges to join the CDs, leaving an open space at the top to create the caddy pocket.
If you want, add a strip of ribbon or bias tape around the opening edge to finish it cleanly and provide extra durability. This also gives your card caddy a professional, polished look.
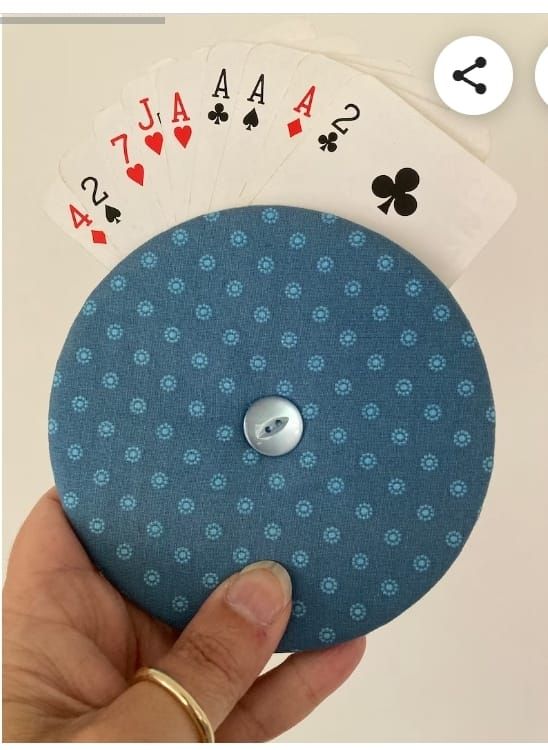
Step 4: Add Buttons and Personal Touches
Finally, decorate your card caddy by sewing or gluing used buttons onto the quilted fabric. Mix and match colors and sizes to create a beautiful, tactile design reminiscent of the embellishments often found on quilts.
If you have leftover fabric scraps, try making small quilt blocks or applique shapes to add to the front of your caddy for an even more personalized touch.
Ideas to Personalize Your Card Caddy
One of the best things about this project is how much you can customize it. Here are some ideas to make your card caddy truly your own:
- Mix quilt patterns: Use fabric scraps from different quilts or quilt patterns you love to make a patchwork-style cover.
- Button themes: Collect buttons by color, shape, or theme (like vintage, floral, or geometric) to tell a story on your caddy.
- Add handles: Attach fabric loops or ribbon handles to carry your card caddy easily.
- Embroidery accents: Add hand embroidery or stitch your initials for a personal signature.
- Use decorative stitches: If you’re using a sewing machine, experiment with different stitch styles on the quilted fabric for added texture.
This project offers a perfect blend of upcycling, quilting, and crafting all in one, and you’ll be amazed at how beautiful your finished card caddy looks with just a few creative touches!
Why This Project is Perfect for Beginners and Quilt Lovers
If you’re new to quilting or sewing, this card caddy project is a gentle introduction to basic techniques like quilting fabric layers, sewing seams, and adding embellishments. It doesn’t require complicated quilt patterns or bulky materials, so it’s manageable and quick to complete.
For experienced quilters, it’s a delightful way to use leftover scraps and practice smaller-scale quilting techniques without committing to a large project. Plus, it’s an opportunity to create functional items that also make great gifts.
Upcycling old CDs also adds an eco-friendly aspect to your crafting — turning something that might otherwise be tossed away into a practical, decorative piece.
Share Your Beautiful Card Caddy Project!
Now that you know how to make card caddies with old CDs, fabric scraps, and used buttons, it’s time to get creative! Whether you make one for yourself or gift it to a friend, this project is sure to bring a smile.
Don’t forget to share your finished card caddies on social media or with your crafting group. Use hashtags like #QuiltPattern #UpcycledCrafts #CardCaddyDIY to connect with other makers. We’d love to see how you incorporate your favorite quilt patterns or button collections into this charming project.
Happy crafting, and keep inspiring creativity in everything you make!