
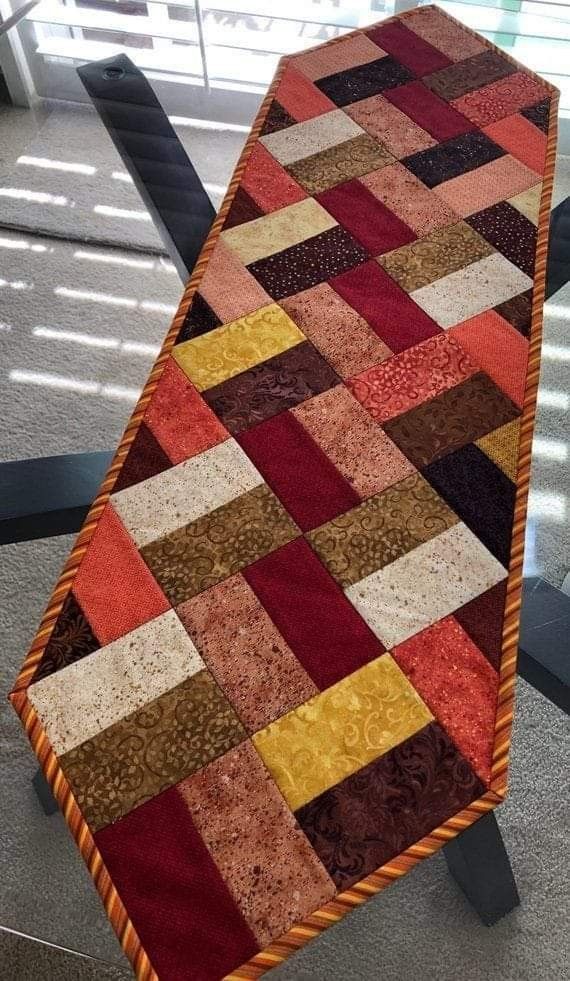
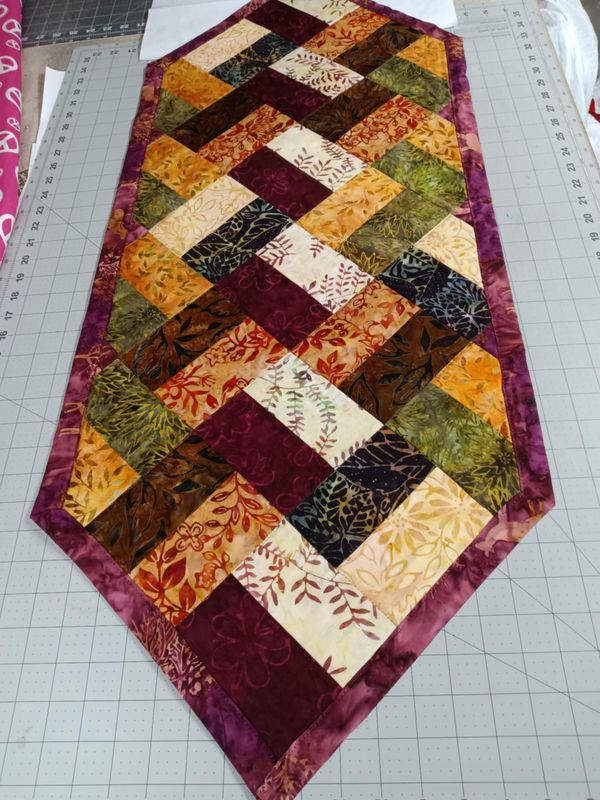
If you are looking for a fun, beginner-friendly sewing project that adds instant charm to your dining table, the Rail Romp Table Runner might just be the perfect choice. This quilt pattern is simple enough for new quilters but still rewarding for more experienced sewists. With its bold, repetitive design, it can be made using a variety of fabrics, from bright and cheerful to soft and muted tones. In this tutorial, we’ll guide you through the entire process—from gathering your materials to stitching the final binding—so you can enjoy creating a piece that’s as functional as it is beautiful.
The Rail Romp Table Runner uses basic piecing techniques, making it a fantastic project to practice precision cutting and straight-line sewing. By following these steps, you’ll not only create a gorgeous runner but also build skills you can use in other quilt projects. Whether you choose to follow the traditional color layout or experiment with your own palette, this quilt pattern gives you the flexibility to make it uniquely yours.
Before we start, remember that quilting should be fun. Don’t stress over perfection—slight variations in seams or fabric placement can add charm and personality to your table runner. So, grab your fabrics, set up your sewing space, and let’s dive into the creative process.
Materials You’ll Need
Before cutting into your fabrics, it’s essential to have all your materials ready. For the Rail Romp Table Runner, you’ll need quilting cotton for the top, a coordinating fabric for the backing, and batting to give it structure and softness. Aim for high-quality cotton to ensure durability and a smooth finish. A rotary cutter and self-healing cutting mat will help you achieve accurate cuts, which is key to keeping your quilt pattern aligned.
Here’s a simple material list to get you started:
- Fabric A (light color): 1/4 yard
- Fabric B (medium tone): 1/4 yard
- Fabric C (dark or contrasting color): 1/4 yard
- Backing fabric: 1/2 yard
- Batting: slightly larger than the finished runner size
- Matching thread
- Rotary cutter and mat
- Quilting ruler
- Sewing machine with 1/4″ foot (optional but recommended)
- Iron and ironing board
When choosing your fabrics, think about the mood you want to set. Bright, high-contrast colors will create a playful and bold look, while softer tones can make your table runner feel warm and inviting. This quilt pattern works well for seasonal themes, so you can even choose fabrics to match holidays or special occasions.
Finally, consider pre-washing your fabrics before cutting to prevent shrinkage and color bleeding later on. It’s a small step that can save you from surprises after your table runner is complete.
Cutting Your Fabric
Accurate cutting is the foundation of a well-made quilt. For the Rail Romp Table Runner, you’ll be creating strips and sub-cut units that will be pieced together to form the repeating rail fence design. Lay your fabric on the cutting mat, making sure it’s smooth and free from wrinkles before cutting.
From Fabric A, cut (6) strips measuring 2.5″ x width of fabric (WOF).
From Fabric B, cut (6) strips measuring 2.5″ x WOF.
From Fabric C, cut (6) strips measuring 2.5″ x WOF.
Once you have your strips, you’ll sew them into strip sets and then sub-cut them into smaller segments. Each segment will be part of the blocks that make up the runner’s distinctive quilt pattern. Consistency is key here—make sure each cut is clean and accurate to help your blocks fit together neatly.
If you are new to rotary cutting, always keep your non-cutting hand steady on the ruler and your fingers well away from the blade. Work slowly and deliberately. Remember, this is not a race—it’s about precision and enjoying the process.
Assembling the Strip Sets
To start piecing, take one strip from Fabric A, one from Fabric B, and one from Fabric C. Place them right sides together and sew along the long edges using a 1/4″ seam allowance. Press the seams toward the darker fabric to prevent shadows from showing through the lighter fabrics.
Once your strip sets are sewn, sub-cut them into segments measuring 6.5″ long. You should end up with several identical segments ready to be arranged into the classic rail fence layout. This is where the Rail Romp design begins to take shape. The alternating arrangement of the strips creates movement and visual interest in the quilt pattern.
The beauty of this method is that it’s very forgiving. Even if your seams aren’t absolutely perfect, the overall pattern will still be eye-catching. If you enjoy chain piecing, you can sew multiple strip sets in one go, saving time and keeping your momentum going.
Building the Blocks
Now that your strip segments are ready, it’s time to build the blocks. Lay out three segments for each block, alternating the direction of the stripes—one horizontal, one vertical, and one horizontal again. This creates the classic woven look associated with the rail fence quilt pattern.
Sew the segments together, matching seams as you go. Press the completed blocks flat, making sure the seams lie neatly. You will repeat this process until you have enough blocks to reach your desired runner length. Typically, 8 to 10 blocks will make a runner that fits most dining tables.
Once all blocks are pieced, lay them out in rows. Experiment with the arrangement before sewing them together—you may find a layout you like even more than the traditional version. The flexibility of the Rail Romp design means you can easily customize the flow and feel of the quilt.
Adding the Borders
Borders help frame your table runner and give it a polished finish. Cut your border strips to the desired width—2″ is common, but you can adjust to taste. Sew the side borders first, pressing seams outward, then attach the top and bottom borders.
Choose a border fabric that either blends softly with your quilt or provides a strong contrast for extra pop. This is another opportunity to play with your creativity. Striped or patterned borders can add personality, while solid borders keep the focus on the central quilt pattern.
If you’re working with limited fabric, you can even make scrappy borders from leftover pieces. This not only reduces waste but also adds a unique charm to your project.
Quilting the Layers
Layering is the next step: backing fabric (right side down), batting, and quilt top (right side up). Smooth out each layer carefully, making sure there are no wrinkles. Pin or baste the layers together to prevent shifting while quilting.
For beginners, straight-line quilting is an excellent choice. You can stitch “in the ditch” along the seams for a subtle look or create diagonal lines for added movement. If you’re comfortable with free-motion quilting, you can add swirls, loops, or even seasonal motifs.
Remember to start quilting in the center and work outward to prevent puckering. Take your time—quilting is not just functional; it’s also decorative, adding texture and depth to your table runner.
Binding Your Table Runner
Binding is the final step, and it’s where your Rail Romp Table Runner really comes together. Cut binding strips 2.5″ wide, join them into one long piece, and press in half lengthwise. Sew the binding to the front of the quilt, then fold it over to the back and hand-stitch or machine-stitch it down.
If you’ve never done binding before, don’t worry—it’s easier than it looks. Take care to miter the corners neatly for a professional finish. The binding can match your borders or contrast for a bold frame.
Once your binding is done, give the table runner a final press. Step back and admire your work—you’ve just completed a beautiful, functional piece using a timeless quilt pattern.
Customization Ideas
One of the best things about the Rail Romp is its adaptability. Here are a few fun ways to make it your own:
- Seasonal Themes: Use holiday prints for Christmas, autumn tones for fall, or pastel shades for spring.
- Scrappy Version: Mix and match leftover fabric strips for a vibrant, eclectic look.
- Monochrome Palette: Stick to one color family for a sophisticated, modern feel.
You can also experiment with block size, border width, and quilting designs. The more you play, the more personal your table runner will feel.
Share Your Creation
Quilting is not only about making something beautiful—it’s also about connecting with others who share your passion. Once you’ve completed your Rail Romp Table Runner, take photos and share them with friends, family, or online quilting communities. You might inspire someone else to try this quilt pattern and start their own creative journey.
Whether you keep your table runner, gift it, or sell it, remember that each stitch tells part of your story. Enjoy the process, celebrate your achievement, and keep quilting!