
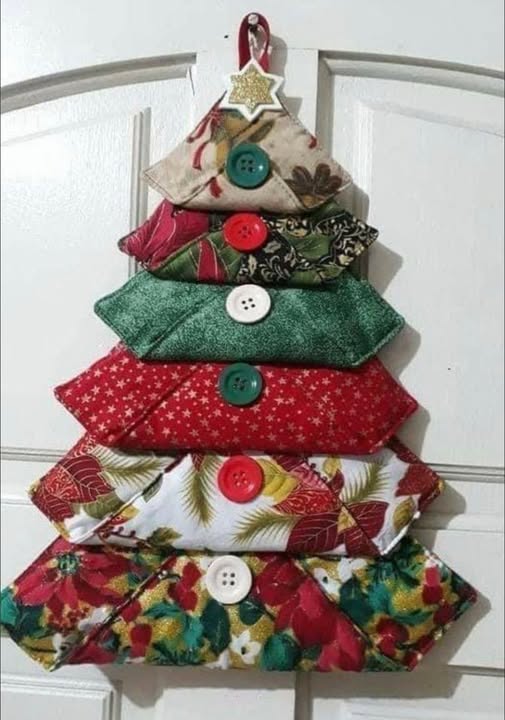
The holiday season is a perfect time to add handmade charm to your home décor, and one delightful way to do so is with a Folded Fabric Christmas Tree Decoration. This project blends the beauty of quilting with the joy of festive creativity, resulting in a piece that is as fun to make as it is to display. Whether you’re a quilting enthusiast or a beginner just starting to explore the world of quilt patterns, this tutorial will guide you step-by-step through the process.
With its layered fabric folds, this Christmas tree design is both charming and versatile. You can use it as a table centerpiece, wall hanging, or even as part of a holiday garland. The folded fabric technique adds texture and depth, making your tree decoration stand out from traditional flat quilted projects. The best part? You can customize the fabrics, colors, and embellishments to perfectly match your holiday style.
In this tutorial, you’ll learn everything from gathering materials to completing your tree. We’ll also cover fun personalization ideas so that each tree you make is truly one-of-a-kind. So, gather your fabrics, prepare your sewing machine, and let’s dive into this festive quilt pattern project that will add warmth and creativity to your holiday season.
Materials You Will Need
Before you begin, make sure you have all the necessary materials ready. One of the joys of working on small quilt projects like this is that you can often use leftover fabric from previous quilting adventures. Scraps from past quilt patterns are perfect for creating a vibrant and varied Christmas tree.
Here’s what you’ll need:
- Fabric in Christmas colors: Green prints for the tree, plus reds, golds, and whites for accents. Fat quarters or scraps work perfectly.
- Background fabric: A neutral tone like cream, white, or light gray to help the tree stand out.
- Batting: A small piece to give structure and slight padding.
- Thread: Matching or contrasting thread, depending on your design choice.
- Scissors or rotary cutter: For precise cutting.
- Pins or clips: To hold fabric layers in place.
- Sewing machine: Although you can hand sew, a machine will speed up the process.
- Optional embellishments: Buttons, beads, ribbons, or small ornaments.
Having everything ready before you start will make the process smoother. While this project is small, working with multiple folded layers can require careful handling, so good tools and materials will help ensure your final tree looks neat and professional.
Preparing Your Fabric Pieces
The foundation of any good quilt or quilt pattern lies in accurate preparation. For the folded fabric Christmas tree, your tree’s shape and folds will depend on precise cutting and folding of your fabric pieces. To get started, cut several squares of fabric for the tree layers.
A good starting point is to prepare 5–7 squares in descending sizes. For example:
- 1 square of 6″ x 6″ (top layer)
- 1 square of 7″ x 7″
- 1 square of 8″ x 8″
- 1 square of 9″ x 9″
- 1 square of 10″ x 10″
You can add more layers if you want a taller, fuller tree. Each square will be folded to create a tier of branches.
Once your squares are cut, press them with an iron to remove wrinkles. This will make folding easier and more precise. If you’re using directional prints, decide which way you want the patterns to face before folding. Taking the time to prepare carefully now will make assembling your quilted tree a breeze later on.
Folding the Fabric for the Tree Layers
Now comes the fun part—creating the folded layers that give this quilt pattern its signature look. Each fabric square will be folded in a way that mimics the layers of a Christmas tree.
First, fold your square in half diagonally to create a triangle. Press the fold. Next, fold the two outer corners of the triangle upward toward the top point, forming a smaller diamond shape. Press again to hold the folds in place. This creates the layered look of “branches.”
Repeat the process for all your fabric squares. You’ll notice that each layer looks like a small, folded fabric unit. When stacked from largest to smallest, they will form the silhouette of a tree. Keep them organized by size so that assembling your decoration later is quick and easy.
Assembling the Christmas Tree
Once your folded units are ready, it’s time to assemble your Christmas tree onto your background fabric. This is where your quilt-making skills will shine.
Start by placing the largest folded square at the bottom center of your background fabric. Pin or clip it in place. Layer the next largest folded square slightly above it, overlapping just enough so that the edges of the bottom layer are still visible. Continue layering in this fashion until you reach the smallest piece at the top.
When you’re happy with the placement, stitch each layer across the top fold to secure it to the background fabric. This method allows the lower parts of each layer to remain free and dimensional. Be sure to backstitch at the beginning and end of each seam for durability.
Adding the Tree Trunk and Finishing the Quilt
Your Christmas tree needs a sturdy base, so now is the time to add the trunk. Cut a small rectangle of brown fabric (about 1.5″ x 2.5″) and position it just below the bottom layer of the tree. Stitch it in place, making sure it aligns nicely with the center of your design.
To complete the quilt, add a layer of batting and a backing fabric behind your decorated front. Pin the layers together and quilt as desired. You can stitch around the tree’s shape, outline each fold, or add free-motion quilting for texture.
Finally, finish your piece with binding. Use a festive print or solid color to frame your project beautifully. Once bound, your folded fabric Christmas tree decoration is ready to hang or gift.
Creative Personalization Ideas
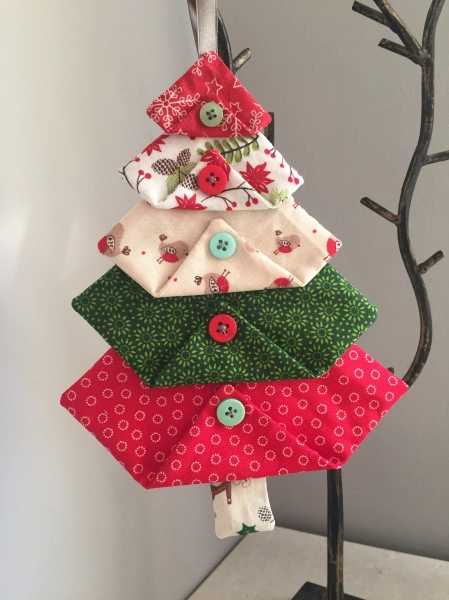
One of the best things about this quilt pattern is how customizable it is. You can adapt the colors, fabrics, and embellishments to suit any holiday theme. Want a whimsical look? Use bright, unconventional colors like turquoise, pink, and gold. Prefer a rustic style? Choose muted greens, plaids, and burlap accents.
Embellishments can take your tree to the next level. Add tiny beads for ornaments, sequins for sparkle, or a small felt star at the top. Ribbons and lace can also be sewn into the folds for a playful touch.
You can even scale the pattern up or down. Make a large wall hanging to become the centerpiece of your holiday décor, or create mini versions to use as ornaments, gift tags, or stocking stuffers.
Displaying and Gifting Your Quilt Tree
Once your tree is complete, there are endless ways to enjoy it. Hang it on your wall, place it on a mantel, or use it as part of a holiday table setting. The dimensional folds catch the light beautifully, giving your decoration depth and visual interest.
Folded fabric Christmas trees also make fantastic gifts. Handmade presents carry a special kind of warmth and meaning, and this quilt pattern is perfect for showing your creativity and care. Pair your tree with a batch of cookies or a holiday-scented candle for a thoughtful gift set.
Because this project is quick to make, you can easily create multiple trees for friends, family, and coworkers. You might even start a tradition of making a new version each year in a different fabric style.
Share Your Folded Fabric Christmas Tree
The joy of quilting is even greater when shared. If you try this folded fabric Christmas tree quilt pattern, don’t keep it to yourself—share it with the quilting community! Post pictures on social media, join quilting forums, or bring your creation to a local quilting guild meeting.
Seeing the different interpretations of the same pattern is inspiring. You’ll get fresh ideas for future projects and encourage others to try their hand at holiday quilting. Sharing your work also helps keep traditional crafts like quilting alive and thriving for the next generation.
So, grab your fabrics, start folding, and bring a little extra handmade joy into this holiday season. Your folded fabric Christmas tree is more than just a decoration—it’s a celebration of creativity, tradition, and festive spirit.