
Sewing your own cloth case with zipper is not only a fun and creative project, but also a practical one. These cases can be used for makeup, school supplies, quilting tools, or even as a small clutch bag. By making one yourself, you’ll have complete freedom to choose your favorite fabrics, colors, and details, making it uniquely yours. Whether you love quilting or simply enjoy crafting with fabric, this project is perfect for you.
Beginners often think that sewing a zipper is difficult, but with the right step-by-step instructions, you’ll discover it’s simpler than it looks. A cloth case project also provides a great opportunity to experiment with different quilt techniques and fabric scraps. This way, you can practice your quilting skills while creating something practical.
In this tutorial, we’ll walk through the process step by step, from gathering materials to sewing the finishing touches. You’ll also find ideas for personalizing your cloth case with quilt patterns, embroidery, and accessories. By the end, you’ll feel confident in making one—or several—to use or gift.
Materials You Will Need
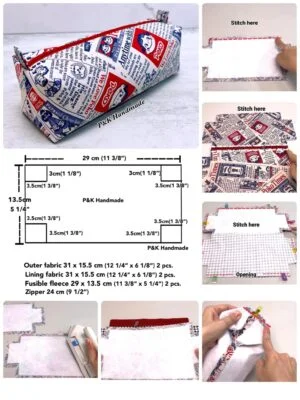
Before starting, let’s go through the materials required for this sewing project. The best part is that most of them are basic and easy to find, and you may even have some at home already. For the outer fabric, choose cotton, canvas, or quilt fabric for sturdiness. For the lining, a softer fabric works well, such as cotton or lightweight polyester. You will also need interfacing if you want extra structure.
Here’s a basic list of materials:
- Outer fabric (two pieces, 10” x 7”)
- Lining fabric (two pieces, 10” x 7”)
- Fusible interfacing (two pieces, 10” x 7”)
- One zipper (9” to 10”)
- Thread matching your fabric
- Sewing machine, scissors, pins, and iron
If you enjoy quilting, you can replace the outer fabric with a quilt block or small quilt pattern of your choice. This allows you to create a cloth case that reflects your personal quilting style, whether traditional or modern. Using quilt scraps also makes this project eco-friendly and budget-friendly.
Step 1: Preparing Your Fabrics
Start by cutting your fabrics according to the measurements provided. You’ll need two pieces for the outer fabric and two pieces for the lining. If you’re using interfacing, cut two matching pieces and fuse them to the back of your outer fabric with an iron. This will give your cloth case more structure and durability.
At this stage, you can add a creative touch by quilting your outer fabric. Layer the outer fabric, batting, and a backing fabric to create a mini quilt sandwich, then stitch your favorite quilt pattern. Simple straight-line quilting works beautifully for beginners, while free-motion quilting can add a more artistic look. This step is optional, but it truly makes your case stand out.
Once your fabric is ready, press everything neatly with your iron. Smooth, crisp pieces will make your sewing much easier and give your finished project a professional appearance. Taking time to prepare your materials sets the stage for a stress-free sewing process.
Step 2: Attaching the Zipper
Zippers may seem intimidating, but this step is easier than it looks. Place your zipper face down along the top edge of one outer fabric piece. Then, layer one lining piece on top, with the right sides facing each other. Pin or clip everything in place so the zipper is sandwiched between the fabrics.
Using a zipper foot on your sewing machine, sew along the edge where the zipper is pinned. Go slowly and carefully, making sure your stitches are straight. Once done, flip the fabric pieces right side out and press them so the zipper lays flat. Repeat this process with the other side of the zipper, attaching it to the remaining outer and lining pieces.
At this point, your cloth case will start taking shape. Open and close the zipper to check that it works smoothly. If you’ve chosen to quilt your outer fabric earlier, you’ll notice how beautifully the quilt pattern highlights the zipper area, giving your case a handmade yet polished look.
Step 3: Sewing the Case Together
Once both sides of the zipper are attached, open the zipper halfway. This is important—you’ll need it open to turn your case right side out later. Place the two outer fabric pieces right sides together, and the two lining pieces right sides together, aligning all edges.
Pin or clip around the case, leaving a small 2” opening in the bottom of the lining. Sew around the entire perimeter with a ¼” seam allowance, carefully going over the edges near the zipper. Make sure your stitches are secure so the case will hold up with use.
After sewing, trim the corners to reduce bulk, but be careful not to cut through the stitches. Turn the case right side out through the zipper opening. Then, close the opening in the lining by sewing a small seam, either by hand or with your machine. Push the lining inside, give everything a good press, and admire your finished cloth case!
Step 4: Customization Ideas
One of the best things about sewing your own cloth case is the endless personalization possibilities. You can mix and match fabrics, use colorful zippers, or add fun details like tassels and charms. For quilting lovers, incorporating a quilt block design on the front is an excellent way to showcase your skills. Try a simple patchwork quilt pattern, or experiment with scraps in a log cabin or flying geese style.
If you enjoy embroidery, add initials, small motifs, or floral details to the outer fabric before assembling the case. This makes your case a thoughtful gift, especially when personalized with someone’s name or favorite colors. For kids, you can choose playful fabrics and bright zippers to create fun cases for school supplies.
Another idea is to vary the size of the case. By adjusting the measurements, you can create smaller coin pouches or larger tablet sleeves. The step-by-step process remains the same, so once you master the basics, you’ll be able to make cases of all shapes and sizes with ease.
Tips for Beginners
If you are new to sewing, don’t worry—this project is very beginner-friendly. Start with sturdy cotton fabrics, as they are easier to handle and sew. Using quilting cotton is a great choice, since it comes in endless patterns and prints, making your project both fun and forgiving.
Take your time with the zipper step, as that’s usually where beginners feel most nervous. Remember to go slowly and use plenty of pins or clips to keep everything in place. Practice makes perfect, and your confidence will grow with each cloth case you make.
Don’t be afraid to experiment with quilt techniques in your cases. A small project like this is perfect for testing new quilt patterns without committing to a large quilt. You’ll not only improve your sewing skills but also build up a beautiful collection of personalized, handmade cases.
Conclusion: Share Your Creation
Congratulations! You’ve completed your own cloth case with zipper, learning valuable sewing and quilting techniques along the way. Whether you use it for organizing small items, gifting to friends, or simply enjoying a handmade accessory, this project is both practical and rewarding.
The beauty of this tutorial is its versatility. Once you’ve mastered the steps, you can customize your cloth case with quilt patterns, embroidery, and fabric choices that reflect your personality. Every piece will be unique and special, whether simple and minimal or bold and colorful.
Now it’s your turn—try making your own cloth case with zipper and share your creations. Post your photos online, show them off in quilting groups, or gift them to someone you love. Crafting is more enjoyable when shared, and your handmade cloth case might inspire someone else to start sewing too!