
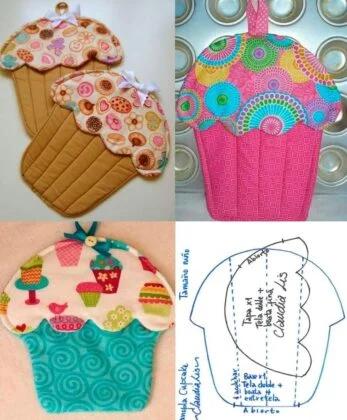
Quilting is an art form that brings together creativity, patience, and joy. One of the most delightful ways to practice your skills and create something unique is by making a quilted cupcake design. This project is perfect for beginners who want to try a small yet impactful quilt pattern that looks charming and playful. Whether you’re creating it for yourself, as a gift, or as part of a larger quilt, this tutorial will guide you step by step.
A quilted cupcake combines the cozy texture of quilting with the sweetness of a cupcake motif. It’s small enough to finish in a day, yet detailed enough to make you proud of your progress. With a few basic quilting techniques, you can craft a piece that will brighten up your home or serve as a cute addition to a quilt block collection.
Throughout this tutorial, we’ll walk through everything you need: the materials, the cutting and piecing process, the stitching details, and even fun ideas to personalize your quilt. Let’s dive in and explore how you can turn fabric scraps into a quilted cupcake masterpiece.
Materials You Will Need
Before beginning, gather all the materials so your quilting experience runs smoothly. You’ll need a variety of cotton fabrics—choose colors and prints that represent your cupcake wrapper, frosting, and any decorations. This is a fantastic opportunity to use leftover fabric scraps from previous projects and bring them together in a colorful quilt pattern.
You’ll also need basic quilting supplies: a rotary cutter, cutting mat, quilting ruler, sewing machine, and coordinating thread. For the batting, select a lightweight option that will give your cupcake design some soft dimension without being too bulky. Backing fabric is also necessary if you want to turn your quilted cupcake into a mini wall hanging or mug rug.
Optional but fun supplies include embellishments such as buttons, beads, or embroidery floss to decorate the top of your cupcake. These extras are not essential, but they help add charm and character to your quilt pattern, making it truly your own.
Cutting the Fabric Pieces
To make your quilted cupcake, you’ll start by cutting your fabric pieces. For the cupcake wrapper, cut a rectangle measuring 4” x 5”. For the frosting section, cut a larger piece in a rounded shape about 5” wide and 4” tall. These measurements can be adjusted depending on the size of your final quilt project, but they’re a great starting point.
If you want to add sprinkles or decorations, cut small fabric scraps into tiny shapes. These can be raw-edge appliquéd onto the frosting section for a whimsical touch. For the background, cut a 7” x 9” rectangle of fabric. This piece will hold your cupcake design in place.
It’s a good idea to press your fabrics before cutting to ensure accuracy. Using a rotary cutter and ruler will help keep your quilt pattern clean and neat. Accuracy is key in quilting, even with playful projects like this one.
Piecing the Cupcake Wrapper
Once your fabric is ready, begin piecing the cupcake wrapper. To give it texture, you can add quilting lines to mimic the ridges of a real cupcake liner. Simply sew vertical lines across the rectangle, spacing them about ½” apart. This will add depth and realism to your quilted cupcake.
Next, attach the wrapper to the background fabric using either fusible web or by sewing it directly onto the base. If you choose fusible web, press it in place with an iron before stitching. If you prefer sewing, use a zigzag or blanket stitch to secure the edges neatly.
This step provides structure and sets the stage for the frosting portion. The quilt pattern begins to take shape here, with the wrapper providing the bottom foundation. Take your time and ensure everything is aligned properly before moving forward.
Adding the Frosting Layer
Now comes the fun part—the frosting! Place your rounded frosting fabric above the cupcake wrapper. You can play with different fabrics here: polka dots for sprinkles, solid colors for a clean look, or even floral prints for a whimsical design.
Sew the frosting piece onto the background fabric, overlapping the top of the cupcake wrapper slightly. This overlap creates a realistic cupcake shape and ensures there are no gaps between sections. You can use a decorative stitch here if you’d like, such as a scalloped or wavy line, to enhance the look of frosting.
To give the frosting extra dimension, you can add quilting lines in swirls or curves across the fabric. This step makes the quilted cupcake look fluffy and full, capturing the essence of a sweet treat.
Decorating the Cupcake
Once the main cupcake shape is assembled, it’s time to decorate! Add “sprinkles” by sewing small fabric scraps or by stitching lines in bright thread colors across the frosting. For a cherry on top, cut a small red circle from fabric and applique it at the peak of the frosting.
If you enjoy hand-stitching, this is a perfect opportunity to add embroidery details. French knots can look like candy toppings, and chain stitches can create playful patterns. Buttons and beads are also fun additions, but remember to secure them tightly if the project will be handled frequently.
This is the stage where your creativity shines. No two quilted cupcakes will ever look the same, and that’s what makes this quilt pattern so delightful. Use your imagination to create a design that reflects your personality or the occasion you’re making it for.
Quilting and Finishing Touches
Once the cupcake is complete, it’s time to quilt the entire block. Place your backing fabric right side down, add batting in the middle, and place your cupcake block on top. Pin or baste the layers together so they stay in place during quilting.
Quilt around the cupcake shape to outline it and make it pop. You can also quilt the background with straight lines, swirls, or even a grid pattern. This quilting not only secures the layers but also enhances the texture of your project.
After quilting, trim any excess batting and backing fabric. Add binding around the edges if you want to finish it as a mini quilt, or simply hem the sides if you prefer a simpler look. Your quilted cupcake is now ready to use, display, or gift.
Personalization Ideas
The beauty of a quilt pattern like this is how versatile it can be. You can create a whole series of quilted cupcakes in different colors and styles, then stitch them together into a fun quilt. Imagine a quilt where every block is a unique cupcake—it would be perfect for a kitchen or a child’s room.
Another idea is to turn your quilted cupcake block into practical items. With the right finishing touches, it can become a mug rug, a pot holder, or even a fabric postcard to send to a friend. These small projects are great for practicing quilting techniques while creating useful and charming gifts.
You can also personalize your cupcake to match different holidays or themes. For Valentine’s Day, use red and pink fabrics; for Christmas, make the frosting green and add tiny star decorations. The possibilities are endless, and each quilt pattern variation tells a different story.
Share Your Quilted Cupcake Project
Now that you’ve completed your quilted cupcake, don’t keep it to yourself! Share your creation with friends, family, or your online quilting community. Posting photos of your work can inspire others to try quilting and join in the fun.
If you’re a beginner, don’t worry about imperfections—quilting is all about learning and enjoying the process. Every stitch adds character and makes your quilt pattern unique. Your project will improve with practice, and small projects like this are perfect stepping stones to bigger quilting adventures.
So, grab your fabric scraps, follow this tutorial, and create your own quilted cupcake. And when you do, be sure to share your finished masterpiece with others—it’s a sweet way to spread creativity and joy.