
Crochet is one of the most creative and relaxing hobbies you can dive into, especially when it comes to making seasonal home decorations. One of the most charming ways to bring warmth and coziness into your home during autumn is by making your own crochet pumpkin home decoration. With just a hook, some yarn, and a little time, you can create pumpkins that look adorable on shelves, dining tables, or even as part of a festive centerpiece.
In this tutorial, you’ll learn how to make a crochet pumpkin using a free crochet pattern that is simple enough for beginners but still enjoyable for experienced crocheters. We’ll cover all the materials you’ll need, walk you through the step-by-step instructions, and share some creative ideas for personalizing your pumpkins. By the end, you’ll be inspired to create a whole pumpkin patch for your home!
Materials You Will Need
Before you start, it’s important to gather all the necessary materials for this crochet pattern. Luckily, most of what you need can be found in any craft store, or maybe you already have them in your crochet basket.
For this project, you will need:
- Worsted weight yarn in orange (or any color you prefer)
- Green or brown yarn for the stem
- A 4.0 mm or 4.5 mm crochet hook
- Fiberfill stuffing (or any soft filling material)
- Yarn needle for sewing ends
- Scissors
These materials are simple, but they make all the difference. The type of yarn you use can create different textures and vibes. For instance, cotton yarn gives a more defined look, while acrylic yarn provides a softer and fluffier finish. Don’t forget that stuffing is key to achieving the perfect plump pumpkin shape.
Step 1: Creating the Pumpkin Base
The base of the pumpkin is worked in rounds. Begin by making a slip knot and chaining 25. This will be the starting point of your crochet pattern. Join the chain into a circle, being careful not to twist it.
Next, work single crochet stitches around the chain, joining at the end of each round. Continue crocheting in the round until you have about 20–25 rows, depending on how big you want your pumpkin to be. The more rows you add, the taller your pumpkin will become.
As you go, you’ll notice the piece taking the shape of a tube. Don’t worry if it doesn’t look like a pumpkin just yet. That transformation will come later when we shape it with stuffing and sewing. For now, the important part is keeping your stitches even and consistent.
Step 2: Shaping the Pumpkin
Once you’ve crocheted the base, it’s time to close the bottom. Thread your yarn needle with a long piece of yarn, weave it through the stitches of the last round, and pull it tightly to close the hole. Tie a secure knot and weave in the ends.
Next, stuff the pumpkin generously with fiberfill. Don’t be afraid to add plenty of stuffing, as this is what will give your pumpkin a plump and realistic look. Once you are happy with the firmness, repeat the same process on the top: weave the yarn through the stitches and pull to close.
At this stage, you’ll have a stuffed ball, but we want a pumpkin shape. To achieve this, use a long piece of yarn, thread it through the center top and bottom of the pumpkin, and pull tightly. Repeat this several times around the pumpkin to create segments, just like a real pumpkin has. This is where your crochet project truly comes to life.
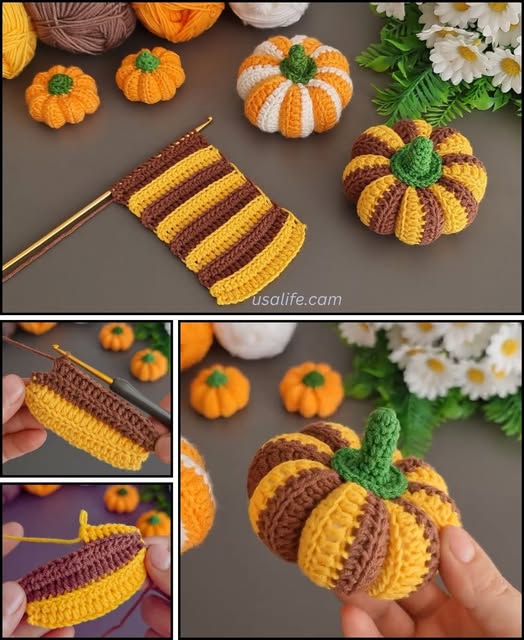
Step 3: Adding the Stem
Now that your pumpkin is shaped, it’s time to make the stem. With green or brown yarn, create a small chain of about 6 stitches. Then, work single crochets back down the chain to create a small tube-like stem.
Attach the stem securely to the top of the pumpkin using your yarn needle. Make sure it is tightly sewn so it doesn’t wobble. You can leave it straight or slightly bent for a more natural look.
The stem is a small detail, but it’s one of the most charming parts of the pumpkin. It adds character and makes your crochet decoration instantly recognizable as a pumpkin.
Step 4: Personalization Ideas
One of the joys of working with any crochet pattern is the ability to customize it. You can make your pumpkins in traditional orange, or you can experiment with different colors. White pumpkins, pastel pumpkins, or even striped pumpkins can bring a modern and playful touch to your home.
Another fun idea is to vary the sizes. Using different hook sizes or yarn thickness, you can make tiny pumpkins to scatter around your coffee table, or oversized ones to place by your entryway. A set of mixed sizes looks especially beautiful when arranged together.
For added flair, you can embellish your pumpkins with small leaves, vines, or even beads. If you’re making them as gifts, consider sewing a little tag or ribbon for a personalized touch. The possibilities are endless and completely up to your creativity.
Step 5: Decorating with Your Crochet Pumpkins
Once your pumpkins are ready, it’s time to showcase them around your home. Place a few on your dining table as part of a fall centerpiece, mix them with candles for a cozy autumn display, or set them on shelves for a pop of seasonal charm.
Crochet pumpkins also make excellent photo props or handmade gifts. They’re lightweight, durable, and reusable year after year. Imagine bringing them out each fall as part of your traditional decorations—it’s a wonderful way to combine creativity with seasonal cheer.
If you enjoy making more than one, consider crafting a whole “pumpkin patch” of crochet decorations. Group them in baskets, wooden trays, or even scatter them around your mantel for a whimsical autumn vibe.
Step 6: Sharing Your Work
One of the best parts about working on a crochet pattern is sharing your finished project with others. After you’ve completed your pumpkins, why not snap a few photos and share them on social media or with your crochet community?
Sharing your work not only spreads inspiration but also connects you with fellow crafters who may want to try the same project. You might even inspire a friend to pick up a crochet hook for the first time!
Remember, every pumpkin you make is unique. No two will be exactly the same, and that’s what makes handmade decorations so special. Be proud of your work and let others see the beauty of what you’ve created.
Conclusion
Making a crochet pumpkin home decoration is a rewarding and creative project that brings warmth and character into your living space. With a simple crochet pattern, basic materials, and a little patience, you can craft beautiful pumpkins to enjoy year after year. Whether you stick to traditional orange or experiment with bold and modern colors, these pumpkins are guaranteed to brighten up your autumn décor.
Now it’s your turn to grab your yarn and hook, follow the steps, and create your own crochet pumpkins. Once you’ve made them, share your creations with friends, family, or online communities—you’ll be surprised at how much joy these small handmade decorations can bring.
Happy crocheting, and may your home be filled with the cozy charm of handmade pumpkins this season!