
Creating your own DIY Zipper Pouch Bag is a fun and practical sewing project that anyone can enjoy. Whether you want a stylish accessory, a handy travel organizer, or a unique gift, making a zipper pouch allows you to customize every detail. With this beginner-friendly tutorial, you’ll learn step by step how to sew a beautiful and functional bag using a simple sewing pattern. Let’s get started on this creative journey together!
Materials You’ll Need
Before we dive into the sewing process, it’s important to gather all the materials. You’ll need some basic sewing supplies that are easy to find. Start with two pieces of fabric for the outside of your bag and two pieces for the lining. Cotton fabrics work wonderfully, but you can also use canvas or lightweight denim for a sturdier pouch.
In addition to fabric, you’ll need a zipper in a length that matches your bag’s width. A 7- or 9-inch zipper is perfect for a small pouch. Other essential tools include thread, scissors, pins or clips, a sewing machine, and a ruler. Having a matching or contrasting thread can make your zipper pouch even more stylish.
Optional items include interfacing to give your bag more structure, decorative trims, or even embroidery floss if you want to personalize your pouch. Once you have all the materials ready, you’ll be able to follow the sewing pattern easily and achieve a polished final result.
Cutting the Fabric
Start by preparing your fabrics according to the sewing pattern. Cut two rectangles from your outer fabric and two from the lining fabric. For a standard small pouch, rectangles of 9 inches by 6 inches work perfectly. If you want a larger pouch, simply adjust the measurements while keeping the proportions consistent.
If you’re using interfacing for added structure, cut pieces to match the outer fabric. Iron the interfacing onto the wrong side of the fabric following the manufacturer’s instructions. This step is optional but highly recommended if you want your pouch to hold its shape over time.
Remember to mark the zipper placement lightly on your fabric with chalk or a fabric pen. This small detail will make sewing the zipper easier and help ensure a professional finish. Preparing your fabric carefully at this stage makes the sewing process smoother and more enjoyable.
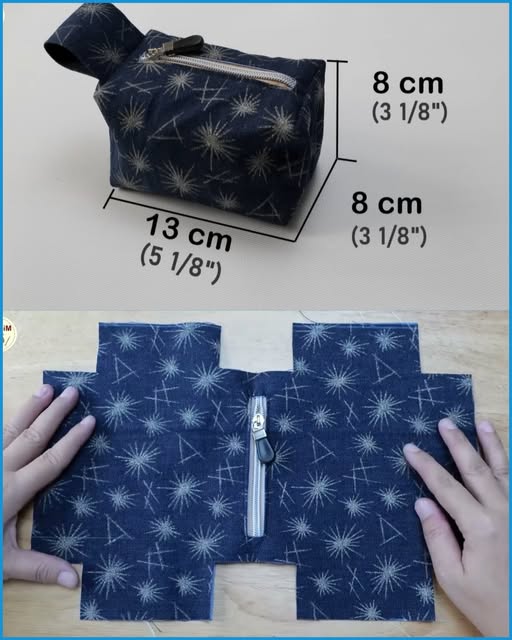
Attaching the Zipper
Place one outer fabric piece right side up, then lay the zipper face down along the top edge. Place one lining fabric piece on top, right side down, so that all layers are stacked neatly. Pin or clip the layers in place to prevent shifting. This “sandwich” method is perfect for beginners and ensures a clean seam.
Using a zipper foot on your sewing machine, stitch along the zipper edge carefully. Take your time to sew straight and remove pins as you go. After stitching, flip the outer fabric away from the zipper and press it flat. Repeat the same process with the other side of the zipper, sandwiching it with the remaining outer and lining fabric pieces.
Once both sides are sewn, topstitch along the zipper edges to secure it in place and give your pouch a professional finish. This small detail not only looks beautiful but also prevents the fabric from catching in the zipper teeth while opening and closing your pouch.
Sewing the Bag Sides
With the zipper attached, it’s time to sew the sides of the pouch. Open the zipper halfway to make turning the bag easier later. Align the right sides of the outer fabric together and the right sides of the lining fabric together. Pin or clip the edges to keep everything in place.
Sew around the edges of the bag, leaving a small opening in the lining for turning. Make sure to backstitch at the beginning and end to secure your seams. For a neat finish, trim the corners diagonally, which reduces bulk and helps the bag corners lie flat when turned.
After sewing, carefully turn the bag right side out through the opening in the lining. Push the corners out gently with a blunt tool like a chopstick or a knitting needle. Press the bag flat with an iron for crisp edges and a professional look. Finally, sew the opening in the lining closed with a small hand stitch or topstitch along the edge.
Personalizing Your Zipper Pouch
One of the most exciting parts of making a DIY Zipper Pouch Bag is personalizing it! You can add patches, embroidery, or fabric paint to reflect your style. For example, a small monogram on the front can make your pouch feel unique and special.
Another fun idea is to mix and match fabrics. Use a patterned fabric for the outer bag and a contrasting solid color for the lining. You can even add decorative ribbons or lace along the zipper edge for extra charm. Playing with colors and textures makes your pouch truly one-of-a-kind.
Consider adding small embellishments like beads or appliqué designs. These small touches make your sewing project feel more personal and can transform a simple pouch into a thoughtful gift. Let your creativity shine while following the basic sewing pattern, and don’t be afraid to experiment!
Finishing Touches
Once your pouch is complete, inspect all seams and trim any loose threads. Give the pouch a final press with your iron to make it look crisp and polished. Check the zipper to make sure it opens and closes smoothly. These finishing touches make a big difference in the final appearance of your project.
If desired, you can add a small fabric loop or keyring attachment to one side of the bag. This addition turns your pouch into a versatile accessory that can be attached to a bag strap or used as a key holder. Small details like this are easy to add and make your pouch even more functional.
Finally, consider making a matching set! Once you’ve mastered this sewing pattern, you can create pouches in various sizes for makeup, stationery, or travel essentials. Each pouch can be customized with different fabrics, colors, and embellishments for endless possibilities.
Share Your Project
Creating your own DIY Zipper Pouch Bag is not only practical but also incredibly rewarding. Once you finish your pouch, take a moment to admire your work and celebrate your accomplishment. Sewing is a journey, and every project helps improve your skills and creativity.
We would love to see your finished pouches! Share your photos in your favorite sewing community or social media platforms. Tag your posts with #Sewing and #SewingPattern to inspire others and connect with fellow crafters. Sharing your projects encourages a positive and supportive sewing environment for everyone.
Remember, every zipper pouch you make is a testament to your creativity and dedication. Keep experimenting with fabrics, colors, and embellishments, and enjoy the satisfaction of completing a beautiful handmade project. Happy sewing, and may your DIY Zipper Pouch Bags bring joy to your life and others!