
If you’re looking for a fun and practical sewing project, making your own tote bag is the perfect place to start. Tote bags are stylish, eco-friendly, and endlessly useful—from carrying groceries to holding books or even functioning as a chic everyday accessory. The best part is that with a simple sewing pattern and basic materials, even beginners can successfully create one. This tutorial will walk you step by step through the process, helping you build confidence with your sewing machine while ending up with a bag you’ll be proud to show off.
In this guide, you’ll find a complete materials list, clear instructions, and creative ideas to customize your tote bag so it reflects your personal style. Sewing can feel intimidating at first, but the beauty of this project is its simplicity. Once you’ve made one tote bag, you’ll probably want to experiment with different fabrics and patterns to create a whole collection. Ready to get started? Let’s dive in!
Materials You’ll Need
Before you begin, it’s important to gather everything required for this sewing project. You don’t need expensive tools or advanced sewing equipment to create a beautiful tote bag. The essentials are likely items you already have or can easily find at your local craft or fabric store.
Here’s a basic list of what you’ll need:
- Fabric: A sturdy cotton canvas or denim works best for durability. Choose one yard for the exterior and one yard for the lining.
- Thread: A strong, all-purpose thread in a color that matches or contrasts with your fabric.
- Straps: You can buy pre-made cotton webbing or sew your own handles from fabric.
- Sewing tools: Scissors, pins or clips, measuring tape, fabric chalk, and a sewing machine.
- Optional extras: Interfacing for added structure, a pocket piece for the inside, or decorative trims.
Having all your materials laid out before you begin ensures a smooth and enjoyable sewing process. Think of this step as setting the stage for creativity—it’s always easier when everything you need is within reach.
Cutting Your Fabric Pieces
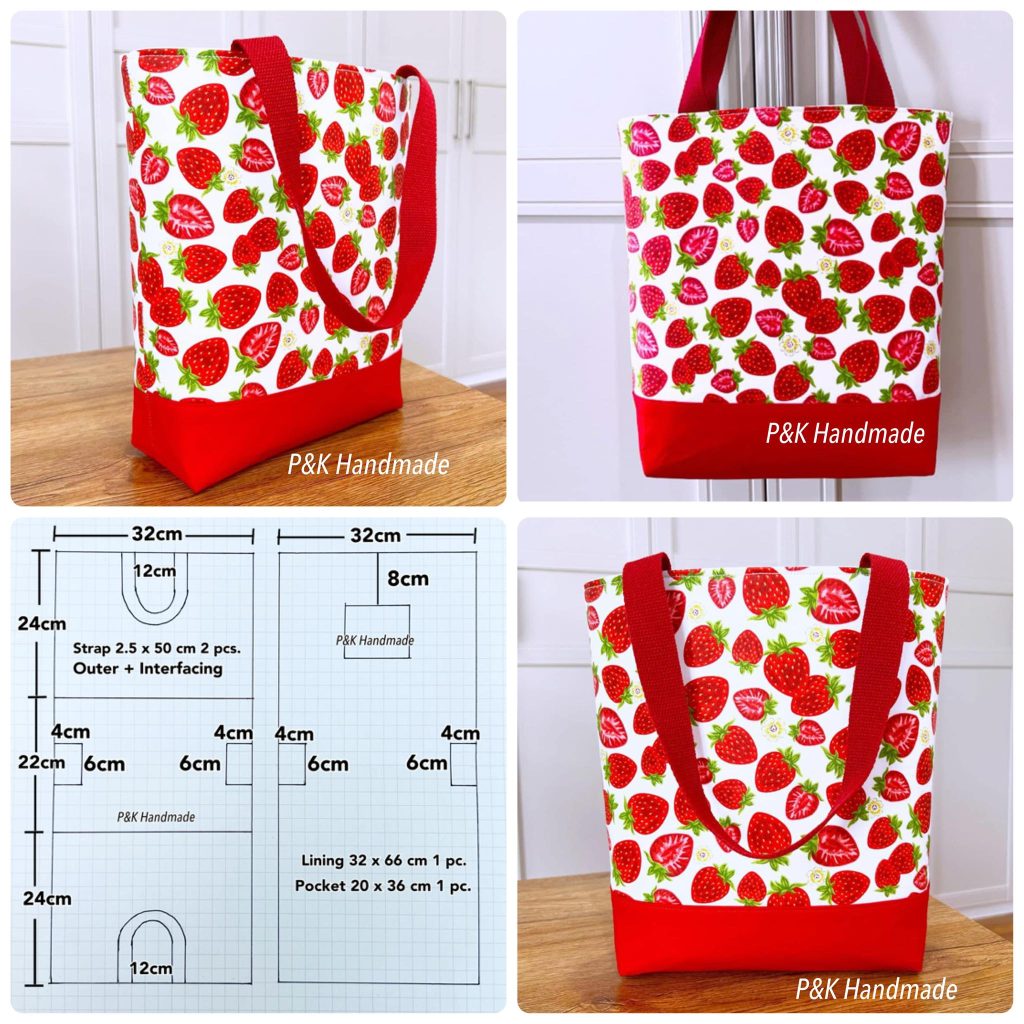
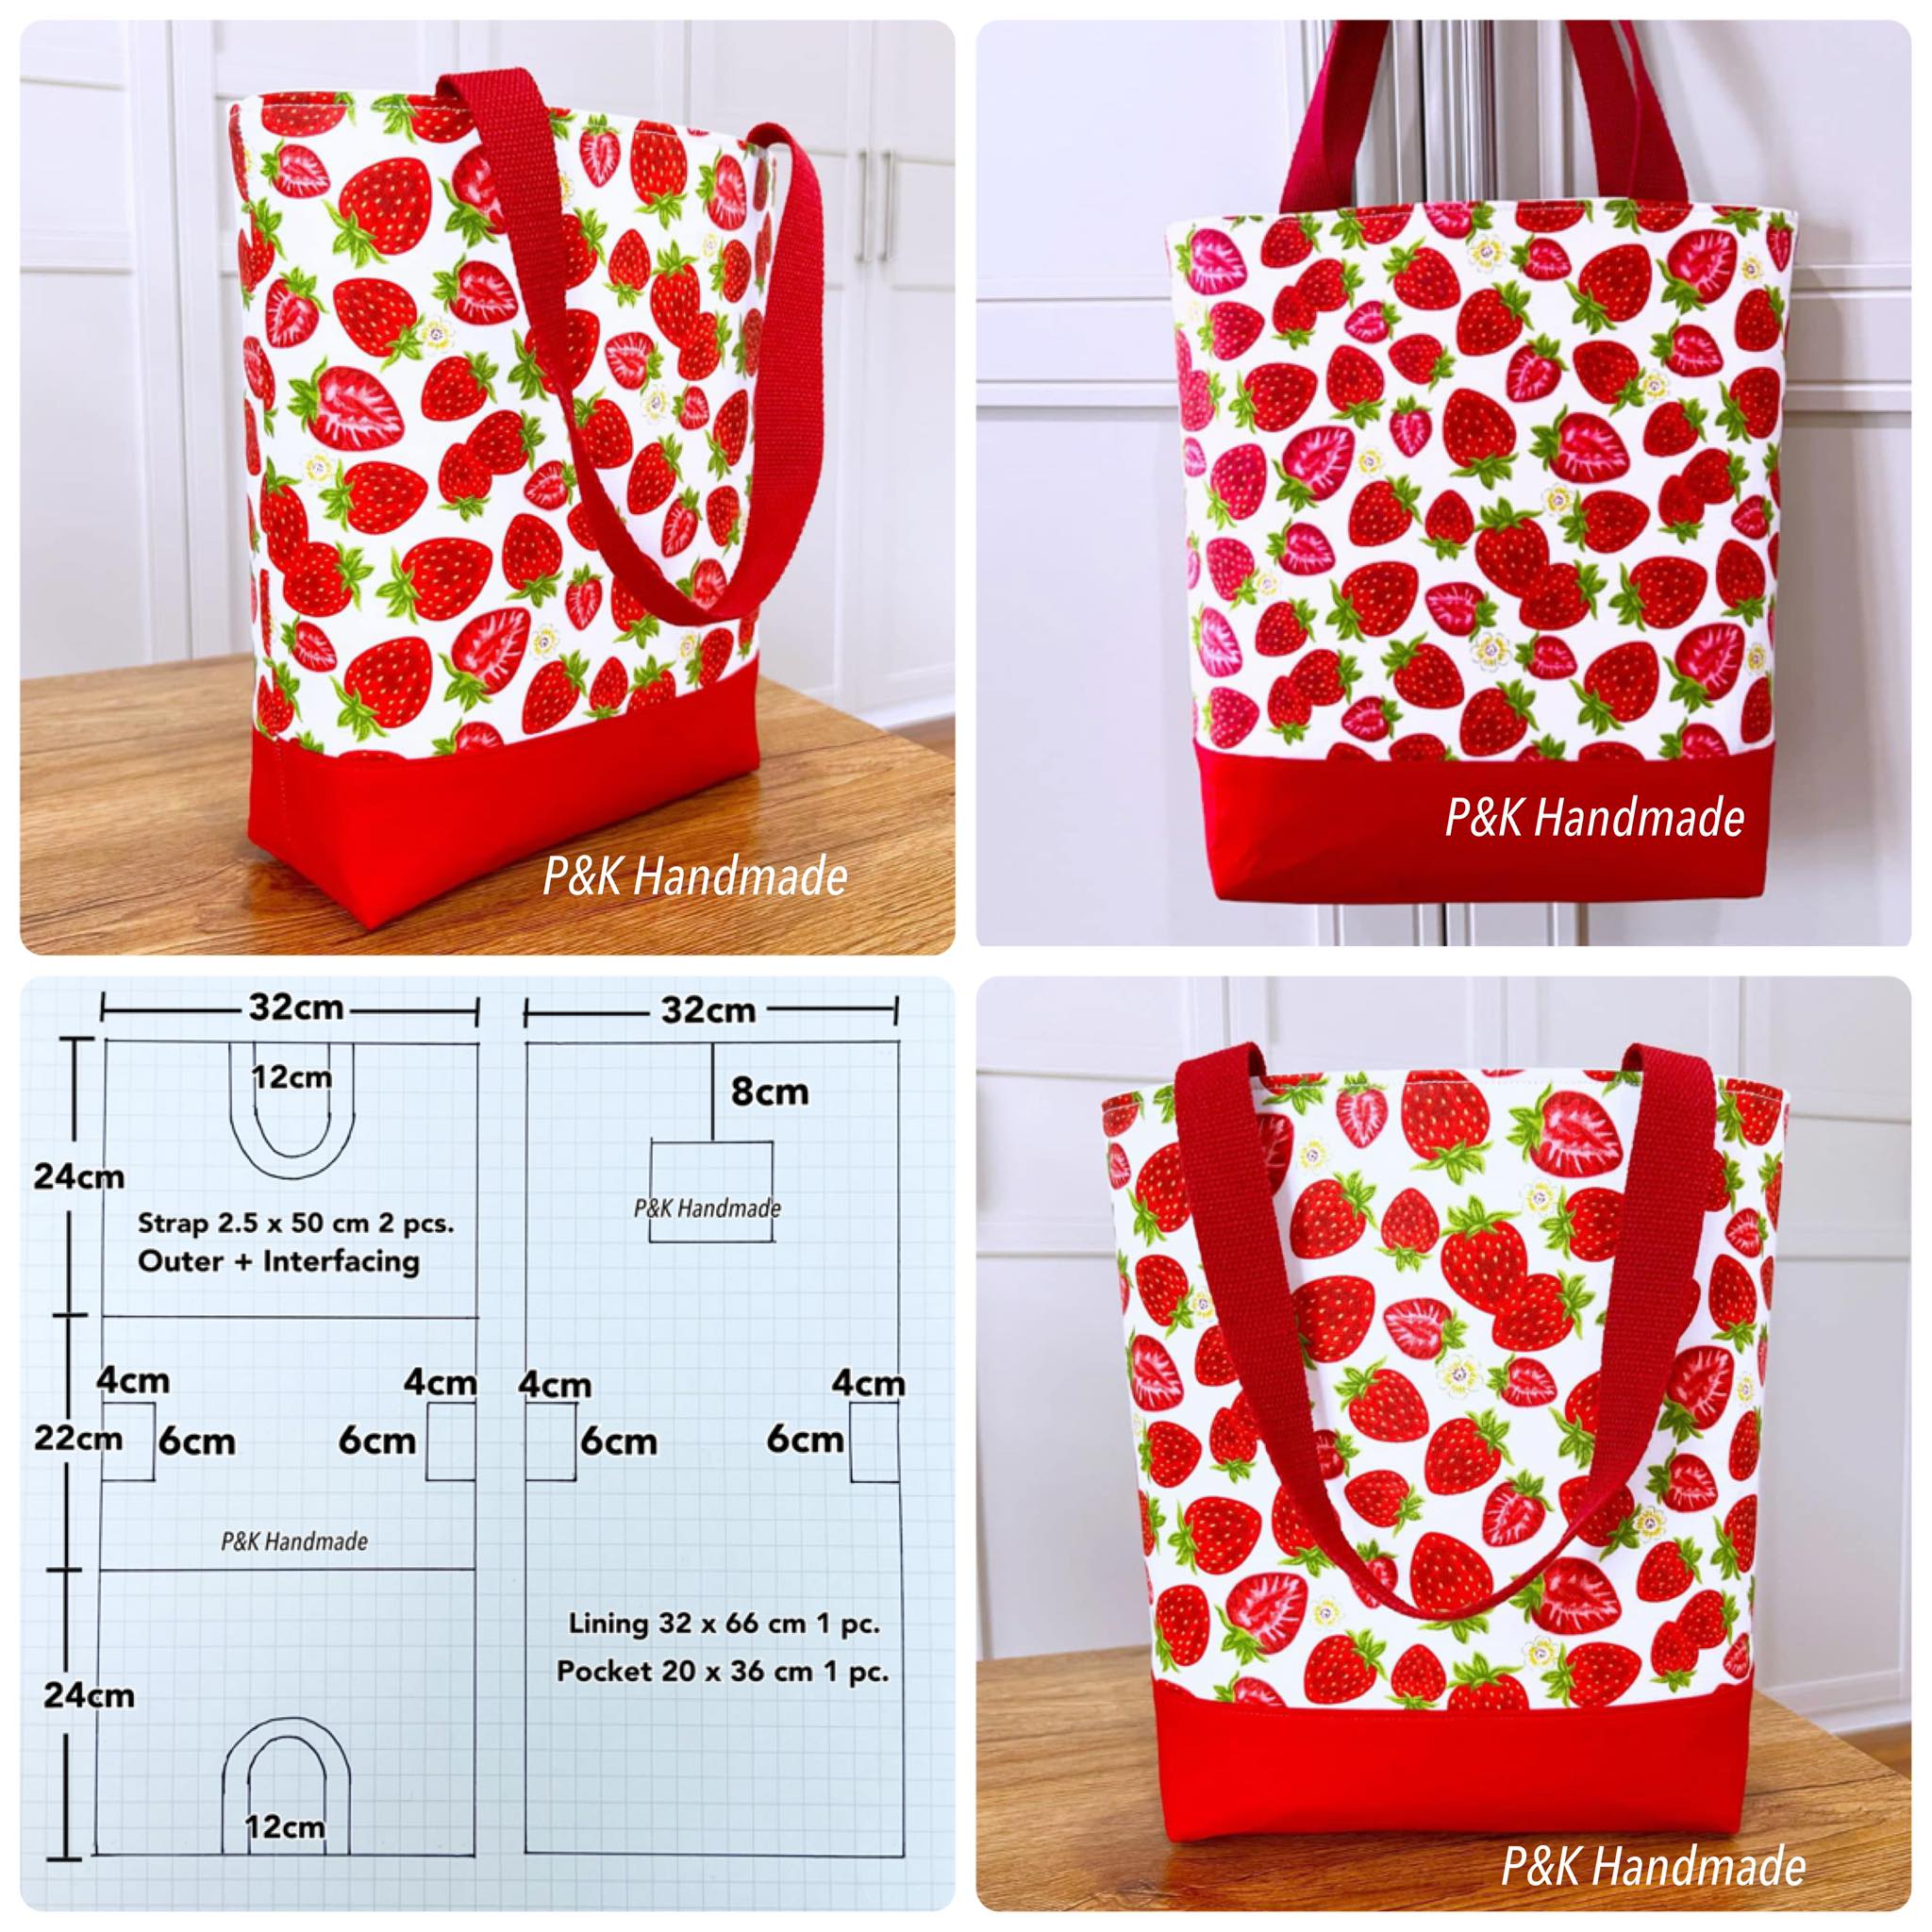
The first step in bringing your tote bag sewing pattern to life is cutting out the pieces. A typical tote bag requires two rectangles for the exterior, two for the lining, and two straps. If you’d like to add a pocket, cut an extra rectangle for that as well.
A good beginner-friendly measurement for a tote bag is 16 inches wide by 14 inches tall, but you can adjust the size depending on your preference. Don’t forget to add a seam allowance (½ inch is standard) around all sides when cutting. For straps, cut two strips of fabric around 24 inches long and 3 inches wide—or use pre-made webbing for convenience.
Make sure to measure carefully and cut your pieces as accurately as possible. Clean, straight cuts will help your sewing process go smoothly and give your finished tote bag a polished, professional look.
Sewing the Tote Bag Body
With your fabric pieces ready, it’s time to start sewing. Begin by placing the two exterior rectangles right sides together and pin along the sides and bottom, leaving the top edge open. Using your sewing machine, stitch along the pinned edges with a ½ inch seam allowance. Repeat this step with the lining pieces.
To create a flat bottom, you can add a simple box corner. Pinch each bottom corner of the bag, align the side seam with the bottom seam, and sew across about 2 inches in from the tip. Trim off the excess fabric. Do this for both the lining and exterior pieces.
This step gives your tote bag a structured, roomy shape rather than a flat design. Once you’ve sewn both the lining and the outer bag, set them aside while you prepare the straps.
Making and Attaching the Straps
If you’re using pre-made cotton webbing, your job is simple—just cut two equal lengths. If you’re sewing fabric straps, fold each strip in half lengthwise with the right sides facing out, press flat, then fold each raw edge toward the center crease. Fold in half again to enclose the raw edges and stitch along both sides to reinforce.
Once the straps are ready, pin them to the exterior bag. Position them evenly about 3 inches from each side seam, with the ends extending about 1 inch below the top edge of the bag. Make sure the straps are not twisted and double-check their placement so they’re aligned.
Baste the straps in place with a quick straight stitch to keep them secure before attaching the lining. This extra step prevents shifting and ensures strong, neat handles for your tote bag.
Assembling the Lining and Exterior
Now comes the exciting part—joining everything together. Place the lining inside the exterior bag with right sides facing each other. Align the top edges and pin all the way around, making sure the straps are tucked down inside between the layers.
Sew around the top edge with a ½ inch seam allowance, leaving a 3-inch opening to turn the bag right side out. Once sewn, gently pull the bag through the opening so the right sides are now facing out and the lining is tucked inside. Press the top edge flat with an iron.
Finally, stitch a topstitch around the entire top edge of the tote bag. This closes the opening, reinforces the straps, and gives your bag a professional finish. Congratulations—you’ve just sewn your very own tote bag!
Personalization Ideas
One of the joys of sewing is making something uniquely yours. With tote bags, the possibilities for personalization are endless. You can experiment with different sewing patterns, fabric textures, and decorative details to create a bag that reflects your style.
For a classic look, stick to neutral fabrics like canvas or denim and add leather straps for a touch of elegance. If you prefer something playful, choose bold prints, colorful thread, or even patchwork designs. You can also sew on appliqués, embroidery, or fabric paint designs for a one-of-a-kind finish.
Don’t forget functional customizations, too—add an inner pocket for keys, a snap closure at the top, or even extend the straps for a shoulder-style tote. Sewing allows you to tailor every detail to your needs, making your tote bag as practical as it is beautiful.
Why Sewing Tote Bags Is Perfect for Beginners
Tote bags are an ideal first sewing project because they’re forgiving, functional, and rewarding. Unlike garments, they don’t require precise fitting, and the basic sewing pattern involves straight seams that are easy to master.
Working on this project builds essential sewing skills, like measuring, cutting, seam finishing, and topstitching. Once you’ve made a tote bag, you’ll feel more confident to move on to other sewing projects, whether that’s pouches, clothing, or even quilts.
Most importantly, tote bags are instantly useful. The sense of pride you’ll feel carrying something you made with your own two hands is unbeatable. Plus, they make thoughtful, handmade gifts for friends and family.
Share Your Sewing Journey
Now that you’ve completed this tote bag sewing tutorial, it’s time to enjoy your creation and inspire others. Whether you made it simple and classic or added lots of personal touches, your tote bag is a reflection of your creativity.
If you’re active on social media or part of a sewing community, don’t hesitate to share photos of your finished bag. Beginners especially love seeing real-life examples of sewing patterns in action—it can encourage them to start their own projects.
Sewing is more than just making things; it’s about learning, expressing yourself, and connecting with others who share the same passion. So go ahead—show off your new tote bag and inspire someone else to pick up a needle and thread today!