
If you’ve ever wanted to create a practical, stylish, and personalized project, a zipper pouch is the perfect choice. This versatile sewing project is beginner-friendly, doesn’t require a large amount of fabric, and can be customized in endless ways. Whether you want a pouch for makeup, stationery, travel essentials, or just everyday storage, this sewing tutorial will guide you step by step.
In this article, we’ll cover everything you need to know: the materials you’ll need, the sewing pattern layout, how to assemble the pouch, and even ideas to add your own creative touch. By the end, you’ll have a beautiful handmade zipper pouch that you can proudly use—or gift to someone special!
Why Make a Zipper Pouch?
Sewing a zipper pouch is one of the most satisfying beginner projects. Unlike larger sewing projects, such as quilts or garments, this one can be completed in a short amount of time. That means you get the joy of finishing something useful without weeks of work.
Another great benefit is practicality. A pouch can be used for so many purposes: to store makeup, organize your bag, keep sewing supplies, or even carry small gadgets and chargers. Plus, once you’ve mastered the sewing pattern, you can create multiple pouches in different sizes.
Finally, a handmade zipper pouch makes a thoughtful gift. It shows care and creativity, and with a bit of fabric personalization, you can make it perfectly suited for the person you’re gifting it to. This makes it not only a sewing project but also a meaningful gesture.
Materials You Will Need
Before we dive into the sewing tutorial, let’s gather everything you need. Preparing your materials ahead of time makes the process smooth and enjoyable.
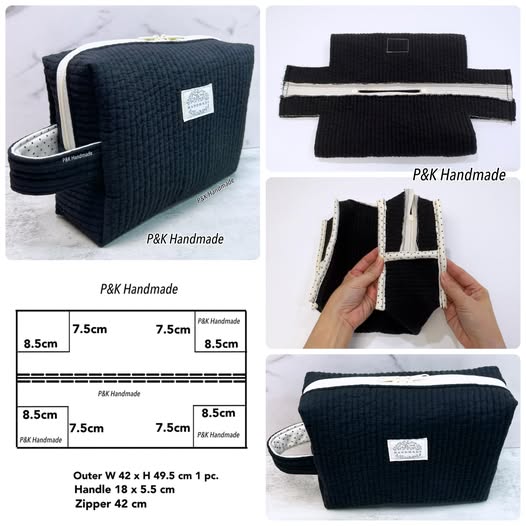
- Fabric: For this project, you’ll need an outer fabric piece measuring about 42 cm x 49.5 cm. Quilted fabric or cotton with interfacing works great for structure.
- Lining fabric (optional): If you want a neat interior finish, cut the same size in lining fabric.
- Zipper: A 42 cm zipper is perfect for this pouch size. You can shorten a longer zipper if needed.
- Handle: Cut a strip of fabric measuring 18 cm x 5.5 cm for the side handle.
- Thread: Choose a color that matches or contrasts your fabric, depending on the look you want.
- Sewing tools: Scissors, pins or clips, ruler, and a sewing machine.
With these materials ready, you’ll be well-equipped to follow along with the step-by-step sewing pattern.
Cutting the Sewing Pattern
The pouch follows a simple boxy design, which makes it easy to cut and sew. Start by laying out your main fabric on a flat surface. The overall cut piece should measure 42 cm wide by 49.5 cm high.
Next, you’ll need to cut squares from each corner to form the boxed shape. Measure 8.5 cm in from the sides and 7.5 cm down from the top and bottom to create the rectangular notches. Once cut, these will later fold up to form the sides of the pouch.
Don’t forget to prepare your handle strip. Fold it lengthwise, press, and stitch along the edges to make it sturdy. Having all pieces cut and prepped will make the sewing process seamless.
Sewing the Zipper
Installing a zipper might feel intimidating, but with a little patience, it’s easier than you think. Place your zipper face down along the top edge of your outer fabric. If you are using lining, sandwich the zipper between the outer fabric and lining. Pin or clip in place.
Using your sewing machine’s zipper foot, stitch along the edge to attach the zipper. Take your time here, as neat stitching will give your pouch a professional finish. Repeat the same process with the other side of the zipper, attaching it to the opposite edge of the fabric.
Once the zipper is installed, press the fabric away from the zipper and topstitch along both sides. This will prevent the fabric from catching in the zipper teeth and give your pouch a clean, polished look.
Assembling the Pouch
With the zipper in place, it’s time to form the pouch shape. Begin by folding the fabric so that the right sides are together, aligning the notched corners. Sew the side seams first, then work on the bottom seam.
For the cut-out notches, pinch the fabric so the edges align to form a boxed corner. Clip in place and stitch across each corner. This will give your pouch its signature three-dimensional shape. Don’t forget to insert the handle on one side seam before sewing it closed.
Turn the pouch right side out through the open zipper. Push out the corners neatly with your fingers or a blunt tool. At this point, you’ll see the pouch taking its full shape.
Finishing Touches
Now that your pouch is complete, it’s time to check the final details. Trim any loose threads, and give the entire pouch a good press with an iron to set the seams. If you’ve used lining, make sure it sits smoothly inside without wrinkles.
You can also add a label or tag for a professional look. A simple fabric tag sewn onto the outside makes the pouch feel store-bought, even though it’s handmade. If gifting the pouch, you could even embroider initials or a small motif.
Lastly, test the zipper to ensure it glides smoothly. If it feels stiff, gently rub a candle or bar of soap along the teeth to make it easier.
Ideas for Personalization
One of the best parts about this sewing project is how easy it is to customize. You can make multiple zipper pouches, each with its own unique style.
- Fabric choice: Use denim for a rugged look, floral cotton for a feminine touch, or even patchwork for a bohemian vibe.
- Size variations: Adjust the sewing pattern measurements to create smaller pouches for coins or larger ones for travel toiletry bags.
- Decorative details: Add appliqué, embroidery, or even fabric paint to make your pouch one-of-a-kind.
With these personalization ideas, no two pouches will ever be the same, and you’ll have fun experimenting with different styles.
Tips for Beginners
If you’re new to sewing, this project is the perfect practice for working with zippers and boxed corners. Here are some tips to make your experience enjoyable:
- Take your time with the zipper installation—rushing can lead to uneven seams.
- Use plenty of clips or pins to keep fabric layers aligned.
- Don’t be afraid to use the seam ripper if something goes wrong—mistakes are part of the learning process.
Remember, every stitch you sew builds your confidence and skills. Even if your first pouch isn’t perfect, it’s still a handmade piece you can be proud of.
Conclusion – Share Your Zipper Pouch!
Congratulations! You’ve just learned how to make a beautiful, practical zipper pouch using a simple sewing pattern. From cutting the fabric to sewing the zipper and boxing the corners, you’ve mastered key sewing techniques that you can apply to future projects.
Now it’s your turn to get creative. Try different fabrics, play with colors, and make as many pouches as you like. They’re quick, fun, and useful for everyone.
If you make this pouch, don’t keep it to yourself—share it! Post a picture online, gift one to a friend, or simply show it off as part of your sewing journey. Every handmade item tells a story, and yours is worth sharing. Happy sewing!