
Tote bags are versatile, stylish, and incredibly practical. Adding a zipper closure and multiple pockets makes them even more functional, perfect for everyday use, work, or travel. In this tutorial, you’ll learn how to create your own zipper tote bag with multi-pockets from scratch. Even if you’re a beginner, don’t worry—the step-by-step sewing instructions will guide you through the process smoothly. Grab your sewing machine, some fabric, and let’s get started!
Materials You’ll Need
Before diving into the sewing process, it’s important to gather all the supplies you’ll need. Preparing your materials in advance makes the sewing process more enjoyable and efficient.
- Fabric for the outer bag: Choose a sturdy cotton, canvas, or denim fabric for durability.
- Fabric for the lining: A lightweight cotton fabric works perfectly.
- Interfacing: Fusible interfacing to give structure to the bag.
- Zipper: One 12–14 inch zipper for the bag closure.
- Thread: High-quality polyester thread that matches your fabric.
- Scissors or rotary cutter: For precise cutting.
- Pins or clips: To hold pieces together before sewing.
- Measuring tape or ruler: For accurate cutting.
- Iron and ironing board: To press fabric and interfacing.
- Sewing machine: Any basic model will do.
Having the right materials ensures your sewing project turns out professional and long-lasting.
Cutting the Fabric Pieces
Accurate cutting is key when following any sewing pattern. For this tote bag, you’ll need several pieces for the outer bag, lining, pockets, and straps.
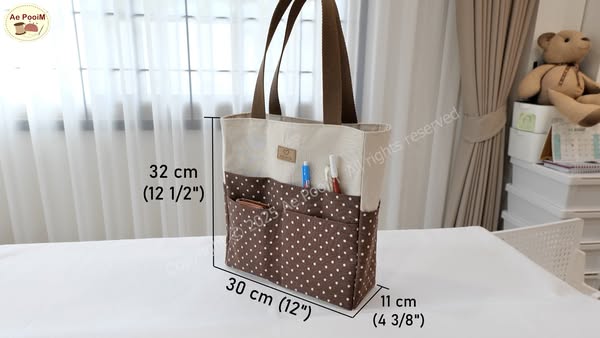
- Main bag body: Cut two pieces of 32 cm (12 ½”) tall × 30 cm (12”) wide fabric.
- Bag sides: Cut two pieces of 32 cm (12 ½”) tall × 11 cm (4 ⅜”) wide fabric.
- Bottom piece: Cut one piece of 30 cm (12”) × 11 cm (4 ⅜”) fabric.
- Lining pieces: Cut the same measurements as the outer pieces.
- Pocket panels: Cut multiple rectangular pieces depending on how many pockets you’d like. For example, cut two 30 cm × 20 cm pieces for front outer pockets.
- Straps: Cut two strips of 60 cm × 7 cm fabric each.
Be sure to cut matching interfacing pieces to add structure to the main body, straps, and pockets. Fuse the interfacing to the wrong side of the fabric with an iron, following the manufacturer’s instructions.
Sewing the Straps
The straps are an essential feature of any tote bag. Sewing them properly ensures comfort and strength when carrying heavier items.
- Take your strap fabric strips and fold them in half lengthwise, wrong sides together.
- Open the fold, then fold each long edge inward to the center crease.
- Fold the strip in half again, enclosing the raw edges inside.
Topstitch along both long sides of the straps to secure them. This technique makes the straps durable and gives them a neat, professional look. You can also add interfacing inside for extra sturdiness, especially if you plan to carry books, laptops, or groceries.
Creating the Multi-Pockets
The highlight of this sewing project is the multi-pocket design. Pockets add function and style to your tote bag.
- Outer pockets: Place two pocket panels on the front outer bag piece, right sides facing. Sew along the top edge, then flip the pocket panel down and press. Topstitch for a polished finish.
- Dividing pockets: Mark vertical lines with chalk or a fabric marker to divide the pocket into sections for pens, a phone, or small notebooks. Sew along these lines to create multiple compartments.
- Inner pockets: Repeat the same process with the lining fabric if you want additional storage inside the bag.
Adding different sizes of pockets makes the tote bag versatile. For example, a smaller pocket for keys prevents them from getting lost, while a larger one can hold a tablet.
Sewing the Outer Bag
With your pockets ready, it’s time to assemble the outer body of the tote bag. This step brings all the pieces together.
- Sew the front panel to the side panels with right sides facing.
- Attach the back panel in the same way.
- Finally, sew on the bottom panel to form the rectangular base.
Press the seams open for a clean finish. At this stage, you’ll begin to see your tote bag taking shape. Don’t forget to attach the straps by sewing them onto the top edge of the front and back panels, ensuring they are evenly spaced.
Sewing the Lining
The lining gives your tote bag a neat interior and strengthens the structure. Follow the same process you used for the outer bag.
- Sew the lining panels together, leaving a small opening at the bottom for turning the bag later.
- Add any desired inner pockets before assembling the lining.
- Press the seams neatly to reduce bulk.
Make sure the lining fits comfortably inside the outer bag without pulling or bunching. A smooth lining will make your tote more practical and comfortable to use.
Adding the Zipper Closure
A zipper keeps your belongings safe and secure. Installing it may feel intimidating, but with practice, it becomes simple.
- Place the zipper face down along the top edge of the outer bag.
- Place the lining fabric over it, right sides facing the outer fabric.
- Sew along the top edge with a zipper foot.
Repeat the process for the other side of the zipper. Once sewn, press the fabric away from the zipper and topstitch along the edges to prevent the lining from catching. Test the zipper to ensure it opens and closes smoothly.
Assembling the Tote Bag
Now it’s time to bring everything together and finish your tote bag.
- Place the lining inside the outer bag with right sides facing.
- Align the seams and sew around the top edge.
- Turn the bag right side out through the opening in the lining.
Stitch the opening in the lining closed, either by hand or machine. Push the lining inside the tote bag and give it a final press. Your zipper tote bag with multi-pockets is now ready to use!
Personalization Ideas
One of the best parts of sewing your own bag is the ability to customize it. Here are some creative ideas:
- Fabric choices: Use contrasting colors or prints for the pockets and lining.
- Embroidery or appliqué: Add your initials, a floral design, or patches to make it unique.
- Decorative stitching: Use a decorative stitch pattern on the straps or along the pocket edges.
- Extra hardware: Add D-rings, snaps, or magnetic closures for additional style and function.
By personalizing your tote bag, you’ll have a one-of-a-kind accessory that reflects your style and creativity.
Final Thoughts
Making your own zipper tote bag with multi-pockets is a rewarding sewing project that combines practicality and creativity. With just a sewing machine, some fabric, and a simple sewing pattern, you can create a bag that’s not only functional but also uniquely yours. Whether you’re carrying books, crafting supplies, or daily essentials, this tote will serve you well.
Now it’s your turn! Gather your materials, follow the steps, and sew your very own tote bag. Don’t forget to share your finished project with friends, family, or even online sewing communities—you might just inspire someone else to start sewing too!