
Quilting has a special magic. It takes tiny pieces of fabric that may seem too small or unimportant on their own and turns them into something beautiful and meaningful. If you’ve been saving fabric scraps from past projects, this is the perfect chance to transform them into a charming quilted bear. This project is fun, beginner-friendly, and a great way to practice basic quilting skills while making something adorable. In this tutorial, we’ll guide you step by step through the process of creating your own “Bear Made with Easy and Fun Scraps – Quilt Pattern.”
This quilting pattern is ideal if you’re just starting your quilting journey. You’ll learn how to piece scraps together, follow a simple outline, and stitch everything securely. By the end, you’ll have a unique bear that’s perfect as a wall hanging, a baby quilt design, or even a decorative pillow. With a little patience and creativity, you’ll see how quilting can be both accessible and deeply rewarding. Let’s dive into the materials, steps, and personalization ideas that make this project truly special.
Materials You’ll Need
Before starting, gather all your materials so you can work smoothly from beginning to end. For this quilting pattern, you won’t need fancy or expensive tools—just basic supplies and your colorful scraps. The beauty of this project is that it encourages you to use what you already have, making it both economical and sustainable.
Here’s the materials list:
- Fabric scraps in various colors and patterns (cotton works best)
- A piece of background fabric (neutral or light-colored)
- Quilt batting (thin or medium weight)
- Backing fabric (to match or contrast with your design)
- Sewing machine (or hand-sewing needle if preferred)
- Rotary cutter or sharp fabric scissors
- Quilting ruler and self-healing cutting mat
- Iron and ironing board
- Pins or fabric clips
- Fabric marker or chalk
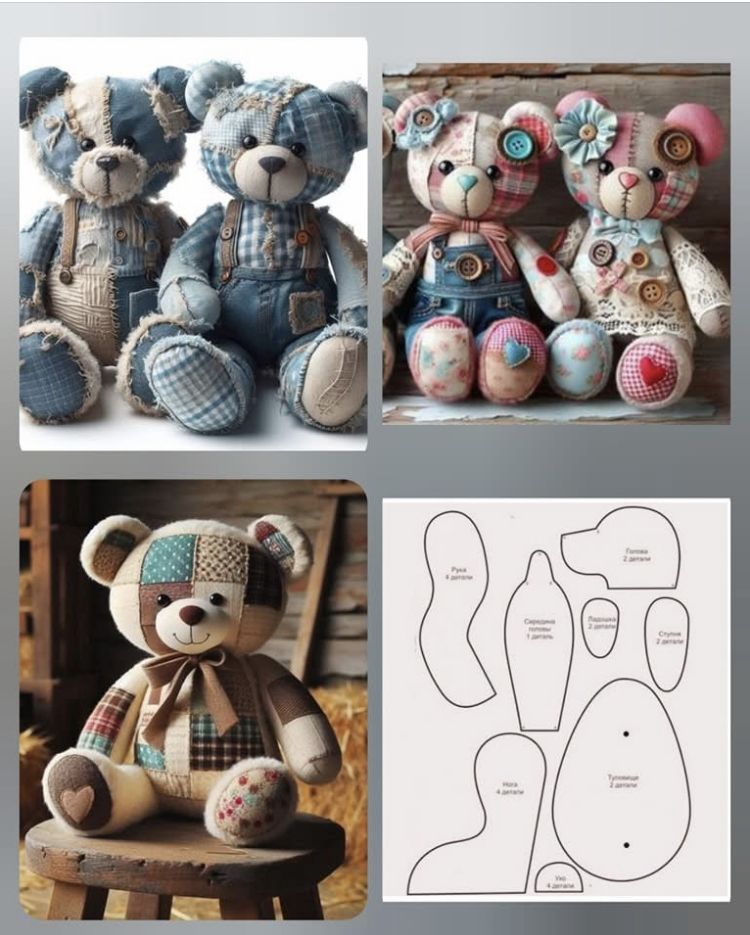
- Bear outline template (you can draw one or print from online resources)
With these supplies ready, you’re set to begin quilting your bear. If you’re missing a tool or two, don’t worry—improvisation is part of the creative process. For example, if you don’t have a rotary cutter, scissors will work just fine.
Preparing Your Fabric Scraps
The first step in this quilting pattern is organizing your fabric scraps. Spread them out on a table and notice their colors, patterns, and textures. The goal is to choose scraps that work well together, but don’t be afraid to mix bold prints with soft solids. Sometimes the most unexpected combinations result in the most charming quilt bears.
Start by pressing all your fabric scraps with an iron. Wrinkle-free fabric is much easier to cut and sew, and ironing helps you see the true colors more clearly. Next, trim the edges so your scraps have straight sides. While they don’t all need to be perfectly square, having cleaner edges will make piecing easier.
Once your scraps are prepared, group them by color families—such as blues, reds, neutrals, or florals. This will help when it’s time to assemble your bear, since you’ll want a nice balance of shades across the design. Think of this step as painting with fabric; each scrap is like a brushstroke that adds personality to your quilt.
Making the Quilted Bear Shape
With your scraps prepared, it’s time to create the bear. Print or sketch a simple bear outline on paper to use as your template. It can be a classic teddy bear shape or a stylized outline—it’s up to you. Place the template on your background fabric and lightly trace around it using a fabric marker or chalk. This outline will serve as your guide.
Next, start arranging your fabric scraps inside the bear shape. Think of it as a puzzle: you’re filling the outline with pieces that fit together, without worrying too much about perfection. Lay the scraps side by side, overlapping slightly if needed, until the entire bear shape is covered. Play with placement until you’re happy with the look.
Once you’ve finalized the layout, pin the scraps in place or use a dab of fabric glue to keep them from shifting. At this stage, your bear is starting to take shape—it’s exciting to see the quilt design come alive! Don’t stress about small gaps or uneven edges; quilting is forgiving, and the stitching will help secure everything neatly.
Stitching the Scraps Together
Now it’s time to bring your bear quilt pattern to life with stitching. Place your background fabric (with the pinned scraps) on top of a piece of batting and secure it with pins or fabric clips. This “quilt sandwich” provides stability as you sew and ensures your scraps stay in place.
Set up your sewing machine with a straight stitch, or prepare your hand-sewing needle if you prefer a slower, mindful process. Begin stitching along the edges of each scrap, securing them to the background. You can use a zigzag stitch for extra durability or stick with straight lines for a simple look. The important part is to make sure every scrap is firmly attached.
As you sew, embrace the natural imperfections. Quilting is not about flawless lines; it’s about creating something handmade, filled with character. The more you practice, the more confident you’ll become. Once all the scraps are stitched down, press your work gently with an iron to flatten everything.
Adding the Backing and Finishing Touches
To complete your quilted bear, it’s time to add the backing fabric. Place your bear piece face down on the backing fabric, right sides together, and sew around the edges, leaving a small opening. Turn the piece right side out through the opening, then stitch the gap closed by hand or machine. If you prefer, you can also bind the edges with bias tape for a more traditional quilting finish.
Once the backing is secure, topstitch around the outline of the bear to define its shape. This step really makes the design pop and ensures the layers are firmly connected. If you’d like, you can quilt additional lines inside the bear to add texture—like crisscross patterns or wavy stitches.
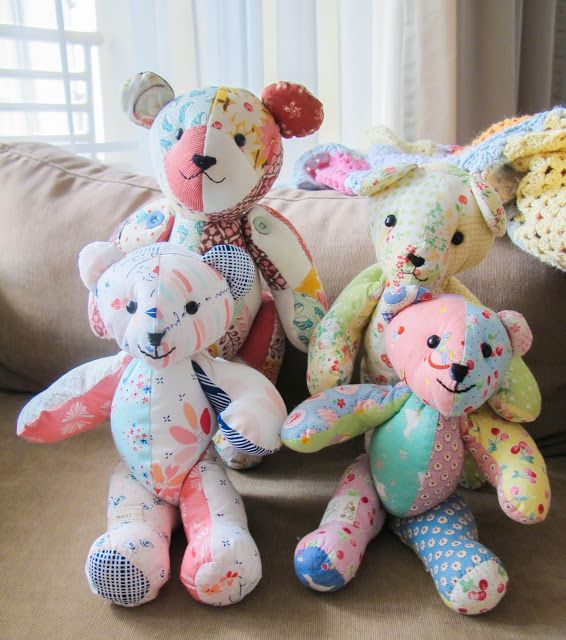
Finally, step back and admire your creation. You now have a beautiful quilted bear made entirely from scraps. Whether you display it on a wall, give it as a gift, or turn it into a pillow cover, it’s a piece filled with love and creativity.
Fun Personalization Ideas
One of the best parts about this quilting pattern is how easy it is to personalize. Each bear can look completely different depending on the scraps you use and the details you add. For example, you could make a soft pastel bear for a baby nursery, or a vibrant rainbow bear for a cheerful living room decoration.
If you enjoy embroidery, consider adding facial features like eyes, a nose, or a smile to your bear. You can also stitch a bow tie, a scarf, or even a small heart patch to give your bear personality. Buttons, appliqué, or fabric paint are also fun options for adding extra details.
Another idea is to create a family of bears using different scrap color themes. Imagine a big bear, a medium bear, and a baby bear quilted together—it’s a heartwarming project that would look adorable as wall art. Personalization is where your creativity shines, so let your imagination run free.
Why This Quilt Pattern Is Perfect for Beginners
If you’ve always admired quilts but felt intimidated by complex patterns, this bear project is the perfect starting point. It doesn’t require precise measurements, tricky piecing, or advanced quilting skills. Instead, it focuses on the joy of using scraps and learning basic techniques.
By following this quilting pattern, you’ll practice essential skills like cutting, piecing, stitching, and layering. These are the building blocks of quilting, and mastering them here will prepare you for bigger projects down the road. The bear design keeps things fun and rewarding, so you don’t feel overwhelmed.
Most importantly, this project shows that quilting doesn’t have to be complicated to be meaningful. A bear made with scraps is proof that beauty can come from simplicity, and that every little piece of fabric has value. That’s a lesson worth carrying into all your creative work.
Share Your Quilted Bear with the World
Now that you’ve completed your “Bear Made with Easy and Fun Scraps – Quilt Pattern,” don’t keep it to yourself! Share your creation with friends, family, or online quilting communities. Posting your work on social media with the hashtag #QuiltedBear is a great way to connect with other makers and inspire beginners who are just starting out.
If you gift your bear to someone, take pride in knowing that you’re giving a handmade treasure. Each stitch tells a story, and each scrap carries a piece of your creativity. Handmade gifts are always cherished, and this quilted bear is no exception.
We’d love to see how your bear turns out! Every project is unique, and your personal touch makes it one of a kind. So grab your scraps, follow this tutorial, and enjoy the joy of quilting. Happy stitching, and may your quilting journey be filled with fun, creativity, and plenty of bears!