
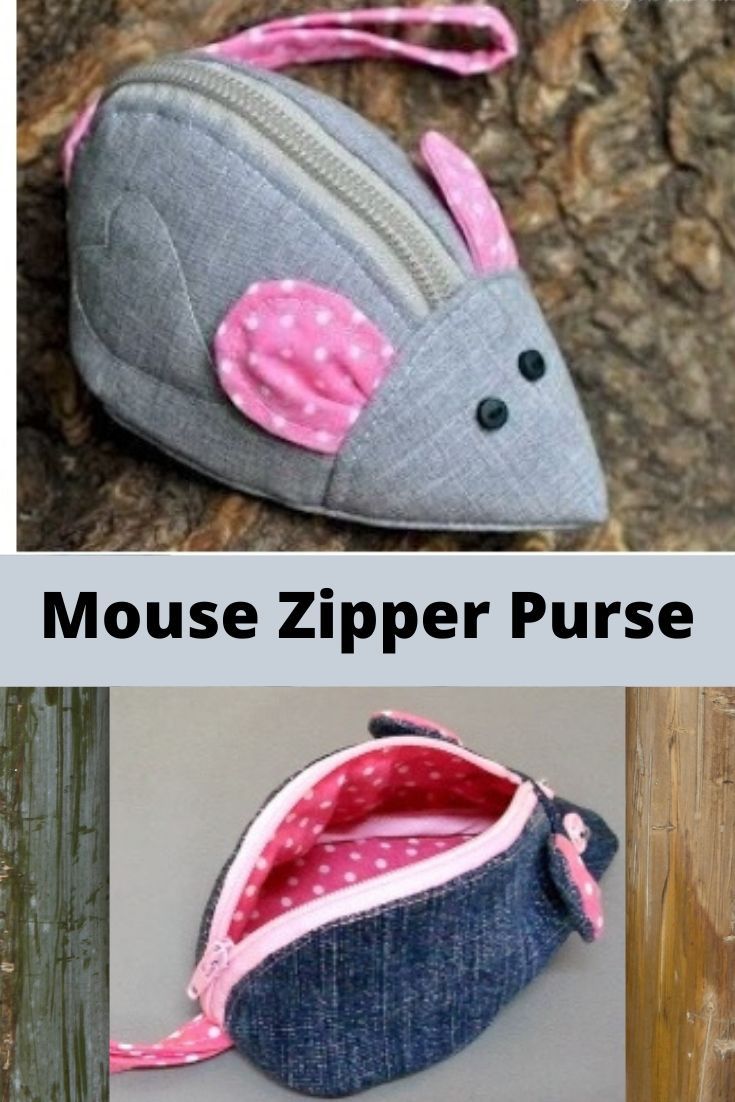
If you are looking for a small yet adorable sewing project, a Mouse Zipper Purse is the perfect choice. This little pouch is both fun and practical, making it a wonderful handmade gift or a charming accessory to keep for yourself. Even better, it is a project that is approachable for beginners, while still allowing more experienced sewists to get creative with fabric choices, quilting techniques, and embellishments. In this tutorial, we will go step by step, from gathering your materials to finishing the final stitches, so you can create a quilt-inspired zipper purse shaped like a mouse.
Not only will you learn how to sew a functional purse, but you will also explore how to incorporate quilting techniques into the design, adding texture and durability to your finished project. The process of making a quilted mouse purse is simple, relaxing, and playful, giving you the freedom to experiment with scraps, colors, and patterns. With its sweet ears, whiskers, and a zipper closure, this purse is bound to make everyone smile.
By the end of this tutorial, you’ll have a finished Mouse Zipper Purse that you can proudly carry or gift. Let’s dive in and discover how easy and fun this sewing project can be.
Materials You Will Need
Before you begin, let’s gather everything you’ll need for this project. Most of the materials are common sewing supplies, so you may already have them in your craft room. The best part is that this project is small, so it’s a great opportunity to use up leftover fabric scraps from other quilt projects.
Here’s a full list:
- Fabric scraps (cotton or quilting fabric) for the mouse body and lining
- Small fabric scraps for ears and nose
- Fusible interfacing (lightweight for structure)
- Small batting piece (optional, for quilting effect)
- 7–8 inch zipper (nylon recommended)
- Embroidery floss or thread for whiskers and eyes
- Sewing thread (matching or contrasting)
- Scissors or rotary cutter
- Pins or clips
- Sewing machine with zipper foot
- Hand sewing needle
- Iron and ironing board
With these supplies ready, you’ll be all set to start crafting your little mouse. Using quilting cotton makes the purse easy to sew and helps give it the softness and charm of a quilted accessory. Don’t worry if your fabric scraps don’t match perfectly—quirky combinations often make the cutest results.
Cutting and Preparing the Fabric
The first step is cutting out your fabric pieces. For the mouse body, you will need two main pieces (front and back), about 6×6 inches each, cut in a rounded teardrop shape. For the lining, cut two pieces of the same size. If you’d like your purse to have more structure, fuse a lightweight interfacing to the back of your outer fabric. This will help your mouse purse keep its shape.
Next, cut two small circles or half-ovals for the ears, as well as a tiny triangle for the nose. If you want your purse to have a quilted texture, this is where you can add batting behind your outer fabric pieces. Sandwich your fabric, batting, and interfacing together, and then quilt simple straight lines or diagonal grids across the mouse body pieces. This step not only strengthens the fabric but also adds a charming handmade look.
Lastly, prepare the zipper by checking that it opens and closes smoothly. If the zipper is too long, you can trim it down after sewing. Quilters often enjoy piecing together small scraps to create a patchwork look for the mouse body, and this is a perfect project to try that technique.
Sewing the Mouse Ears and Nose
Let’s begin by preparing the fun details: the ears and nose. Start by folding each ear piece in half, right sides together, and sewing along the curved edge. Turn them right side out and press flat with an iron. These ears will be sewn into the side seams later, giving your mouse its characteristic look.
For the nose, take the small triangle piece of fabric and place it at the pointed end of one of your mouse body pieces. Secure it with a few stitches, either by hand or machine. If you prefer, you can use felt for the nose, which adds softness and makes it stand out.
Adding little features like ears and a nose early in the process ensures that they’ll be securely sewn into the purse as you assemble it. This is also the stage where you can embroider the mouse’s eyes and whiskers. Using black embroidery floss, stitch two small eyes above the nose, and then add three short lines on each side for whiskers. These touches bring your quilt-inspired mouse to life before the zipper is even attached.
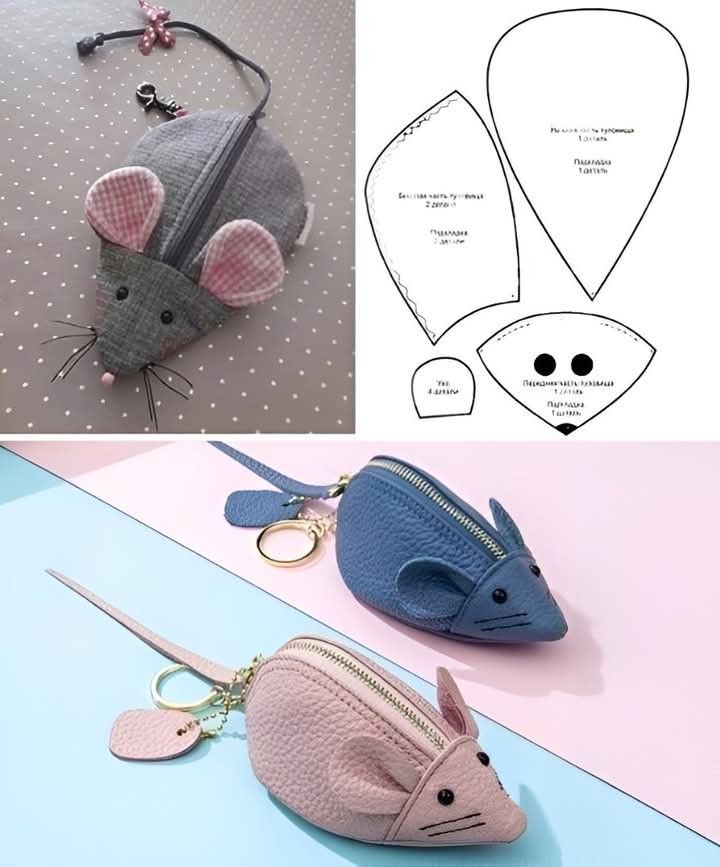
Attaching the Zipper
Now it’s time to tackle the zipper, which might feel intimidating if you’re new to sewing. Don’t worry—this step is easier than it looks. Place the zipper face down along the top edge of one of your outer mouse body pieces. Then, place the lining piece on top, right side down, so the zipper is sandwiched between the two layers. Pin or clip everything in place.
Using a zipper foot, sew along the edge where the zipper is pinned. When you finish, flip the fabrics so the right sides are visible, and press them flat. Repeat this process with the other side of the zipper, attaching it to the second mouse body and lining pieces. You should now have a fabric-zipper “sandwich” that opens and closes neatly.
To give the zipper a clean finish, topstitch along the edges of the fabric near the zipper teeth. This prevents the fabric from getting caught in the zipper and adds a professional look. Quilters often find that topstitching also enhances the overall aesthetic, making the purse appear polished.
Assembling the Mouse Purse
Once your zipper is installed, it’s time to sew the purse together. Open the zipper halfway (this is important so you can turn the purse later). Place the two outer body pieces right sides together, and do the same with the lining pieces. Pin or clip around the edges.
Don’t forget to tuck the ears between the outer fabric layers, pointing inward. They’ll be sewn into the seams and will pop out once the purse is turned right side out. Stitch all the way around, leaving a 2-inch opening at the bottom of the lining. Backstitch at the start and end to secure the seams.
After sewing, trim any excess fabric and clip curves for smoother edges. Turn the purse right side out through the opening in the lining. Push out the corners and rounded edges with a blunt tool, then sew the lining opening closed with a slip stitch or machine topstitch. Finally, tuck the lining neatly inside the mouse purse and admire your progress.
Adding the Final Touches
Your mouse zipper purse is nearly complete! At this point, you can add optional details to make your purse truly unique. Some makers like to attach a small ribbon loop or keyring at the top, making it easy to hang the purse on a bag or use as a keychain. You could also add a tiny bow near one ear for a playful touch.
Another fun option is quilting additional patterns into the body of the mouse. Swirls, hearts, or crosshatch designs all look adorable on the small surface area. If you used plain fabric, this quilting step is a great way to add depth and interest to your purse.
Don’t be afraid to personalize your mouse purse to reflect your style. Whether you prefer minimalist designs or colorful patchwork, the charm of quilting and sewing lies in the freedom to make each project your own.
Ideas for Customization
The Mouse Zipper Purse can be adapted in countless ways, making it a versatile pattern you’ll want to try again and again. For a whimsical effect, try using polka dots, stripes, or floral quilting cottons. If you prefer something more subtle, neutral tones with soft quilting lines create a modern and chic look.
You can also play with size. By enlarging or reducing the pattern, you can create anything from a tiny coin pouch to a larger makeup bag. Quilters often enjoy making matching sets—imagine a whole family of mouse purses in different fabrics and sizes.
Another creative idea is to add a quilt-inspired patchwork front. Use small squares or triangles from your scrap stash, sew them together into a mini quilt block, and then cut out the purse body shape. This makes your mouse purse extra special and gives it that authentic quilted charm.
Conclusion – Share Your Mouse Zipper Purse
Congratulations—you’ve completed your very own Mouse Zipper Purse! This project combines quilting, sewing, and creativity in a fun and practical way. Whether you keep it for yourself, gift it to a friend, or make multiples for craft fairs, your mouse purse is sure to spread joy.
Sewing small projects like this is a wonderful way to practice quilting and zipper installation without feeling overwhelmed. It’s also a fantastic scrap-busting project, making use of leftover materials from bigger quilt projects. Every purse you make will have its own character, shaped by your fabric choices and finishing touches.
Now that you’ve finished, we’d love to see your creations! Share your mouse zipper purse on social media or with your local quilting group to inspire others. Handmade projects are meant to be celebrated, and your unique quilt-inspired mouse purse is a perfect example of creativity at work. Happy sewing!