
There’s something timeless and charming about a red gingham dress. Whether you think of summer picnics, vintage fashion, or simply want a cheerful addition to your wardrobe, sewing your own gingham dress is both fun and rewarding. The checked pattern brings instant personality to your outfit, while the satisfaction of wearing something you made with your own hands is unmatched.
In this tutorial, we’ll walk through a complete guide on how to create a beautiful red gingham dress using a simple sewing pattern. We’ll cover everything from choosing the right fabric to assembling each piece and adding your own personal touch. Even if you’re new to sewing, this project is very approachable and a great way to build your confidence.
By the end, you’ll have a handmade gingham dress that looks store-bought, fits you perfectly, and feels uniquely yours. So grab your supplies, find a cozy spot at your sewing machine, and let’s get started on this creative journey.
Materials You Will Need
Before you dive into sewing, it’s important to gather all your materials. Using the right fabric and tools will make your project go smoothly and give you a professional-looking result. For a red gingham dress, cotton gingham is the best choice because it’s breathable, easy to work with, and holds its shape beautifully.
Here’s a basic list of what you’ll need:
- 2 to 3 yards of red gingham fabric (depending on your size)
- A sewing pattern for a dress with a fitted bodice and gathered skirt
- Matching thread (red or white works well)
- Sewing machine and basic sewing tools (scissors, pins, tape measure, seam ripper)
- Buttons, zipper, or elastic depending on your closure preference
- Optional: lining fabric for extra comfort and structure
Having all your supplies ready before you begin ensures that you can focus on the creative process instead of running around looking for missing pieces. Plus, it helps you visualize the dress as a finished garment before you’ve even started.
Preparing Your Fabric and Pattern
Once you’ve gathered your materials, the first step is to prepare your gingham fabric. Pre-wash the cotton to prevent any shrinking later, and give it a quick press with your iron to remove wrinkles. This step may seem simple, but it’s essential for ensuring a smooth sewing process.
Next, take a look at your sewing pattern. If you’re using a printed pattern, cut out the pieces according to your size. For beginners, it’s helpful to label each piece with a sticky note or chalk so you don’t get confused while working. Pay special attention to the grainline and direction of the checks. Aligning your pattern pieces with the gingham squares will make your dress look neat and balanced.
Finally, pin your pattern pieces to the fabric and cut carefully. Using a rotary cutter on a cutting mat can help achieve clean edges, but fabric scissors work just as well. Double-check that all your pieces are cut correctly before moving on—it’s much easier to fix a mistake at this stage than later.
Sewing the Bodice
The bodice is the heart of your red gingham dress, giving it structure and shape. Start by sewing the darts, if your sewing pattern includes them. Darts help the fabric contour to your body and create a flattering fit. Take your time here, as accuracy will make a big difference in how the finished dress looks.
Next, sew the front and back pieces together at the side seams. Press your seams open with an iron to keep everything flat and professional-looking. If you’re adding a lining, this is also the stage where you would attach it to the bodice. A lining adds polish to the inside of your dress and makes it more comfortable to wear.
Once the bodice is assembled, you can add sleeves or straps depending on the style you prefer. For a classic gingham dress, short puff sleeves are a charming choice, while simple straps give a more modern look. Attach them securely, making sure both sides are symmetrical.
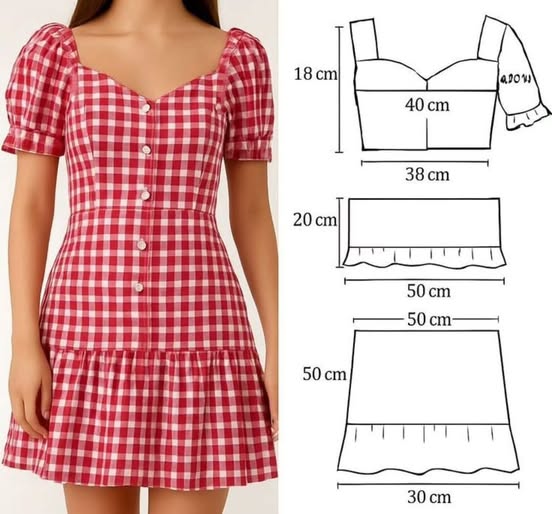
Creating the Skirt
The skirt of your gingham dress brings movement and playfulness to the design. Begin by sewing the side seams of the skirt panels together. If you want a gathered skirt, run a long basting stitch along the top edge and gently pull the threads to create even gathers. This detail looks especially pretty with gingham fabric, as the checks highlight the texture.
Match the skirt to the bodice, pinning carefully to align the side seams. Distribute the gathers evenly and sew the two sections together. Once attached, press the seam toward the bodice for a neat finish. This step transforms your dress from separate pieces into something that already looks wearable.
If your sewing pattern includes pockets, now is the perfect time to add them. Side-seam pockets are practical and stylish, and they’re surprisingly easy to sew. With gingham fabric, they’ll blend in beautifully while still being functional.
Adding Finishing Touches
Now that your dress is assembled, it’s time to focus on the details. For closures, you can choose between a zipper, buttons, or even an elastic waistband depending on the style of your sewing pattern. A row of white buttons down the front looks especially charming with red gingham, while a hidden zipper keeps the look sleek.
Hem the bottom of your skirt by folding the fabric edge twice and stitching it down. Take your time to make sure the hem is even all the way around. A well-done hem elevates the look of your handmade dress, giving it that store-bought polish.
Lastly, give your dress a final press with the iron. Pressing helps set the seams, flattens wrinkles, and makes the gingham checks crisp and fresh. At this point, you’ll be able to admire the beautiful red gingham dress you’ve created with your own hands.
Personalization Ideas
One of the best parts of sewing your own dress is the freedom to customize it. Even though you’re following a sewing pattern, there are endless ways to make the dress your own. For instance, you could choose larger or smaller gingham checks for a different visual effect. Tiny checks look delicate and vintage, while larger squares feel bold and playful.
You could also experiment with trim and embellishments. Adding lace along the hem or neckline gives the dress a romantic flair, while contrasting buttons can make it pop with personality. A ribbon belt in white or navy would add structure and highlight your waist.
Finally, consider variations in the skirt length or sleeve design. A shorter skirt gives a youthful vibe, while a midi length feels more classic. Puff sleeves, cap sleeves, or even sleeveless designs all work beautifully with gingham. The possibilities are endless, so don’t be afraid to experiment and let your creativity shine.
Why Sewing a Gingham Dress is Perfect for Beginners
If you’re new to sewing, making a gingham dress is an excellent project. The regular checkered pattern makes it easier to align seams and spot mistakes, which is very helpful when you’re still building confidence. Plus, cotton gingham is a forgiving fabric that doesn’t slip around like silk or stretch like jersey.
Another reason this is a great beginner project is the simplicity of the sewing pattern. Most gingham dresses use a fitted bodice and gathered skirt, which are straightforward shapes to sew. You’ll practice essential techniques like darts, gathering, and hemming without being overwhelmed by complicated steps.
Finally, the end result is so rewarding. Having a finished dress that you can actually wear out in public is an incredible feeling. It gives you a sense of accomplishment and encourages you to keep exploring more sewing projects in the future.
Share Your Gingham Dress Journey
Now that you’ve learned how to sew a red gingham dress from start to finish, it’s time to put your skills into practice. Whether you follow this tutorial exactly or add your own creative touches, the joy of sewing is in making something uniquely yours.
We’d love to see how your gingham dress turns out! Share photos of your project with friends, on social media, or in sewing groups. Your creation might inspire someone else to pick up a sewing machine and try making their own dress.
So go ahead—grab that red gingham fabric, follow your sewing pattern, and enjoy every stitch of the process. Happy sewing, and may your new dress bring you confidence, compliments, and countless sunny-day adventures.