
Advertising
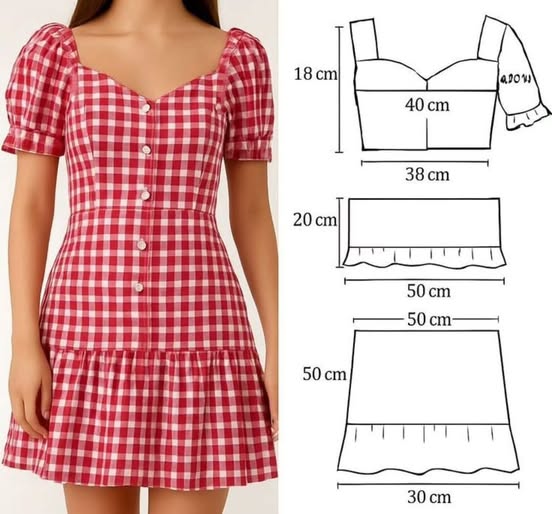
(Measurements come from the diagram: bodice height 18 cm, bust across ~40 cm, lower bodice ~38 cm; mid/ruffle panel 20 × 50 cm; skirt panel 50 cm high; ruffle height 30 cm. Add seam allowances — I recommend 1 cm (3/8″) unless you prefer 1.5 cm.)
Materials
- Red gingham cotton, about 2–2.5 m (depending on your size)
- Matching thread
- Lightweight fusible interfacing (for button placket/waistband if desired)
- Buttons (5–6) or an invisible zipper (if you prefer zip closure)
- Elastic (for puff sleeve cuff, if making puff sleeves)
- Pins, fabric scissors/rotary cutter, measuring tape, chalk/marker
- Sewing machine and iron
1. Prepare fabric and pattern pieces
- Pre-wash and press your gingham so it won’t shrink later and the checks lay flat. Lay fabric on a flat surface, matching checks across folds so seams line up neatly.
- On pattern paper (or directly on fabric if you’re drafting), copy the diagram dimensions: draw a bodice shape about 18 cm tall with top width ~40 cm (bust) and lower width ~38 cm (waist area). Draft two mirrored front bodice pieces (left + right) and a back bodice piece if your chosen sewing pattern includes it. Add your desired neckline shape (the picture shows a shallow sweetheart).
- Draft straps (or shoulder pieces) and sleeves: the diagram suggests puff sleeve pieces with a rectangle 20 cm tall and a width long enough to gather (~50 cm) so the sleeve puffs when gathered. Also plan a short cuff or elastic channel.
- Draft the mid waist panel (the rectangular band under the bodice): 20 cm tall × 50 cm wide (this runs across the front — scale for full circumference).
- Draft the main skirt panels: the diagram shows skirt panels about 50 cm tall with a gathered ruffle at the bottom. Cut two skirt panels (front + back) using the top width ~50 cm (adjust to your waist measurement) and the length 50 cm. For the lower ruffle strip, plan about 30 cm height and a length 2.5–3× the skirt bottom for a full gathered ruffle (see note below).
- IMPORTANT: Add seam allowances to every pattern piece: 1 cm for seams and 2–3 cm for hems unless you prefer different allowances.
2. Cut the pieces
- Pin the pattern pieces to the fabric, making sure the gingham checks are straight with grainline. Cut carefully.
- Cut: bodice pieces (2 front, 1–2 back pieces depending on pattern), straps (2), sleeves (2 rectangles), waist band (1 or 2 pieces to join around), skirt panels (2), and ruffle strip (1 long strip for full circumference).
- Transfer any markings (darts, notches, center front) with chalk.
3. Sew the bodice
- Darts & shaping — if your pattern includes darts, sew them first on each bodice piece. Press darts toward center or down depending on placement.
- Front center / closure — the photo shows buttons down the center. If you want buttons: finish the center front edges with interfacing, fold and topstitch a button placket (or create a facing). If you prefer a zipper, leave one side seam open or add an invisible zipper at the side/back.
- Side seams — with right sides together, sew the front and back bodice pieces at the side seams. Press seams open for a neat look.
- Neckline & strap attachment — finish the neckline with a facing or bias binding. Attach straps (or straps + shoulder seams) securely, checking fit on a dress form or yourself. Stay-stitch the neckline to prevent stretching.
Tip: Because gingham is patterned, match checks at the center and side seams for a professional look.
4. Make sleeves (puff sleeve version)
- Take the sleeve rectangle (diagram ~20 cm tall × 50 cm wide). Hem the sleeve bottom: fold up twice (0.5–1 cm each fold) and stitch, OR leave a channel for elastic.
- Sew a gathering stitch along the top long edge (armhole edge) and pull threads to create even gathers to fit the bodice armhole. Pin the sleeve to the armhole, right sides together, matching notches. Sew in place.
- If using a cuff: fold cuff piece and attach; insert elastic into the channel (if you want a snug cuff) or sew a simple hem for a short puff sleeve.
5. Construct the waist panel / mid band
- Join the short ends of the rectangular waist panel (20 × ~50 cm) to form a loop that fits around the lower edge of the bodice. Apply a small strip of fusible interfacing if you want extra structure or if you’ll add buttonholes.
- Finish the top and bottom raw edges of the band (either by folding under or overlocking/serging). Press thoroughly.
6. Assemble the skirt and ruffle
- Skirt panels: With right sides together, sew the side seams of the front and back skirt panels. Press seams open.
- Ruffle: Take the long ruffle strip (height ~30 cm). Finish the top raw edge (where it will be gathered) with a narrow hem or overlock. Run two parallel basting stitches across the top length of the ruffle, then pull to gather the ruffle to the width of the skirt bottom where it will be attached. The ruffle length should be 2.5–3× the skirt lower opening for a full look.
- Pin the gathered ruffle to the skirt bottom right sides together, distribute gathers evenly, and stitch. Press seam upward toward the skirt.
7. Join skirt to bodice
- Pin the top edge of the skirt (or skirt + ruffle assembly) to the bottom edge of the waist panel (or bodice bottom if you’re not using a band). Match side seams and distribute gathers evenly if the skirt is gathered.
- Sew the skirt to the waistband/bodice, then finish the seam allowance (zigzag/serge), and press toward the bodice.
8. Closure (buttons or zipper) and finishing
- If you chose buttons down the center front, mark button placements evenly. Make buttonholes on the button placket (test on scrap fabric first) and sew buttons. If you chose a zipper, install it into the side seam or back seam following your preferred zipper method.
- Hem the bottom of the dress (if you used a ruffle, hem the ruffle bottom). Fold under the hem twice and stitch evenly. Press the entire dress with steam for crisp finishes.
- Topstitch or understitch facings and seams where needed for stability and a clean finish.
9. Final fit and tips
- Try the dress on and check fit at the bust, waist, and hips. Make small adjustments to side seams if you need a tighter or looser fit.
- Press all seams flat. Add any final trims (contrast buttons, ribbon belt, lace at the hem) for personalization.
- For gingham: take care to match checks at the center front and side seams — it makes a huge difference visually. Use lots of pins and baste first if matching precisely.
Quick checklist & sewing tips
- Add seam allowances (+1 cm) to pattern pieces.
- Stay-stitch curved edges (neckline) to prevent stretching.
- Use fusible interfacing for button plackets or waistband if you want more stability.
- Gather ruffle to 2.5–3× the skirt width for a full look.
- Press at every step — pressing makes sewing look professionally finished.
Advertising