
When the fall season arrives, many crafters feel the urge to bring the cozy spirit of autumn into their homes. Pumpkins are the symbol of harvest, warmth, and gatherings, making them the perfect subject for seasonal projects. By combining pumpkins with patchwork, you can create beautiful quilted decorations that feel both traditional and modern at the same time. These patchwork pumpkins are a fun way to practice your quilting skills while also making something festive.
Unlike large quilts that take weeks or even months to finish, small patchwork projects like pumpkins are quick and manageable. They are also a wonderful way to use up leftover fabric scraps from previous quilting projects. If you have been saving small pieces of fabric, this is the perfect moment to give them new life. You’ll end up with a charming decoration that feels personal and handmade.
Best of all, patchwork pumpkins are versatile. They can be used as wall hangings, table runners, or even small stuffed decorations. With just a few materials and a simple quilting pattern, you’ll be able to create pumpkins that reflect your own style. Whether you are a beginner in quilt making or an experienced quilter looking for a relaxing project, this tutorial will inspire you to get started.
Materials You’ll Need
Before diving into the step-by-step instructions, let’s gather the essential materials. The best part about quilting pumpkins is that you don’t need a long list of complicated supplies. Most of these items can be found in your sewing basket or local craft store.
- Fabric scraps in autumn colors (orange, brown, green, gold, or cream)
- Background fabric (white, beige, or any neutral shade)
- Batting (thin layer to give your quilted pumpkin structure)
- Backing fabric (for the reverse side of your project)
- Thread in coordinating colors
- Scissors or rotary cutter and cutting mat
- Ruler for precise cuts
- Sewing machine (though hand-sewing is possible if preferred)
- Iron and ironing board to press seams
Optional items include embroidery floss for extra details, fabric glue for quick fixes, and embellishments like buttons or ribbons. If you want to make stuffed patchwork pumpkins, you’ll also need fiberfill. This flexibility makes the project appealing, as you can adapt the materials to fit your personal quilting style.
Step One: Cutting Your Fabric
The first step in creating your patchwork pumpkin is cutting your fabric into manageable pieces. Since quilting patterns rely on repetition and precision, taking time with this stage ensures smoother sewing later.
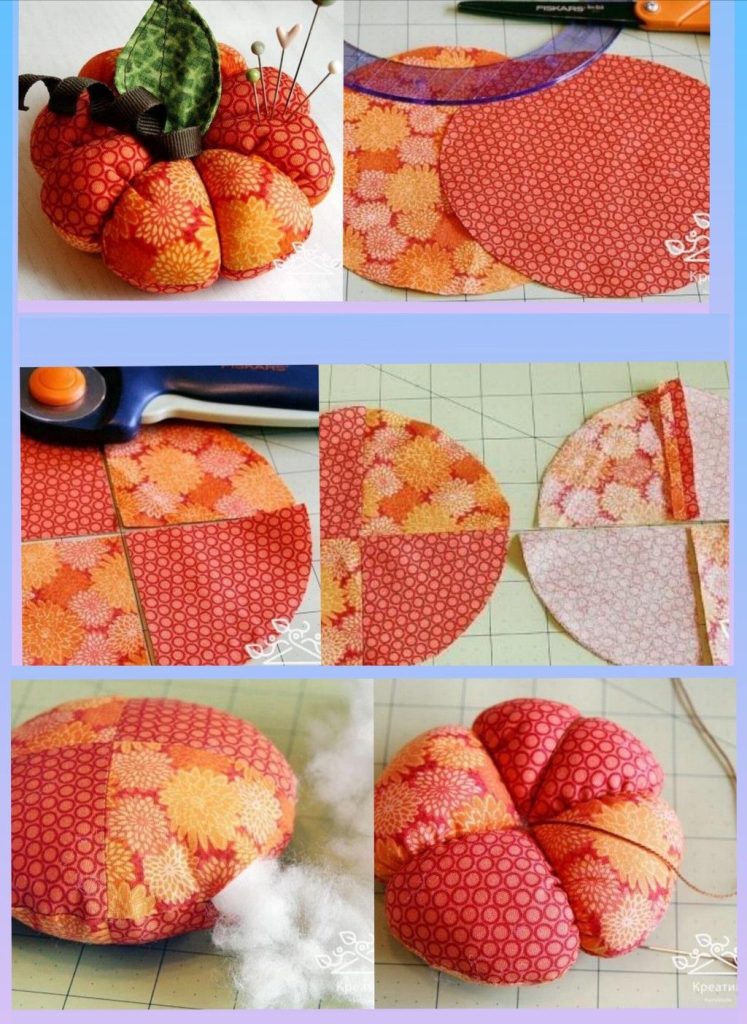
Start by choosing a mix of fabrics that remind you of autumn. Think of the variety of pumpkin shades you see in nature—bright orange, muted tan, deep rust, or even green. Cut your chosen fabrics into squares or rectangles, around 2×2 or 3×3 inches. If you want a more modern look, try experimenting with triangles or strips.
Arrange your fabric pieces on a flat surface before sewing. Move them around until you find a combination that feels balanced. Play with light and dark tones to create dimension. Once you are satisfied with the arrangement, you can begin sewing them together into a block that will form the base of your pumpkin.
Step Two: Piecing the Pumpkin Block
With your fabric cut and arranged, it’s time to sew the pieces together. This step is where the patchwork truly comes to life. Using a ¼-inch seam allowance, join the fabric squares row by row. Press each seam flat with an iron to keep your block neat.
Continue sewing rows until you form a square or rectangle large enough to shape into a pumpkin. If you want multiple pumpkins in your quilting project, repeat the process with different color combinations. Remember, no two pumpkins have to be alike—just like in a real pumpkin patch!
To create the stem, cut a small rectangle of brown or green fabric and attach it to the top of your patchwork block. You can sew it directly into the block or applique it on later. This adds character and completes the recognizable pumpkin shape.
Step Three: Quilting Your Pumpkin
Now that your pumpkin block is pieced together, it’s time to quilt. Layer your patchwork block with batting in the middle and backing fabric on the bottom. Smooth the layers to avoid wrinkles and pin them together.
When quilting, you can follow the seams for a classic look or stitch in curves to mimic the natural shape of a pumpkin. Free-motion quilting is another fun option if you feel confident experimenting. Choose thread colors that either blend with your fabrics or contrast for extra detail.
The quilting stage not only adds decorative stitching but also reinforces your patchwork, giving it durability. Don’t skip this step—it’s what transforms simple fabric pieces into a real quilting pattern. Once quilted, trim the edges so everything is even.
Step Four: Finishing Touches
With your quilted pumpkin complete, the next step is finishing the edges. If you’re making a block for a quilt, you can leave raw edges for now and sew it into a larger design later. For stand-alone pumpkins, add a fabric binding around the edges for a polished look.
If you prefer a stuffed pumpkin, sew your quilted block into a circular or oval shape, leaving a small opening. Turn it inside out, fill it with fiberfill, and sew the opening closed. You’ll now have a soft, decorative pumpkin perfect for tabletops or shelves.
This is also the moment to add extras. You might stitch on embroidered vines, glue a button in the center, or tie a ribbon around the stem. These little details make each pumpkin unique and showcase your creativity.
Personalization Ideas
One of the joys of quilting is the freedom to personalize each project. Patchwork pumpkins are especially fun because they can reflect your taste, your home décor, or even the mood of the season.
For a rustic farmhouse vibe, choose muted fabrics like linen, burlap, and soft plaids. For a modern aesthetic, go bold with geometric prints, metallics, or even black-and-white combinations. You can also create themed pumpkins—pastel fabrics for a shabby chic look or jewel tones for a luxurious feel.
Consider turning your patchwork pumpkins into larger projects, like a quilted table runner or a wall hanging. By repeating the pumpkin quilting pattern in different sizes, you can design a cohesive seasonal display. These projects also make heartfelt handmade gifts for friends and family.
Conclusion: Share Your Pumpkin Patch
Creating pumpkins with patchwork is a delightful way to celebrate both quilting and autumn. This beginner-friendly project helps you practice basic quilting skills while also allowing for endless creativity. From cutting and piecing to quilting and finishing, each step builds confidence and brings your pumpkin to life.
Remember, quilting is about more than fabric—it’s about storytelling and creating something that reflects who you are. Every stitch in your pumpkin carries a little bit of your personality, making the final result a true treasure.

Now it’s your turn. Gather your fabrics, follow this quilting pattern, and see where your imagination takes you. When you finish your pumpkin project, don’t keep it to yourself—share it with your quilting community, friends, or online groups. Who knows? Your patchwork pumpkins may inspire someone else to begin their own quilting journey.