
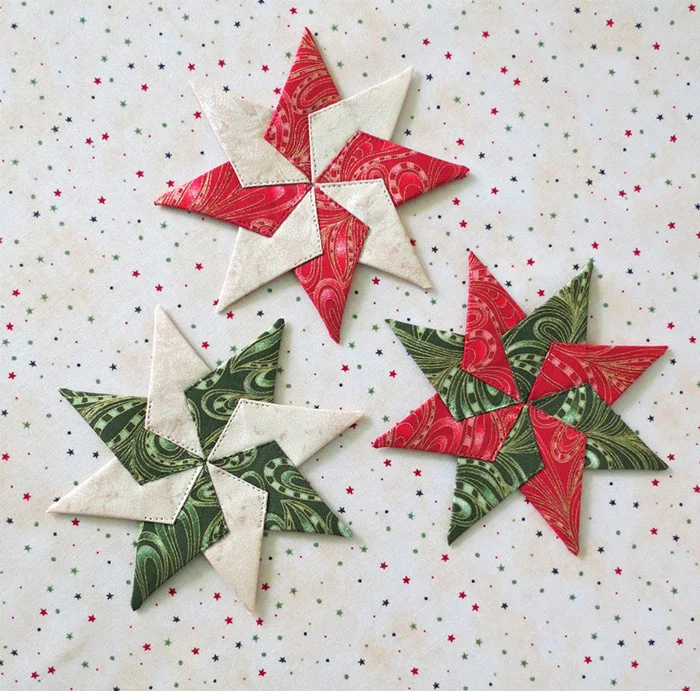
There’s something magical about handmade ornaments, especially when they combine fabric, creativity, and a touch of quilting charm. A fabric star ornament is one of those timeless projects that works beautifully for holiday décor, gifts, or even year-round embellishments. With just a few fabric scraps, you can create a stunning star that reflects your personal style.
What makes this project so appealing is its versatility. Whether you’re a beginner learning your first quilting pattern or an experienced quilter looking for a quick and satisfying project, the fabric star ornament fits the bill. You don’t need advanced sewing skills, just a love for fabric and a willingness to play with colors and textures.
By the end of this tutorial, you’ll not only have a beautiful ornament in hand but also the confidence to experiment with variations. Let’s walk through the steps together, from gathering materials to finishing details, so you can enjoy the process as much as the result.
Materials You Will Need
To make your fabric star ornament, you don’t need an extensive list of supplies. Most of the items can be found in your sewing kit or even repurposed from leftover quilting projects. That’s what makes this tutorial beginner-friendly and sustainable.
Here’s a basic list to get you started:
- Assorted fabric scraps (cotton works best)
- Needle and thread or a sewing machine
- Fabric scissors or rotary cutter
- Quilting ruler
- Pins or clips
- Lightweight batting or interfacing (optional for structure)
- Ribbon or twine for hanging
These simple materials open the door to endless creativity. If you’ve been saving bits of fabric from other quilt projects, now is the perfect time to use them. Each star can showcase a different memory or theme, making it both personal and decorative.
Preparing Your Fabric Pieces
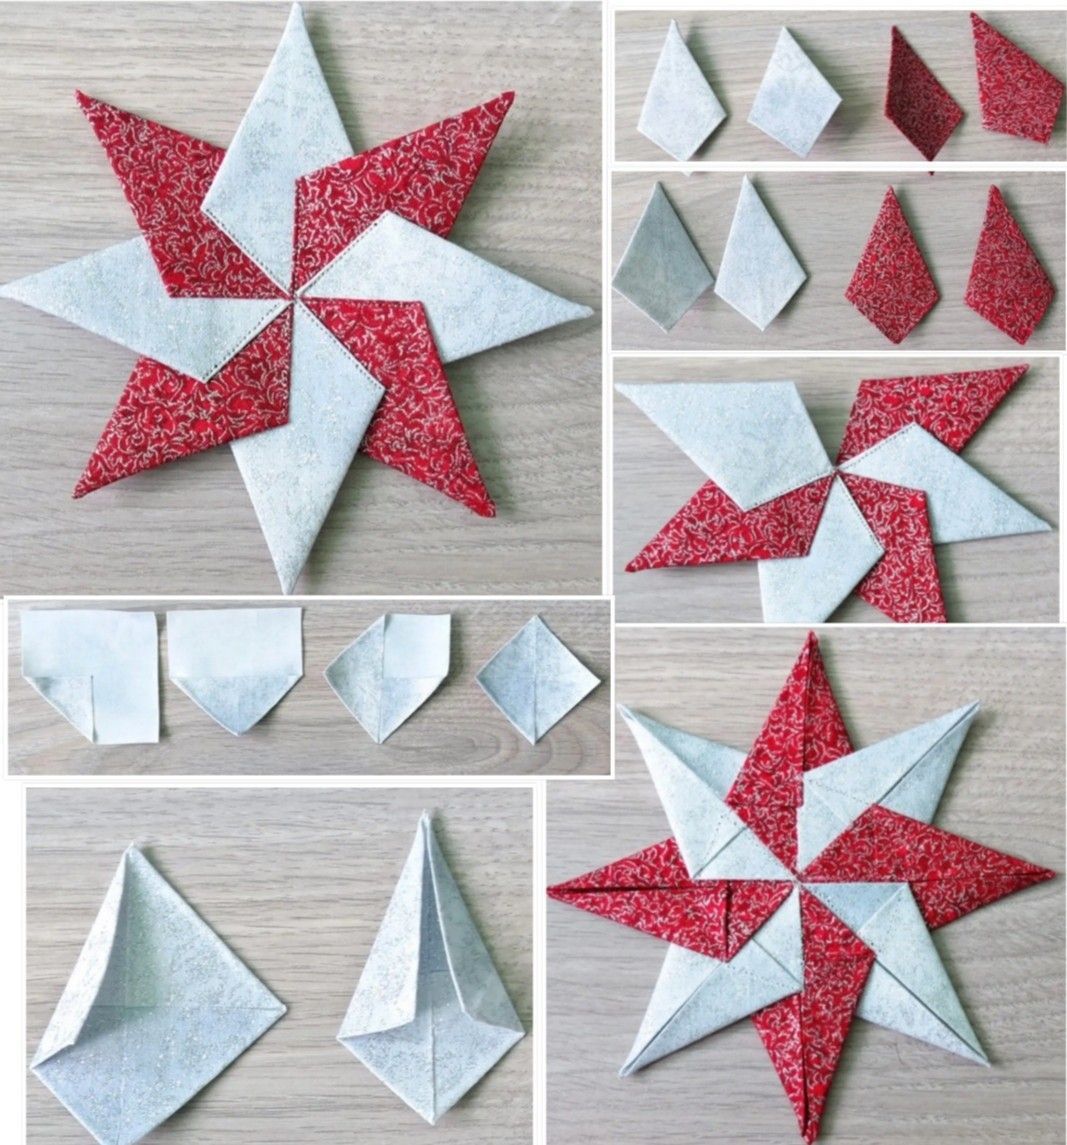
The first step in any quilting pattern is preparing the fabric, and this ornament is no exception. Begin by selecting two or three fabrics that complement each other. A mix of solids and prints works beautifully, especially when you want the star points to stand out.
Using your quilting ruler and rotary cutter, cut out squares that measure around 4 x 4 inches. Each star will require multiple pieces, depending on the design you choose. Don’t worry if your cuts aren’t perfectly straight—this project is forgiving, and a bit of character only adds charm.
If you’d like a sturdier ornament, consider ironing on lightweight interfacing or placing a small piece of batting inside. This gives the star more body and ensures it keeps its shape when hanging on your tree or wall.
Step-by-Step Sewing Instructions
Now it’s time to bring your star to life. Start by folding each fabric square into a triangle. With the wrong sides together, press the fold neatly. You’ll end up with crisp triangles that will later form the points of your star.
Arrange your triangles in a circular pattern, overlapping the edges slightly to form a star shape. Once you’re happy with the layout, pin or clip the pieces in place. This step is a bit like puzzle-building—it’s playful and allows you to experiment until it looks just right.
Stitch the triangles together along the overlapping edges, either by hand with small, neat stitches or using your sewing machine for speed. As the pieces come together, you’ll see the quilting pattern emerge in the star’s symmetry.
Adding Structure and Finishing the Star
Once your star is assembled, you may want to add a layer of batting or interfacing inside. Simply cut a star shape that matches your finished fabric piece and sandwich it between two layers of fabric. Sew around the edges, leaving a small opening.
Turn the star right side out through the opening, then press it flat with your iron. At this point, you can add a decorative topstitch around the edges. This not only secures the batting but also gives your ornament a polished look.
Finally, slip a loop of ribbon or twine into the top corner and stitch it securely. This turns your star into a ready-to-hang ornament, perfect for a Christmas tree, garland, or even as a charming gift topper.
Ideas for Personalization
One of the joys of this project is how customizable it is. Your fabric star ornament can reflect holidays, seasons, or personal stories. By swapping fabric colors and textures, you create a completely new mood each time.
For a festive touch, try using metallic fabrics, plaids, or holiday prints. If you want something more rustic, use linen or burlap with frayed edges for a farmhouse look. Bright solids and modern prints make stars that fit perfectly in contemporary homes.
You can also embellish your stars with beads, sequins, or embroidery. Adding a few stitches of hand quilting not only highlights the design but also deepens the connection to traditional quilt making.
Why This Makes a Great Beginner Project
When you’re new to sewing or quilting, it’s easy to feel overwhelmed by big projects. That’s why small crafts like the fabric star ornament are so rewarding. They let you practice key skills—like cutting, pressing, and stitching—without the pressure of perfection.
This quilting pattern is also a fantastic way to experiment with color combinations. Because the stars are small, you can try bold pairings that you might hesitate to use in a large quilt. Each ornament becomes a mini design challenge, helping you grow more confident with your choices.
And the best part? These stars come together quickly. You can finish one in under an hour, making them ideal for last-minute décor or gifts. The sense of accomplishment is instant, and that keeps your sewing journey joyful.
Expanding the Project: From Ornaments to Quilts
Once you’ve mastered the fabric star ornament, you might find yourself dreaming bigger. The same technique can be adapted to create larger stars that become quilt blocks. By repeating the design, you could build an entire quilt filled with starry patterns.
This transition from ornament to quilt shows how versatile quilting can be. A small project becomes the foundation for a much larger and meaningful piece. Imagine a quilt where each block represents a star you’ve sewn throughout the year—it becomes a visual diary of your creative journey.
Even if you stick to ornaments, they can be joined into a garland or wall hanging. This way, you’re not just making decorations but building traditions and heirlooms to enjoy year after year.
Conclusion: Share the Sparkle
Creating a fabric star ornament is more than just a craft—it’s a celebration of fabric, creativity, and the joy of quilting. With a few scraps, some simple stitches, and your imagination, you can make stars that light up any space.
Whether you use them on a holiday tree, as part of your home décor, or as thoughtful handmade gifts, these ornaments carry warmth and meaning. Each one tells a story through its fabric choices, patterns, and finishing touches.
Now it’s your turn! Try this quilting pattern and see how fun and rewarding it is to make your own stars. And don’t keep the sparkle to yourself—share your creations with friends, family, or even online communities. The more we share, the more inspiration we spread.